 搜云库技术团队
@
目录
- 1、OAuth2.0信息存储方式
- 2、数据表schema脚本
- 3、SpringBoot环境搭建
- 4、OAuth2.0配置类实现
- 4.1 客户端信息
- 4.2 授权码和token配置
- 4.3 TokenStoreUserApprovalHandler
- 4.4 自定义UserDetailsService
- 5、SpringSecurity配置类
- 6、OAuth2.0授权功能简单测试
OAuth2.0系列博客:
- OAuth2.0系列之基本概念和运作流程(一)
- OAuth2.0系列之授权码模式实践教程(二)
- OAuth2.0系列之简化模式实践教程(三)
- OAuth2.0系列之密码模式实践教程(四)
- OAuth2.0系列之客户端模式实践教程(五)
- OAuth2.0系列之信息数据库存储教程(六)
- OAuth2.0系列之信息Redis存储教程(七)
- OAuth2.0系列之JWT令牌实践教程(八)
- OAuth2.0系列之集成JWT实现单点登录
1、OAuth2.0信息存储方式
在前面文章中我们学习了OAuth2的一些基本概念,对OAuth2有了基本的认识,也对OAuth2.0的几种授权模式进行了实践,比如授权码模式
在前面的学习中,我们配置客户端信息,一般会如下配置,如果有多个客户端的话,就复制一遍,修改一些参数,很显然,这种在生产环境是不适应的,所以Spring Security OAuth2是有提供几种存储方式的,默认是基于内存存储
@Override
    public void configure(ClientDetailsServiceConfigurer clients) throws Exception {
        clients
                // 使用内存存储
                .inMemory()
                //标记客户端id
                .withClient(CLIENT_ID)
                //客户端安全码
                .secret(SECRET_CHAR_SEQUENCE)
                //为true 直接自动授权成功返回code
                .autoApprove(true)
                .redirectUris("http://127.0.0.1:8084/cms/login") //重定向uri
                //允许授权范围
                .scopes(ALL)
                //token 时间秒
                .accessTokenValiditySeconds(ACCESS_TOKEN_VALIDITY_SECONDS)
                //刷新token 时间 秒
                .refreshTokenValiditySeconds(FREFRESH_TOKEN_VALIDITY_SECONDS)
                //允许授权类型
                .authorizedGrantTypes(GRANT_TYPE_PASSWORD , AUTHORIZATION_CODE , REFRESH_TOKEN , IMPLICIT);
    }
对于token存储一遍使用内存存储
    @Bean
    public TokenStore memoryTokenStore() {
        // 最基本的InMemoryTokenStore生成token
        return new InMemoryTokenStore();
    }
IDEA中,Ctrl+Alt+B,可以看到TokenStore的实现,有如下几种:

ok,其实对于token存储有如上方式,对于其它比如授权码code等的存储也基本如上几种,分别进行介绍:
- InMemoryTokenStore,默认存储,保存在内存
- JdbcTokenStore,access_token存储在数据库
- JwtTokenStore,JWT这种方式比较特殊,这是一种无状态方式的存储,不进行内存、数据库存储,只是JWT中携带全面的用户信息,保存在jwt中携带过去校验就可以
- RedisTokenStore,将 access_token 存到 redis 中。
- JwkTokenStore,将 access_token 保存到 JSON Web Key。
2、数据表schema脚本
ok,有了前面的了解之后,现在要实现客户端配置信息,access_token等等信息的数据库存储要怎么实现?
要数据库存储,肯定要先建表,当然不用自己设计,去官方github拿就可以。schema脚本:官方Spring-security-oauth2提供的所有脚本:链接,官方脚本是HSQL数据库,所以我们改成mysql版,其中oauth_client_details 用于存储客户端配置信息,oauth_code存储授权码,oauth_access_token存储access_token
-- used in tests that use MYSQL
CREATE TABLE oauth_client_details (
  client_id VARCHAR(128) PRIMARY KEY,
  resource_ids VARCHAR(128),
  client_secret VARCHAR(128),
  scope VARCHAR(128),
  authorized_grant_types VARCHAR(128),
  web_server_redirect_uri VARCHAR(128),
  authorities VARCHAR(128),
  access_token_validity INTEGER,
  refresh_token_validity INTEGER,
  additional_information VARCHAR(4096),
  autoapprove VARCHAR(128)
);

CREATE TABLE oauth_client_token (
  token_id VARCHAR(128),
  token BLOB,
  authentication_id VARCHAR(128) PRIMARY KEY,
  user_name VARCHAR(128),
  client_id VARCHAR(128)
);

CREATE TABLE oauth_access_token (
  token_id VARCHAR(128),
  token BLOB,
  authentication_id VARCHAR(128) PRIMARY KEY,
  user_name VARCHAR(128),
  client_id VARCHAR(128),
  authentication BLOB,
  refresh_token VARCHAR(128)
);


CREATE TABLE oauth_refresh_token (
  token_id VARCHAR(128),
  token BLOB,
  authentication BLOB
);


CREATE TABLE oauth_code (
  CODE VARCHAR(128), authentication BLOB
);

CREATE TABLE oauth_approvals (
    userId VARCHAR(128),
    clientId VARCHAR(128),
    scope VARCHAR(128),
    STATUS VARCHAR(10),
    expiresAt TIMESTAMP,
    lastModifiedAt TIMESTAMP DEFAULT CURRENT_TIMESTAMP
);

-- customized oauth_client_details table
CREATE TABLE ClientDetails (
  appId VARCHAR(128) PRIMARY KEY,
  resourceIds VARCHAR(128),
  appSecret VARCHAR(128),
  scope VARCHAR(128),
  grantTypes VARCHAR(128),
  redirectUrl VARCHAR(128),
  authorities VARCHAR(128),
  access_token_validity INTEGER,
  refresh_token_validity INTEGER,
  additionalInformation VARCHAR(4096),
  autoApproveScopes VARCHAR(128)
);
要进行登录验证,也可以设计一张用户数据业务表:
 # 用户表
CREATE TABLE USER (
  id INT(11) NOT NULL AUTO_INCREMENT,
  email VARCHAR(255),
  PASSWORD VARCHAR(255) NOT NULL,
  phone VARCHAR(255),
  username VARCHAR(255) NOT NULL UNIQUE,
  last_login_time DATETIME ,
  PRIMARY KEY  (id)
)
INSERT INTO USER (email,PASSWORD,phone,username,last_login_time) VALUES ('123456@qq.com','11','15522288822','admin',SYSDATE());
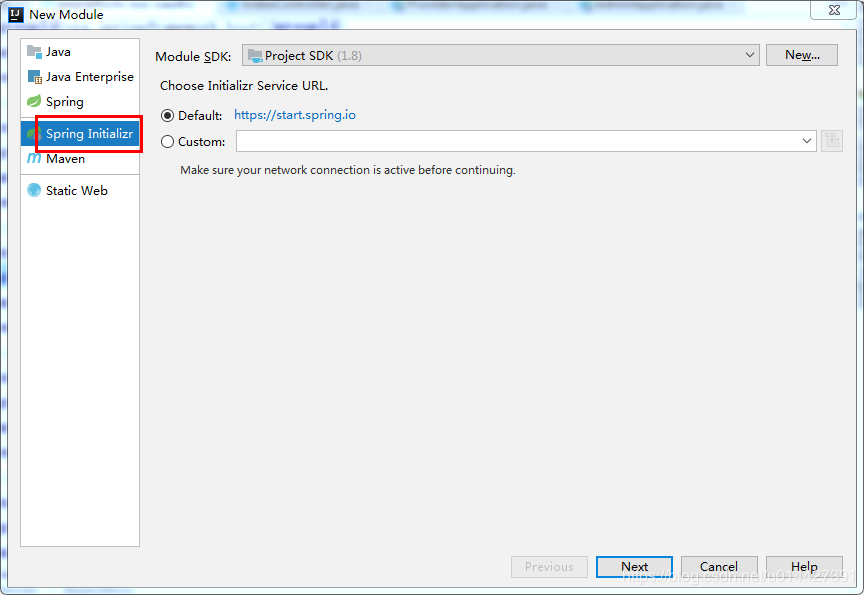
3、SpringBoot环境搭建
- IntelliJ IDEA
- Maven3.+版本
新建SpringBoot Initializer项目,可以命名oauth2-jdbc-store

主要加入如下配置:
 <dependency>
            <groupId>org.springframework.boot</groupId>
            <artifactId>spring-boot-starter-web</artifactId>
        </dependency>
 <!-- Spring Cloud Oauth2-->
        <dependency>
            <groupId>org.springframework.cloud</groupId>
            <artifactId>spring-cloud-starter-oauth2</artifactId>
        </dependency>
        <!-- Spring Cloud Security-->
        <dependency>
            <groupId>org.springframework.cloud</groupId>
            <artifactId>spring-cloud-starter-security</artifactId>
        </dependency>
数据库相关maven配置,orm框架使用mybatis
<!-- springboot mybatis-->
        <dependency>
            <groupId>org.mybatis.spring.boot</groupId>
            <artifactId>mybatis-spring-boot-starter</artifactId>
            <version>2.1.1</version>
        </dependency>

        <dependency>
            <groupId>mysql</groupId>
            <artifactId>mysql-connector-java</artifactId>
            <version>5.1.27</version>
            <scope>runtime</scope>
        </dependency>
lombok也可以加进来,自行配置:
  <!-- lombok -->
        <dependency>
            <groupId>org.projectlombok</groupId>
            <artifactId>lombok</artifactId>
            <version>1.16.10</version>
        </dependency>
数据源配置:
spring:
  datasource:
    url: jdbc:mysql://127.0.0.1::3306/jeeplatform?autoReconnect=true&useUnicode=true&characterEncoding=utf8&characterSetResults=utf8&useSSL=false
    username: root
    password: 123456
    driver-class-name: com.mysql.jdbc.Driver
Mybatis配置类:
package com.example.springboot.oauth2.config;

import org.mybatis.spring.annotation.MapperScan;
import org.mybatis.spring.boot.autoconfigure.ConfigurationCustomizer;
import org.springframework.context.annotation.Bean;
import org.springframework.context.annotation.Configuration;
import org.springframework.transaction.annotation.EnableTransactionManagement;

/**
 * <pre>
 *  Mybatis配置
 * </pre>
 *
 * <pre>
 * @author mazq
 * 修改记录
 *    修改后版本:     修改人:  修改日期: 2020/06/15 15:33  修改内容:
 * </pre>
 */
@Configuration
@EnableTransactionManagement
@MapperScan(basePackages = {"com.example.springboot.oauth2.mapper"})
public class MybatisConfig {

    /**
     * 配置支持驼峰命名和大小写自动转换
     * @Author mazq
     * @Date 2020/06/15 15:34
     * @Param []
     */
    @Bean
    public ConfigurationCustomizer configurationCustomizer(){
        return new ConfigurationCustomizer(){
            @Override
            public void customize(org.apache.ibatis.session.Configuration configuration) {
                configuration.setMapUnderscoreToCamelCase(true);
            }
        };
    }
}
4、OAuth2.0配置类实现
4.1 客户端信息
先将客户端配置信息存储到数据表:
insert into `oauth_client_details` (`client_id`, `resource_ids`, `client_secret`, `scope`, `authorized_grant_types`, `web_server_redirect_uri`, `authorities`, `access_token_validity`, `refresh_token_validity`, `additional_information`, `autoapprove`) values('cms',NULL,'{noop}secret','all','authorization_code','http://localhost:8084/cms/login',NULL,'60','60',NULL,'true');
insert into `oauth_client_details` (`client_id`, `resource_ids`, `client_secret`, `scope`, `authorized_grant_types`, `web_server_redirect_uri`, `authorities`, `access_token_validity`, `refresh_token_validity`, `additional_information`, `autoapprove`) values('oa',NULL,'{noop}secret','all','authorization_code','http://localhost:8082/oa/login',NULL,'60','60',NULL,'true');
OAuth2.0配置类加上@EnableAuthorizationServer,实现AuthorizationServerConfigurerAdapter抽象类
@Configuration
@EnableAuthorizationServer
public class OAuth2Config extends AuthorizationServerConfigurerAdapter {
    ...
}
配置数据从oauth_client_details表读取来存储,先加上如下配置
 @Autowired
    @Qualifier("dataSource")
    private DataSource dataSource;

    @Override
    public void configure(ClientDetailsServiceConfigurer clients) throws Exception {
        // 配置数据从oauth_client_details表读取来存储
        clients.withClientDetails(clientDetailsService());
    }

 @Bean
    public ClientDetailsService clientDetailsService() {
        Assert.state(dataSource != null, "DataSource must be provided");
        return new JdbcClientDetailsService(dataSource);
    }
启动过程可能出现ClientDetailsService 不能被重写,可以加上如下配置:
spring:
  main:
    allow-bean-definition-overriding: true
4.2 授权码和token配置
授权码和token同样配置
@Bean
    public AuthorizationCodeServices authorizationCodeServices() {
        Assert.state(dataSource != null, "DataSource must be provided");
        return new JdbcAuthorizationCodeServices(dataSource);
    }

    @Bean
    public TokenStore jdbcTokenStore() {
        Assert.state(dataSource != null, "DataSource must be provided");
        return new JdbcTokenStore(dataSource);
    }
4.3 TokenStoreUserApprovalHandler
自定义TokenStoreUserApprovalHandler:
package com.example.springboot.oauth2.component;

import com.example.springboot.oauth2.entity.dto.OauthClientDetailsDto;
import com.example.springboot.oauth2.service.OAuthService;
import org.slf4j.Logger;
import org.slf4j.LoggerFactory;
import org.springframework.beans.factory.annotation.Autowired;
import org.springframework.security.core.Authentication;
import org.springframework.security.oauth2.provider.AuthorizationRequest;
import org.springframework.security.oauth2.provider.approval.TokenStoreUserApprovalHandler;

/**
 * <pre>
 *  自定义TokenStoreUserApprovalHandler
 * </pre>
 *
 * <pre>
 * @author mazq
 * 修改记录
 *    修改后版本:     修改人:  修改日期: 2020/06/15 14:48  修改内容:
 * </pre>
 */
//@Component
public class JdbcTokenStoreUserApprovalHandler extends TokenStoreUserApprovalHandler {

    Logger LOG = LoggerFactory.getLogger(JdbcTokenStoreUserApprovalHandler.class);

    @Autowired
    OAuthService oAuthService;

    @Override
    public boolean isApproved(AuthorizationRequest authorizationRequest, Authentication userAuthentication) {
        if (super.isApproved(authorizationRequest, userAuthentication)) {
            return true;
        }
        if (!userAuthentication.isAuthenticated()) {
            return false;
        }
        String clientId = authorizationRequest.getClientId();
        LOG.info("clientId:[{}]",clientId);
        OauthClientDetailsDto clientDetails = oAuthService.loadOauthClientDetails(clientId);
        return clientDetails != null;
    }
}
OauthClientDetailsDto类:
package com.example.springboot.oauth2.entity.dto;

import lombok.AllArgsConstructor;
import lombok.Data;
import lombok.NoArgsConstructor;
import lombok.ToString;

import java.io.Serializable;


@Data
@AllArgsConstructor
@NoArgsConstructor
@ToString
public class OauthClientDetailsDto implements Serializable {

    private String clientId;

    private String resourceIds;

    /**
     * Encrypted
     */
    private String clientSecret;
    /**
     * Available values: read,write
     */
    private String scope;

    /**
     * grant types include
     * "authorization_code", "password", "assertion", and "refresh_token".
     * Default value is "authorization_code,refresh_token".
     */
    private String authorizedGrantTypes = "authorization_code,refresh_token";

    /**
     * The re-direct URI(s) established during registration (optional, comma separated).
     */
    private String webServerRedirectUri;

    /**
     * Authorities that are granted to the client (comma-separated). Distinct from the authorities
     * granted to the user on behalf of whom the client is acting.
     * <p/>
     * For example: ROLE_USER
     */
    private String authorities;

    /**
     * The access token validity period in seconds (optional).
     * If unspecified a global default will be applied by the token services.
     */
    private Integer accessTokenValidity;

    /**
     * The refresh token validity period in seconds (optional).
     * If unspecified a global default will  be applied by the token services.
     */
    private Integer refreshTokenValidity;

    // optional
    private String additionalInformation;

    /**
     * Value is 'true' or 'false',  default 'false'
     */
    private String autoApprove;
}
加上UserApprovalHandler bean
@Bean
    public OAuth2RequestFactory oAuth2RequestFactory() {
        return new DefaultOAuth2RequestFactory(clientDetailsService());
    }

    @Bean
    public UserApprovalHandler userApprovalHandler() {
        JdbcTokenStoreUserApprovalHandler approvalHandler = new JdbcTokenStoreUserApprovalHandler();
            approvalHandler.setTokenStore(jdbcTokenStore());
        approvalHandler.setClientDetailsService(clientDetailsService());
        approvalHandler.setRequestFactory(oAuth2RequestFactory());
        return approvalHandler;
    }
配置类配置启动:
 @Override
    public void configure(AuthorizationServerEndpointsConfigurer endpoints) throws Exception {
        endpoints.tokenStore(jdbcTokenStore()).authenticationManager(authenticationManager)
                //自定义AccessToken
                //.accessTokenConverter(accessTokenConverter)
                //设置userDetailsService
                .userDetailsService(userDetailsService)
                //授权码储存
                .authorizationCodeServices(authorizationCodeServices())
                //设置userApprovalHandler
                .userApprovalHandler(userApprovalHandler())
                //设置tokenServices
                //.tokenServices(tokenServices())
                //支持获取token方式
                .allowedTokenEndpointRequestMethods(HttpMethod.GET, HttpMethod.POST,HttpMethod.PUT,HttpMethod.DELETE,HttpMethod.OPTIONS)
                //刷新token
                .reuseRefreshTokens(true);
    }
总的OAuth2Config配置类代码参考:
package com.example.springboot.oauth2.config;

import com.example.springboot.oauth2.component.JdbcTokenStoreUserApprovalHandler;
import org.springframework.beans.factory.annotation.Autowired;
import org.springframework.beans.factory.annotation.Qualifier;
import org.springframework.context.annotation.Bean;
import org.springframework.context.annotation.Configuration;
import org.springframework.http.HttpMethod;
import org.springframework.security.authentication.AuthenticationManager;
import org.springframework.security.core.userdetails.UserDetailsService;
import org.springframework.security.oauth2.config.annotation.configurers.ClientDetailsServiceConfigurer;
import org.springframework.security.oauth2.config.annotation.web.configuration.AuthorizationServerConfigurerAdapter;
import org.springframework.security.oauth2.config.annotation.web.configuration.EnableAuthorizationServer;
import org.springframework.security.oauth2.config.annotation.web.configurers.AuthorizationServerEndpointsConfigurer;
import org.springframework.security.oauth2.config.annotation.web.configurers.AuthorizationServerSecurityConfigurer;
import org.springframework.security.oauth2.provider.ClientDetailsService;
import org.springframework.security.oauth2.provider.OAuth2RequestFactory;
import org.springframework.security.oauth2.provider.approval.UserApprovalHandler;
import org.springframework.security.oauth2.provider.client.JdbcClientDetailsService;
import org.springframework.security.oauth2.provider.code.AuthorizationCodeServices;
import org.springframework.security.oauth2.provider.code.JdbcAuthorizationCodeServices;
import org.springframework.security.oauth2.provider.request.DefaultOAuth2RequestFactory;
import org.springframework.security.oauth2.provider.token.AuthorizationServerTokenServices;
import org.springframework.security.oauth2.provider.token.DefaultTokenServices;
import org.springframework.security.oauth2.provider.token.TokenStore;
import org.springframework.security.oauth2.provider.token.store.JdbcTokenStore;
import org.springframework.util.Assert;

import javax.annotation.Resource;
import javax.sql.DataSource;


/**
 * <pre>
 *  OAuth2.0配置类
 * </pre>
 *
 * <pre>
 * @author mazq
 * 修改记录
 *    修改后版本:     修改人:  修改日期: 2020/06/15 10:38  修改内容:
 * </pre>
 */
@Configuration
@EnableAuthorizationServer
public class OAuth2Config extends AuthorizationServerConfigurerAdapter {

    @Autowired
    @Qualifier("authenticationManagerBean")
    private AuthenticationManager authenticationManager;

    @Resource(name = "userDetailService")
    private UserDetailsService userDetailsService;

    @Autowired
    @Qualifier("dataSource")
    private DataSource dataSource;

    @Override
    public void configure(ClientDetailsServiceConfigurer clients) throws Exception {
        // 配置数据从oauth_client_details表读取来存储
        clients.withClientDetails(clientDetailsService());
    }

    @Override
    public void configure(AuthorizationServerEndpointsConfigurer endpoints) throws Exception {
        endpoints.tokenStore(jdbcTokenStore()).authenticationManager(authenticationManager)
                //自定义AccessToken
                //.accessTokenConverter(accessTokenConverter)
                //设置userDetailsService
                .userDetailsService(userDetailsService)
                //授权码储存
                .authorizationCodeServices(authorizationCodeServices())
                //设置userApprovalHandler
                .userApprovalHandler(userApprovalHandler())
                //设置tokenServices
                //.tokenServices(tokenServices())
                //支持获取token方式
                .allowedTokenEndpointRequestMethods(HttpMethod.GET, HttpMethod.POST,HttpMethod.PUT,HttpMethod.DELETE,HttpMethod.OPTIONS)
                //刷新token
                .reuseRefreshTokens(true);
    }

    /**
     * 认证服务器的安全配置
     * @param security
     * @throws Exception
     */
    @Override
    public void configure(AuthorizationServerSecurityConfigurer security) throws Exception {
        security
                // 开启/oauth/token_key验证端口认证权限访问
                .tokenKeyAccess("isAuthenticated()")
                //  开启/oauth/check_token验证端口认证权限访问
                .checkTokenAccess("isAuthenticated()")
                //允许表单认证 在授权码模式下会导致无法根据code获取token
                .allowFormAuthenticationForClients();
    }

    @Bean
    public AuthorizationCodeServices authorizationCodeServices() {
        Assert.state(dataSource != null, "DataSource must be provided");
        return new JdbcAuthorizationCodeServices(dataSource);
    }

    @Bean
    public TokenStore jdbcTokenStore() {
        Assert.state(dataSource != null, "DataSource must be provided");
        return new JdbcTokenStore(dataSource);
    }

    @Bean
    public ClientDetailsService clientDetailsService() {
        Assert.state(dataSource != null, "DataSource must be provided");
        return new JdbcClientDetailsService(dataSource);
    }

    @Bean
    public OAuth2RequestFactory oAuth2RequestFactory() {
        return new DefaultOAuth2RequestFactory(clientDetailsService());
    }

    @Bean
    public UserApprovalHandler userApprovalHandler() {
        JdbcTokenStoreUserApprovalHandler approvalHandler = new JdbcTokenStoreUserApprovalHandler();
            approvalHandler.setTokenStore(jdbcTokenStore());
        approvalHandler.setClientDetailsService(clientDetailsService());
        approvalHandler.setRequestFactory(oAuth2RequestFactory());
        return approvalHandler;
    }

    @Bean
    AuthorizationServerTokenServices tokenServices() {
        DefaultTokenServices services = new DefaultTokenServices();
        services.setClientDetailsService(clientDetailsService());
        services.setSupportRefreshToken(true);
        services.setTokenStore(jdbcTokenStore());
        return services;
    }

}
4.4 自定义UserDetailsService
自定义UserDetailsService:
package com.example.springboot.oauth2.service.impl;

import com.example.springboot.oauth2.entity.User;
import com.example.springboot.oauth2.mapper.UserDao;
import org.slf4j.Logger;
import org.slf4j.LoggerFactory;
import org.springframework.beans.factory.annotation.Autowired;
import org.springframework.security.core.authority.SimpleGrantedAuthority;
import org.springframework.security.core.userdetails.UserDetails;
import org.springframework.security.core.userdetails.UserDetailsService;
import org.springframework.security.core.userdetails.UsernameNotFoundException;
import org.springframework.stereotype.Service;
import org.springframework.transaction.annotation.Propagation;
import org.springframework.transaction.annotation.Transactional;

import java.util.Arrays;
import java.util.List;

@Service("userDetailService")
public class UserDetailServiceImpl implements UserDetailsService {

    Logger LOG = LoggerFactory.getLogger(UserDetailServiceImpl.class);

    @Autowired
    UserDao userDao;

    @Override
    @Transactional(propagation = Propagation.SUPPORTS,rollbackFor = Exception.class,readOnly = true)
    public UserDetails loadUserByUsername(String username) throws UsernameNotFoundException {
        User user = userDao.findByUsername(username);
        if(user == null){
            //LOG.info("登录用户[{}]没注册!",username);
            throw new UsernameNotFoundException("登录用户["+username + "]没注册!");
        }
        return new org.springframework.security.core.userdetails.User(user.getUsername(), user.getPassword(), getAuthority());
    }

    private List getAuthority() {
        return Arrays.asList(new SimpleGrantedAuthority("ROLE_ADMIN"));
    }
}
5、SpringSecurity配置类
SpringSecurity配置类:
package com.example.springboot.oauth2.config;

import com.example.springboot.oauth2.component.CustomPasswordEncoder;
import org.springframework.context.annotation.Bean;
import org.springframework.context.annotation.Configuration;
import org.springframework.core.annotation.Order;
import org.springframework.security.authentication.AuthenticationManager;
import org.springframework.security.config.annotation.authentication.builders.AuthenticationManagerBuilder;
import org.springframework.security.config.annotation.web.builders.HttpSecurity;
import org.springframework.security.config.annotation.web.builders.WebSecurity;
import org.springframework.security.config.annotation.web.configuration.EnableWebSecurity;
import org.springframework.security.config.annotation.web.configuration.WebSecurityConfigurerAdapter;
import org.springframework.security.core.userdetails.UserDetailsService;
import org.springframework.security.crypto.password.PasswordEncoder;

import javax.annotation.Resource;

/**
 * <pre>
 *      Spring Security配置类
 * </pre>
 *
 * <pre>
 * @author mazq
 * 修改记录
 *    修改后版本:     修改人:  修改日期: 2020/06/15 10:39  修改内容:
 * </pre>
 */
@Configuration
@EnableWebSecurity
@Order(1)
public class SecurityConfig extends WebSecurityConfigurerAdapter {

    @Resource(name = "userDetailService")
    private UserDetailsService userDetailsService;

    @Bean
    @Override
    public AuthenticationManager authenticationManagerBean() throws Exception {
        return super.authenticationManagerBean();
    }


    @Override
    protected void configure(AuthenticationManagerBuilder auth) throws Exception {    //auth.inMemoryAuthentication()
        auth.userDetailsService(userDetailsService)
                .passwordEncoder(new CustomPasswordEncoder());
        auth.parentAuthenticationManager(authenticationManagerBean());
    }

    @Override
    public void configure(WebSecurity web) throws Exception {
        //解决静态资源被拦截的问题
        web.ignoring().antMatchers("/asserts/**");
        web.ignoring().antMatchers("/favicon.ico");
    }

    @Override
    protected void configure(HttpSecurity http) throws Exception {
        http   // 配置登录页并允许访问
                .formLogin().permitAll()
                // 配置Basic登录
                //.and().httpBasic()
                // 配置登出页面
                .and().logout().logoutUrl("/logout").logoutSuccessUrl("/")
                .and().authorizeRequests().antMatchers("/oauth/**", "/login/**", "/logout/**").permitAll()
                // 其余所有请求全部需要鉴权认证
                .anyRequest().authenticated()
                // 关闭跨域保护;
                .and().csrf().disable();
    }


}
6、OAuth2.0授权功能简单测试
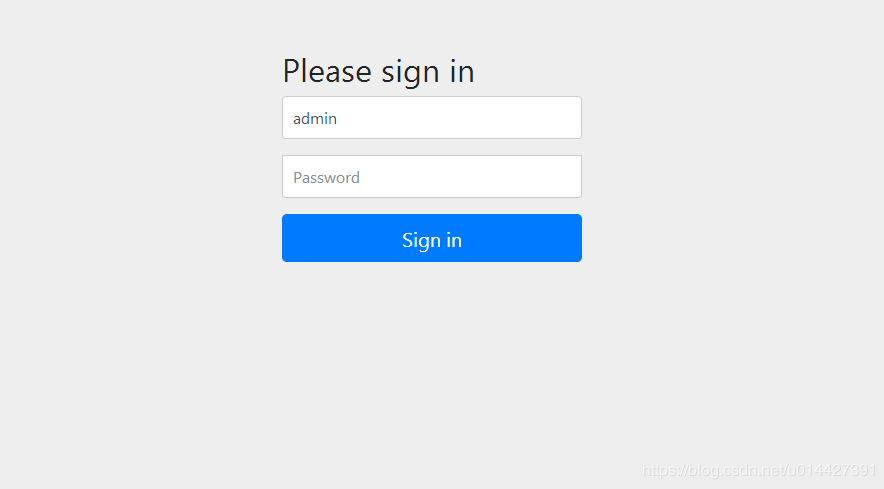
访问授权链接,在浏览器访问就可以,授权码模式response_type参数传code:
http://localhost:8888/oauth/authorize?client_id=cms&client_secret=secret&response_type=code
因为没登录,所以会返回SpringSecurity的默认登录页面,具体代码是http .formLogin().permitAll();,如果要弹窗登录的,可以配置http.httpBasic();,这种配置是没有登录页面的,自定义登录页面可以这样配置http.formLogin().loginPage("/login").permitAll()
如图,输入SpringSecurity配置的数据库密码
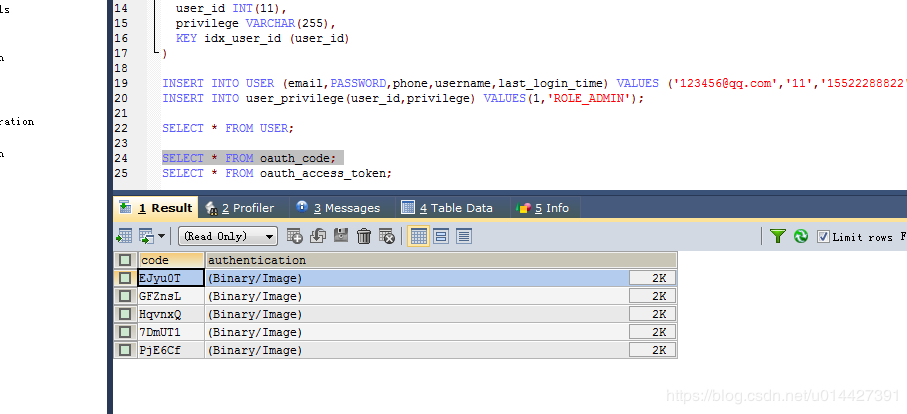
登录成功,返回redirect_uri,拿到授权码
重定向回redirect_uri,http://localhost:8084/cms/login?code=???
查询数据库SELECT * FROM oauth_code; , 授权码code保存成功:
配置一下请求头的授权参数,用Basic Auth方式,username即client_id,password即client_secret
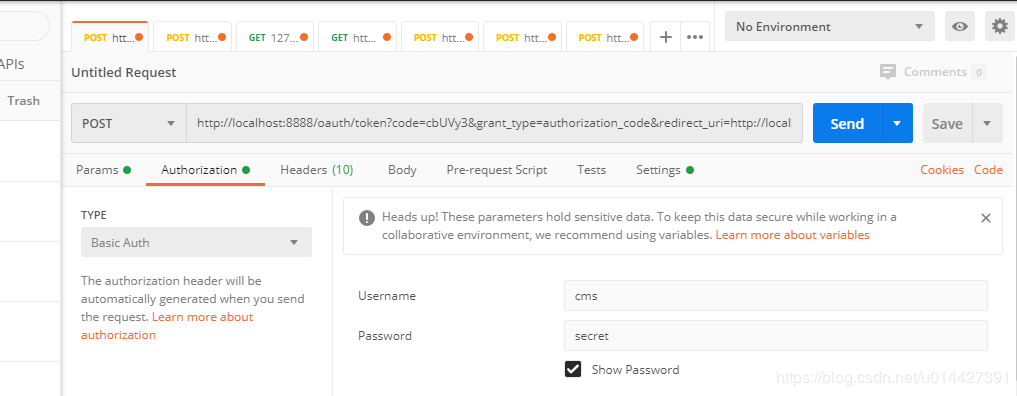
拿到授权码之后去获取token,本教程使用授权码方式
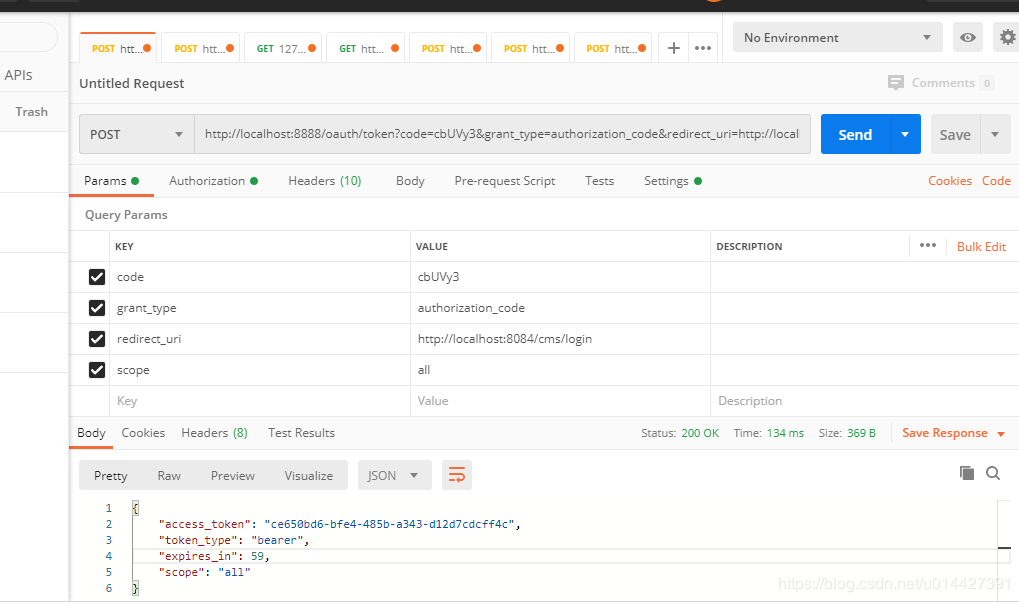
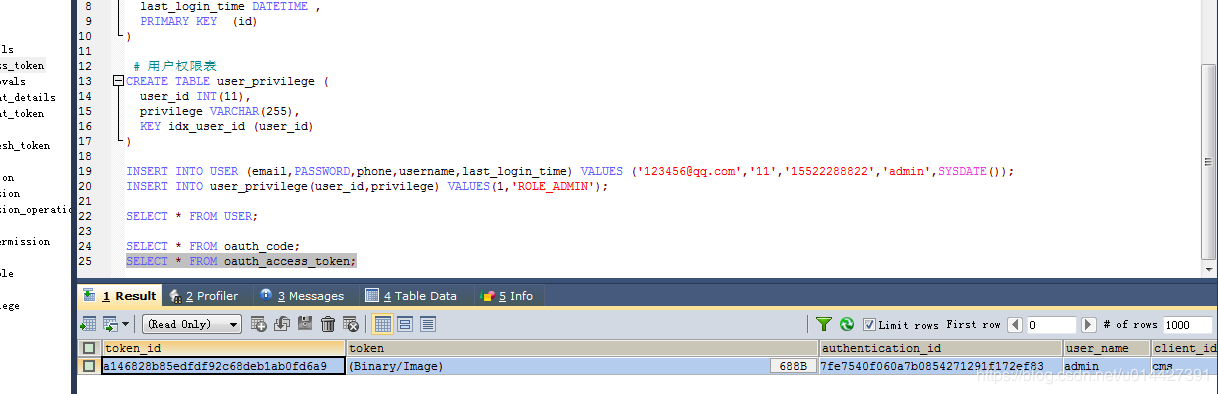
查询数据库SELECT * FROM oauth_access_token;,token是保存成功的:
例子代码下载:code download

