 搜云库技术团队
文章目录
- 前言
- 正文
- 环境准备
两个重要的Processor
注册BeanPostProcessor对象
Bean对象的创建
- createBeanInstance
addSingletonFactory
populateBean
initializeBean
- createBeanInstance
- 总结
前言
前两篇文章分析了Spring XML和注解的解析原理,并将其封装为BeanDefinition对象存放到IOC容器中,而这些只是refresh方法中的其中一个步骤——obtainFreshBeanFactory,接下来就将围绕着这些BeanDefinition对象进行一系列的处理,如BeanDefinitionRegistryPostProcessor对象方法的调用、BeanFactoryPostProcessor对象方法的调用以及Bean实例的创建都离不开这些BeanDefinition对象。下面就来看看Spring是如何处理这些对象的。
正文
环境准备
首先我们先回忆下refresh方法:
    public void refresh() throws BeansException, IllegalStateException {
        synchronized (this.startupShutdownMonitor) {
            //为容器初始化做准备
            prepareRefresh();

            // 解析xml和注解
            ConfigurableListableBeanFactory beanFactory = obtainFreshBeanFactory();

            // 给BeanFacory设置属性值以及添加一些处理器,即准备Spring的上下文环境
            prepareBeanFactory(beanFactory);

            try {
                // 由子类实现对BeanFacoty的一些后置处理
                postProcessBeanFactory(beanFactory);


                /*
                * BeanDefinitionRegistryPostProcessor
                * BeanFactoryPostProcessor
                * 完成对这两个接口的调用
                * */
                invokeBeanFactoryPostProcessors(beanFactory);

                /*
                * 把实现了BeanPostProcessor接口的类实例化,并且加入到BeanFactory中
                * */
                registerBeanPostProcessors(beanFactory);

                /*
                * 国际化
                * */
                initMessageSource();

                //初始化事件管理类
                initApplicationEventMulticaster();

                //这个方法着重理解模板设计模式,因为在springboot中,这个方法是用来做内嵌tomcat启动的
                onRefresh();

                /*
                * 往事件管理类中注册事件类
                * */
                registerListeners();


                /*
                * 1、bean实例化过程
                * 2、依赖注入
                * 3、注解支持
                * 4、BeanPostProcessor的执行
                * 5、Aop的入口
                *
                * */
                finishBeanFactoryInitialization(beanFactory);

                // Last step: publish corresponding event.
                finishRefresh();
            } finally {
                resetCommonCaches();
            }
        }
    }
prepareBeanFactory和postProcessBeanFactory没什么复杂的,关注一下里面设置了哪些值,添加了哪些对象就行,这些东西在后面的流程中会起到作用。尤其是postProcessBeanFactory,这是一个模板方法,在其子类AbstractRefreshableWebApplicationContext中设置了两个重要的标识:
    protected void postProcessBeanFactory(ConfigurableListableBeanFactory beanFactory) {
        // 主要看着里面
        beanFactory.addBeanPostProcessor(new ServletContextAwareProcessor(this.servletContext, this.servletConfig));
        beanFactory.ignoreDependencyInterface(ServletContextAware.class);
        beanFactory.ignoreDependencyInterface(ServletConfigAware.class);

        WebApplicationContextUtils.registerWebApplicationScopes(beanFactory, this.servletContext);
        WebApplicationContextUtils.registerEnvironmentBeans(beanFactory, this.servletContext, this.servletConfig);
    }

    public void addBeanPostProcessor(BeanPostProcessor beanPostProcessor) {
        Assert.notNull(beanPostProcessor, "BeanPostProcessor must not be null");
        // Remove from old position, if any
        this.beanPostProcessors.remove(beanPostProcessor);
        // Track whether it is instantiation/destruction aware
        if (beanPostProcessor instanceof InstantiationAwareBeanPostProcessor) {
            this.hasInstantiationAwareBeanPostProcessors = true;
        }
        if (beanPostProcessor instanceof DestructionAwareBeanPostProcessor) {
            this.hasDestructionAwareBeanPostProcessors = true;
        }
        // Add to end of list
        this.beanPostProcessors.add(beanPostProcessor);
    }
分别将hasInstantiationAwareBeanPostProcessors、hasDestructionAwareBeanPostProcessors属性都设置成了true,可以猜一下它们有什么作用。
两个重要的Processor
在将上下文环境设置完成后,就是通过invokeBeanFactoryPostProcessors方法完成对BeanDefinitionRegistry以及BeanFactory的后置处理器的处理和调用,也就是依次调用BeanDefinitionRegistryPostProcessor接口和BeanFactoryPostProcessor接口的实现类。我们可以通过实现这两个接口在在BeanDefinition注册完成后,对象实例化之前对容器中的BeanDefinition进行动态的增删查改,比如Spring中@Configuration注解的解析就是在这个过程中实现的。我们先来了解一下Spring内置的Processor实现有哪些: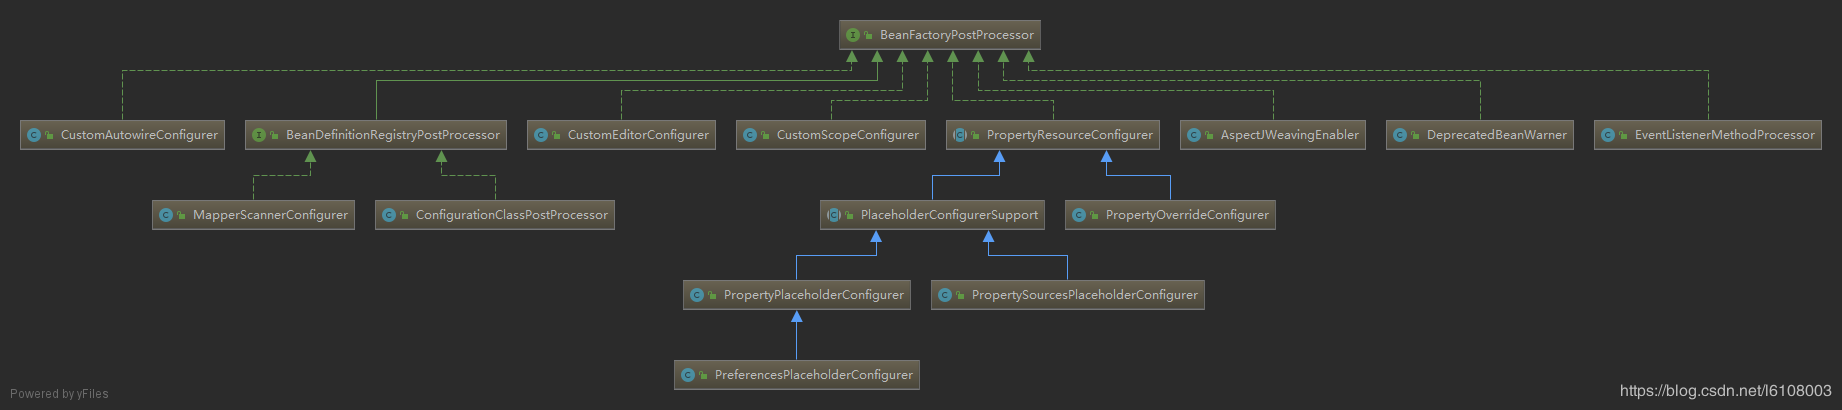
整个体系需要有个大概的印象,其中重点关注ConfigurationClassPostProcessor类,该类就是完成对@Configuration、@Bean等注解的解析注册,这一块的源码这里暂时不分析。继续开始的流程,进入到invokeBeanFactoryPostProcessors方法:
    protected void invokeBeanFactoryPostProcessors(ConfigurableListableBeanFactory beanFactory) {
        // getBeanFactoryPostProcessors方法一般是获取不到值的,除非我们手动调用addBeanFactoryPostProcessor方法添加进去,
        // 换言之我们可以通过注解@Component或是手动调用addBeanFactoryPostProcessor方法来注入BeanFactoryPostProcessors对象
        PostProcessorRegistrationDelegate.invokeBeanFactoryPostProcessors(beanFactory, getBeanFactoryPostProcessors());

        省略......
    }
这里面 通过委托模式调用PostProcessorRegistrationDelegate的invokeBeanFactoryPostProcessors方法,并传入了BeanFactory和Processors对象,但需要注意getBeanFactoryPostProcessors方法不是获取通过xml配置和Component注解注册到容器中的Processor对象,而是获取通过调用AbstractApplicationContext.addBeanFactoryPostProcessor方法添加的类,换言之我们实现了Processor接口后可以不在类上添加@Component,直接调用addBeanFactoryPostProcessor方法即可,但需要注意,这种方式并没有对应的BeanDefinition类,添加的对象也不存在于IOC容器中。
继续进入invokeBeanFactoryPostProcessors方法:
    public static void invokeBeanFactoryPostProcessors(
            ConfigurableListableBeanFactory beanFactory, List<BeanFactoryPostProcessor> beanFactoryPostProcessors) {

        // Invoke BeanDefinitionRegistryPostProcessors first, if any.
        Set<String> processedBeans = new HashSet<>();

        if (beanFactory instanceof BeanDefinitionRegistry) {
            BeanDefinitionRegistry registry = (BeanDefinitionRegistry) beanFactory;
            List<BeanFactoryPostProcessor> regularPostProcessors = new ArrayList<>();
            List<BeanDefinitionRegistryPostProcessor> registryProcessors = new ArrayList<>();

            // 优先处理通过addBeanFactoryPostProcessor方法添加的BeanFactoryPostProcessor
            for (BeanFactoryPostProcessor postProcessor : beanFactoryPostProcessors) {
                // 优先处理BeanDefinitionRegistryPostProcessor对象
                if (postProcessor instanceof BeanDefinitionRegistryPostProcessor) {
                    BeanDefinitionRegistryPostProcessor registryProcessor =
                            (BeanDefinitionRegistryPostProcessor) postProcessor;
                    registryProcessor.postProcessBeanDefinitionRegistry(registry);
                    registryProcessors.add(registryProcessor);
                }
                else {
                    regularPostProcessors.add(postProcessor);
                }
            }

            List<BeanDefinitionRegistryPostProcessor> currentRegistryProcessors = new ArrayList<>();

            //获取实现了BeanDefinitionRegistryPostProcessor接口的所有类的BeanDefinition对象的beanName
            String[] postProcessorNames =
                    beanFactory.getBeanNamesForType(BeanDefinitionRegistryPostProcessor.class, true, false);
            for (String ppName : postProcessorNames) {
                //判断是否实现了排序接口 PriorityOrdered
                if (beanFactory.isTypeMatch(ppName, PriorityOrdered.class)) {
                    currentRegistryProcessors.add(beanFactory.getBean(ppName, BeanDefinitionRegistryPostProcessor.class));
                    processedBeans.add(ppName);
                }
            }

            //排序
            sortPostProcessors(currentRegistryProcessors, beanFactory);
            registryProcessors.addAll(currentRegistryProcessors);

            //调用过程
            invokeBeanDefinitionRegistryPostProcessors(currentRegistryProcessors, registry);
            currentRegistryProcessors.clear();

            // Next, invoke the BeanDefinitionRegistryPostProcessors that implement Ordered.
            postProcessorNames = beanFactory.getBeanNamesForType(BeanDefinitionRegistryPostProcessor.class, true, false);
            for (String ppName : postProcessorNames) {

                //判断是否是实现的Ordered接口
                if (!processedBeans.contains(ppName) && beanFactory.isTypeMatch(ppName, Ordered.class)) {
                    currentRegistryProcessors.add(beanFactory.getBean(ppName, BeanDefinitionRegistryPostProcessor.class));
                    processedBeans.add(ppName);
                }
            }
            sortPostProcessors(currentRegistryProcessors, beanFactory);
            registryProcessors.addAll(currentRegistryProcessors);
            invokeBeanDefinitionRegistryPostProcessors(currentRegistryProcessors, registry);
            currentRegistryProcessors.clear();

            //没实现排序接口的调用
            boolean reiterate = true;
            while (reiterate) {
                reiterate = false;
                postProcessorNames = beanFactory.getBeanNamesForType(BeanDefinitionRegistryPostProcessor.class, true, false);
                for (String ppName : postProcessorNames) {
                    if (!processedBeans.contains(ppName)) {
                        currentRegistryProcessors.add(beanFactory.getBean(ppName, BeanDefinitionRegistryPostProcessor.class));
                        processedBeans.add(ppName);
                        reiterate = true;
                    }
                }
                sortPostProcessors(currentRegistryProcessors, beanFactory);
                registryProcessors.addAll(currentRegistryProcessors);
                //
                invokeBeanDefinitionRegistryPostProcessors(currentRegistryProcessors, registry);
                currentRegistryProcessors.clear();
            }

            //调用postProcessBeanFactory方法
            invokeBeanFactoryPostProcessors(registryProcessors, beanFactory);
            invokeBeanFactoryPostProcessors(regularPostProcessors, beanFactory);
        }

        else {
            // Invoke factory processors registered with the context instance.
            invokeBeanFactoryPostProcessors(beanFactoryPostProcessors, beanFactory);
        }

        //获取实现了BeanFactoryPostProcessor接口的类,获取beanDefinition的名称
        String[] postProcessorNames =
                beanFactory.getBeanNamesForType(BeanFactoryPostProcessor.class, true, false);

        List<BeanFactoryPostProcessor> priorityOrderedPostProcessors = new ArrayList<>();
        List<String> orderedPostProcessorNames = new ArrayList<>();
        List<String> nonOrderedPostProcessorNames = new ArrayList<>();
        for (String ppName : postProcessorNames) {
            if (processedBeans.contains(ppName)) {
                // skip - already processed in first phase above
            }
            //实现了PriorityOrdered接口的
            else if (beanFactory.isTypeMatch(ppName, PriorityOrdered.class)) {
                priorityOrderedPostProcessors.add(beanFactory.getBean(ppName, BeanFactoryPostProcessor.class));
            }
            //实现了Ordered接口的
            else if (beanFactory.isTypeMatch(ppName, Ordered.class)) {
                orderedPostProcessorNames.add(ppName);
            }
            else {
                //没实现接口的
                nonOrderedPostProcessorNames.add(ppName);
            }
        }

        //排序
        // First, invoke the BeanFactoryPostProcessors that implement PriorityOrdered.
        sortPostProcessors(priorityOrderedPostProcessors, beanFactory);

        //调用
        invokeBeanFactoryPostProcessors(priorityOrderedPostProcessors, beanFactory);

        // Next, invoke the BeanFactoryPostProcessors that implement Ordered.
        List<BeanFactoryPostProcessor> orderedPostProcessors = new ArrayList<>();
        for (String postProcessorName : orderedPostProcessorNames) {
            orderedPostProcessors.add(beanFactory.getBean(postProcessorName, BeanFactoryPostProcessor.class));
        }
        sortPostProcessors(orderedPostProcessors, beanFactory);
        invokeBeanFactoryPostProcessors(orderedPostProcessors, beanFactory);

        List<BeanFactoryPostProcessor> nonOrderedPostProcessors = new ArrayList<>();
        for (String postProcessorName : nonOrderedPostProcessorNames) {
            nonOrderedPostProcessors.add(beanFactory.getBean(postProcessorName, BeanFactoryPostProcessor.class));
        }
        invokeBeanFactoryPostProcessors(nonOrderedPostProcessors, beanFactory);

        beanFactory.clearMetadataCache();
    }
这个方法很长,但逻辑并不复杂。首先判断传入的BeanFactory对象是不是BeanDefinitionRegistry对象,是的话则优先调用传入的Processor对象的postProcessBeanDefinitionRegistry方法,之后再通过beanFactory.getBeanNamesForType拿到容器中所有BeanDefinitionRegistryPostProcessor实现类的名字,然后依次实例化并调用实现了PriorityOrdered、Ordered接口(前者优先级高于后者,数字越小优先级越高)的Processor的postProcessBeanDefinitionRegistry方法,最后再实例化并调用剩余未实现排序接口的Processor的方法。当所有BeanDefinitionRegistryPostProcessor实现类调用完成后,会依次调用来自于父接口BeanFactoryPostProcessor的postProcessBeanFactory方法。
上述流程处理完成后,又会通过beanFactory.getBeanNamesForType拿到容器中所有BeanFactoryPostProcessor实现类的名字,处理流程和上面一样。
注册BeanPostProcessor对象
以上就是两个扩展点的调用流程,完成之后又会调用registerBeanPostProcessors注册所有BeanPostProcessor的子类到容器中来,这个接口也是Spring的一个重要的扩展点,它包含了两个方法:
    @Nullable
    default Object postProcessBeforeInitialization(Object bean, String beanName) throws BeansException {
        return bean;
    }

    @Nullable
    default Object postProcessAfterInitialization(Object bean, String beanName) throws BeansException {
        return bean;
    }
实现了该接口的对象在实例化之前和之后分别会调用这两个方法。同样,我们先来了解下该接口的继承体系:

可以看到这个接口Spring内置的实现就比较多,可见用途之广泛。另外上面画红框的是本次需要重点记忆的类,后面Bean实例化时会出现。接着我们来看看registerBeanPostProcessors的实现逻辑:
    public static void registerBeanPostProcessors(
            ConfigurableListableBeanFactory beanFactory, AbstractApplicationContext applicationContext) {

        //拿到工程里面所有实现了BeanPostProcessor接口的类,获取到BeanDefinition的名称
        String[] postProcessorNames = beanFactory.getBeanNamesForType(BeanPostProcessor.class, true, false);

        int beanProcessorTargetCount = beanFactory.getBeanPostProcessorCount() + 1 + postProcessorNames.length;
        beanFactory.addBeanPostProcessor(new BeanPostProcessorChecker(beanFactory, beanProcessorTargetCount));

        List<BeanPostProcessor> priorityOrderedPostProcessors = new ArrayList<>();
        List<BeanPostProcessor> internalPostProcessors = new ArrayList<>();
        List<String> orderedPostProcessorNames = new ArrayList<>();
        List<String> nonOrderedPostProcessorNames = new ArrayList<>();

        //提前实例化BeanPostProcessor类型的bean,然后bean进行排序
        for (String ppName : postProcessorNames) {
            if (beanFactory.isTypeMatch(ppName, PriorityOrdered.class)) {

                //getBean是实例化方法,后面我们在讲bean实例化过程是会着重讲到
                BeanPostProcessor pp = beanFactory.getBean(ppName, BeanPostProcessor.class);
                priorityOrderedPostProcessors.add(pp);

                //判断类型是否是MergedBeanDefinitionPostProcessor,如果是则代码是内部使用的
                if (pp instanceof MergedBeanDefinitionPostProcessor) {
                    internalPostProcessors.add(pp);
                }
            }
            else if (beanFactory.isTypeMatch(ppName, Ordered.class)) {
                orderedPostProcessorNames.add(ppName);
            }
            else {
                nonOrderedPostProcessorNames.add(ppName);
            }
        }

        // First, register the BeanPostProcessors that implement PriorityOrdered.
        sortPostProcessors(priorityOrderedPostProcessors, beanFactory);

        //注册到BeanFactory中
        registerBeanPostProcessors(beanFactory, priorityOrderedPostProcessors);

        // Next, register the BeanPostProcessors that implement Ordered.
        List<BeanPostProcessor> orderedPostProcessors = new ArrayList<>();
        for (String ppName : orderedPostProcessorNames) {
            BeanPostProcessor pp = beanFactory.getBean(ppName, BeanPostProcessor.class);
            orderedPostProcessors.add(pp);
            if (pp instanceof MergedBeanDefinitionPostProcessor) {
                internalPostProcessors.add(pp);
            }
        }
        sortPostProcessors(orderedPostProcessors, beanFactory);
        registerBeanPostProcessors(beanFactory, orderedPostProcessors);

        // Now, register all regular BeanPostProcessors.
        List<BeanPostProcessor> nonOrderedPostProcessors = new ArrayList<>();
        for (String ppName : nonOrderedPostProcessorNames) {
            BeanPostProcessor pp = beanFactory.getBean(ppName, BeanPostProcessor.class);
            nonOrderedPostProcessors.add(pp);
            if (pp instanceof MergedBeanDefinitionPostProcessor) {
                internalPostProcessors.add(pp);
            }
        }
        registerBeanPostProcessors(beanFactory, nonOrderedPostProcessors);

        // Finally, re-register all internal BeanPostProcessors.
        sortPostProcessors(internalPostProcessors, beanFactory);
        registerBeanPostProcessors(beanFactory, internalPostProcessors);

        // Re-register post-processor for detecting inner beans as ApplicationListeners,
        // moving it to the end of the processor chain (for picking up proxies etc).
        beanFactory.addBeanPostProcessor(new ApplicationListenerDetector(applicationContext));
    }
这段代码的实现逻辑也很简单,也是先区分优先级,再获取Bean实例,最后注册到容器中,等到Bean实例化时调用。
接下来在refresh方法中调用了initMessageSource、initApplicationEventMulticaster、onRefresh、registerListeners,分别是初始化国际化资源、初始化时间广播器、容器刷新事件(子类回调)、注册监听器,这几个方法都很简单,自己看看就行,这里就不详细阐述了。
Bean对象的创建
当所有的准备工作都做好后,就该开始初始化Bean实例了,也就是finishBeanFactoryInitialization方法所做的事。不过这里可不是根据BeanDefinition new一个对象就完了,它包含了以下几个工作:
- 初始化实例
- 解析@PostConstruct,@PreDestroy,@Resource, @Autowired,@Value等注解
- 依赖注入
- 调用BeanPostProcessor方法
- AOP入口(本篇暂不分析)
下面就来详细分析Bean实例化的整个流程:
    protected void finishBeanFactoryInitialization(ConfigurableListableBeanFactory beanFactory) {
        ......

        //重点看这个方法
        // Instantiate all remaining (non-lazy-init) singletons.
        beanFactory.preInstantiateSingletons();
    }

    public void preInstantiateSingletons() throws BeansException {
        if (logger.isTraceEnabled()) {
            logger.trace("Pre-instantiating singletons in " + this);
        }

        // Iterate over a copy to allow for init methods which in turn register new bean definitions.
        // While this may not be part of the regular factory bootstrap, it does otherwise work fine.
        // xml解析时,讲过,把所有beanName都缓存到beanDefinitionNames了
        List<String> beanNames = new ArrayList<>(this.beanDefinitionNames);

        // Trigger initialization of all non-lazy singleton beans...
        for (String beanName : beanNames) {
            // 把父BeanDefinition里面的属性拿到子BeanDefinition中
            RootBeanDefinition bd = getMergedLocalBeanDefinition(beanName);

            //如果不是抽象的,单例的,非懒加载的就实例化
            if (!bd.isAbstract() && bd.isSingleton() && !bd.isLazyInit()) {

                //判断bean是否实现了FactoryBean接口,这里可以不看
                if (isFactoryBean(beanName)) {
                    Object bean = getBean(FACTORY_BEAN_PREFIX + beanName);
                    if (bean instanceof FactoryBean) {
                        final FactoryBean<?> factory = (FactoryBean<?>) bean;
                        boolean isEagerInit;
                        if (System.getSecurityManager() != null && factory instanceof SmartFactoryBean) {
                            isEagerInit = AccessController.doPrivileged((PrivilegedAction<Boolean>)
                                            ((SmartFactoryBean<?>) factory)::isEagerInit,
                                    getAccessControlContext());
                        }
                        else {
                            isEagerInit = (factory instanceof SmartFactoryBean &&
                                    ((SmartFactoryBean<?>) factory).isEagerInit());
                        }
                        if (isEagerInit) {
                            getBean(beanName);
                        }
                    }
                }
                else {
                    //主要从这里进入,看看实例化过程
                    getBean(beanName);
                }
            }
        }
    }
在preInstantiateSingletons方法中可以看到这里有一个判断:单例、非懒加载、非抽象,满足这三个条件才会调用getBean(Bean实例化都是通过调用该方法实现的)实例化:
    public Object getBean(String name) throws BeansException {
        return doGetBean(name, null, null, false);
    }

    protected <T> T doGetBean(final String name, @Nullable final Class<T> requiredType,
            @Nullable final Object[] args, boolean typeCheckOnly) throws BeansException {

        final String beanName = transformedBeanName(name);
        System.out.println("====beanName=="+beanName+"===instance begin====");
        Object bean;

            //从缓存中拿实例
        Object sharedInstance = getSingleton(beanName);
        //如果缓存里面能拿到实例
        if (sharedInstance != null && args == null) {
            // 该方法是FactoryBean接口的调用入口
            bean = getObjectForBeanInstance(sharedInstance, name, beanName, null);
        }

        else {

            //如果缓存里面没有,则走下来
            //如果是scope 是Prototype的,校验是否有出现循环依赖,如果有则直接报错
            if (isPrototypeCurrentlyInCreation(beanName)) {
                throw new BeanCurrentlyInCreationException(beanName);
            }

            BeanFactory parentBeanFactory = getParentBeanFactory();
            if (parentBeanFactory != null && !containsBeanDefinition(beanName)) {
                // Not found -> check parent.
                String nameToLookup = originalBeanName(name);
                if (parentBeanFactory instanceof AbstractBeanFactory) {
                    return ((AbstractBeanFactory) parentBeanFactory).doGetBean(
                            nameToLookup, requiredType, args, typeCheckOnly);
                }
                else if (args != null) {
                    // Delegation to parent with explicit args.
                    return (T) parentBeanFactory.getBean(nameToLookup, args);
                }
                else if (requiredType != null) {
                    // No args -> delegate to standard getBean method.
                    return parentBeanFactory.getBean(nameToLookup, requiredType);
                }
                else {
                    return (T) parentBeanFactory.getBean(nameToLookup);
                }
            }

            if (!typeCheckOnly) {
                markBeanAsCreated(beanName);
            }

            try {
                // 父子BeanDefinition合并
                final RootBeanDefinition mbd = getMergedLocalBeanDefinition(beanName);
                // 检验是不是抽象类,是直接抛出异常
                checkMergedBeanDefinition(mbd, beanName, args);

                // 获取依赖对象属性,依赖对象要先实例化
                // Guarantee initialization of beans that the current bean depends on.
                String[] dependsOn = mbd.getDependsOn();
                if (dependsOn != null) {
                    for (String dep : dependsOn) {
                        if (isDependent(beanName, dep)) {
                            throw new BeanCreationException(mbd.getResourceDescription(), beanName,
                                    "Circular depends-on relationship between '" + beanName + "' and '" + dep + "'");
                        }
                        registerDependentBean(dep, beanName);
                        try {
                            //实例化
                            getBean(dep);
                    }
                        catch (NoSuchBeanDefinitionException ex) {
                            throw new BeanCreationException(mbd.getResourceDescription(), beanName,
                                    "'" + beanName + "' depends on missing bean '" + dep + "'", ex);
                        }
                    }
                }

                //大部分是单例的情况
                if (mbd.isSingleton()) {
                    sharedInstance = getSingleton(beanName, () -> {
                        try {
                            return createBean(beanName, mbd, args);
                        }
                    });
                    // 该方法是FactoryBean接口的调用入口
                    bean = getObjectForBeanInstance(sharedInstance, name, beanName, mbd);
                }

                else if (mbd.isPrototype()) {
                    // It's a prototype -> create a new instance.
                    Object prototypeInstance = null;
                    try {
                        beforePrototypeCreation(beanName);
                        prototypeInstance = createBean(beanName, mbd, args);
                    }
                    finally {
                        afterPrototypeCreation(beanName);
                    }
                    // 该方法是FactoryBean接口的调用入口
                    bean = getObjectForBeanInstance(prototypeInstance, name, beanName, mbd);
                }

                else {
                    String scopeName = mbd.getScope();
                    final Scope scope = this.scopes.get(scopeName);
                    if (scope == null) {
                        throw new IllegalStateException("No Scope registered for scope name '" + scopeName + "'");
                    }
                    try {
                        Object scopedInstance = scope.get(beanName, () -> {
                            beforePrototypeCreation(beanName);
                            try {
                                return createBean(beanName, mbd, args);
                            }
                            finally {
                                afterPrototypeCreation(beanName);
                            }
                        });
                        // 该方法是FactoryBean接口的调用入口
                        bean = getObjectForBeanInstance(scopedInstance, name, beanName, mbd);
                    }
                }
            }
        }

        return (T) bean;
    }
这段代码首先从缓存里面拿到单例对象,如果没有,则通过scope类型去创建对应的Bean实例(直接创建或是通过getObjectForBeanInstance调用FactoryBean接口的方法创建)。在创建对象之前如果scope是prototype类型的首先会通过isPrototypeCurrentlyInCreation检验是否存在循环依赖(循环依赖这里先不讲),存在直接抛出异常,原型对象不允许有循环依赖出现;校验完成后还会通过mbd.getDependsOn拿到@DependsOn注解的值,如果有,则会优先实例化依赖的对象。
因为大部分都是创建单例对象,所以下面我以getSingleton方法来分析,需要注意该方法传入了一个Lambda表达式,在该表达式中调用了createBean方法,观察其它scope创建bean会发现都调用了该方法,所以实际创建bean对象就是该方法,不过我们还是先进入getSingleton方法看看做了些什么:
    public Object getSingleton(String beanName, ObjectFactory<?> singletonFactory) {
        Assert.notNull(beanName, "Bean name must not be null");
        synchronized (this.singletonObjects) {
            // 如果缓存中有,则直接返回
            Object singletonObject = this.singletonObjects.get(beanName);
            if (singletonObject == null) {
                if (this.singletonsCurrentlyInDestruction) {
                    throw new BeanCreationNotAllowedException(beanName,
                            "Singleton bean creation not allowed while singletons of this factory are in destruction " +
                            "(Do not request a bean from a BeanFactory in a destroy method implementation!)");
                }
                if (logger.isDebugEnabled()) {
                    logger.debug("Creating shared instance of singleton bean '" + beanName + "'");
                }

                // 把beanName添加到singletonsCurrentlyInCreation Set容器中,在这个集合里面的bean都是正在实例化的bean
                beforeSingletonCreation(beanName);
                boolean newSingleton = false;
                boolean recordSuppressedExceptions = (this.suppressedExceptions == null);
                if (recordSuppressedExceptions) {
                    this.suppressedExceptions = new LinkedHashSet<>();
                }
                try {
                    // 如果这里有返回值,就代表这个bean已经结束创建了,已经完全创建成功
                    singletonObject = singletonFactory.getObject();
                    newSingleton = true;
                }
                finally {
                    if (recordSuppressedExceptions) {
                        this.suppressedExceptions = null;
                    }
                    //bean创建完成后singletonsCurrentlyInCreation要删除该bean
                    afterSingletonCreation(beanName);
                }
                if (newSingleton) {
                    System.out.println("====beanName==" + beanName + "===instance end====");
                    // 创建对象成功时,把对象缓存到singletonObjects缓存中,bean创建完成时放入一级缓存
                    addSingleton(beanName, singletonObject);
                }
            }
            return singletonObject;
        }
    }
这个方法里面首先是从缓存中获取对象,如果有直接返回,如果没有则将该对象的beanName加入到singletonsCurrentlyInCreation缓存中,如果添加不成功,说明已经有其它地方正在创建该对象,当前创建直接抛出异常,如果添加成功,则调用singletonFactory.getObject去创建对象,这个方法就是传入的Lambda表达式,创建完成后删除掉singletonsCurrentlyInCreation缓存中的值并将对象添加到一级缓存,后续需要该对象时,都是从一级缓存中获取的。
在getObject中通过createBean去创建对象,而该方法又调用了doCreateBean,我们直接来看这个方法:
    protected Object doCreateBean(final String beanName, final RootBeanDefinition mbd, final @Nullable Object[] args)
            throws BeanCreationException {

        // Instantiate the bean.
        BeanWrapper instanceWrapper = null;
        if (mbd.isSingleton()) {
            instanceWrapper = this.factoryBeanInstanceCache.remove(beanName);
        }
        if (instanceWrapper == null) {
            //创建实例,,重点看
            instanceWrapper = createBeanInstance(beanName, mbd, args);
        }
        final Object bean = instanceWrapper.getWrappedInstance();
        Class<?> beanType = instanceWrapper.getWrappedClass();
        if (beanType != NullBean.class) {
            mbd.resolvedTargetType = beanType;
        }

        synchronized (mbd.postProcessingLock) {
            if (!mbd.postProcessed) {
                try {

                    // Bean实例化完成后收集类中的注解(@PostConstruct,@PreDestroy,@Resource, @Autowired,@Value)
                    applyMergedBeanDefinitionPostProcessors(mbd, beanType, beanName);
                }
                catch (Throwable ex) {
                    throw new BeanCreationException(mbd.getResourceDescription(), beanName,
                            "Post-processing of merged bean definition failed", ex);
                }
                mbd.postProcessed = true;
            }
        }

        // 单例bean提前暴露
        boolean earlySingletonExposure = (mbd.isSingleton() && this.allowCircularReferences &&
                isSingletonCurrentlyInCreation(beanName));
        if (earlySingletonExposure) {
            if (logger.isTraceEnabled()) {
                logger.trace("Eagerly caching bean '" + beanName +
                        "' to allow for resolving potential circular references");
            }
            // 这里着重理解,对理解循环依赖帮助非常大,添加三级缓存
            addSingletonFactory(beanName, () -> getEarlyBeanReference(beanName, mbd, bean));
        }

        // Initialize the bean instance.
        Object exposedObject = bean;
        try {
            // ioc di,依赖注入的核心方法
            populateBean(beanName, mbd, instanceWrapper);

            // bean 实例化+ioc依赖注入完以后的调用
            exposedObject = initializeBean(beanName, exposedObject, mbd);
        }
        catch (Throwable ex) {
            if (ex instanceof BeanCreationException && beanName.equals(((BeanCreationException) ex).getBeanName())) {
                throw (BeanCreationException) ex;
            }
            else {
                throw new BeanCreationException(
                        mbd.getResourceDescription(), beanName, "Initialization of bean failed", ex);
            }
        }

        if (earlySingletonExposure) {
            Object earlySingletonReference = getSingleton(beanName, false);
            if (earlySingletonReference != null) {
                if (exposedObject == bean) {
                    exposedObject = earlySingletonReference;
                }
                else if (!this.allowRawInjectionDespiteWrapping && hasDependentBean(beanName)) {
                    String[] dependentBeans = getDependentBeans(beanName);
                    Set<String> actualDependentBeans = new LinkedHashSet<>(dependentBeans.length);
                    for (String dependentBean : dependentBeans) {
                        if (!removeSingletonIfCreatedForTypeCheckOnly(dependentBean)) {
                            actualDependentBeans.add(dependentBean);
                        }
                    }
                }
            }
        }

        // Register bean as disposable.
        try {
            //注册bean销毁时的类DisposableBeanAdapter
            registerDisposableBeanIfNecessary(beanName, bean, mbd);
        }

        return exposedObject;
    }
这个方法里面首先去通过createBeanInstance创建对象的实例,创建完成后又通过applyMergedBeanDefinitionPostProcessors收集类中的注解@Autowired、@Value、@PostConstruct,@PreDestroy,@Resource准备依赖注入或是方法调用,紧接着调用addSingletonFactory添加三级缓存处理循环依赖,之后通过populateBean依赖注入真正完成一个完整对象的创建,最后在initializeBean中触发事件和一些方法的调用。下面逐个分析这些方法。
createBeanInstance
    protected BeanWrapper createBeanInstance(String beanName, RootBeanDefinition mbd, @Nullable Object[] args) {
        // Make sure bean class is actually resolved at this point.
        //反射拿到Class对象
        Class<?> beanClass = resolveBeanClass(mbd, beanName);

        if (beanClass != null && !Modifier.isPublic(beanClass.getModifiers()) && !mbd.isNonPublicAccessAllowed()) {
            throw new BeanCreationException(mbd.getResourceDescription(), beanName,
                    "Bean class isn't public, and non-public access not allowed: " + beanClass.getName());
        }

        Supplier<?> instanceSupplier = mbd.getInstanceSupplier();
        if (instanceSupplier != null) {
            return obtainFromSupplier(instanceSupplier, beanName);
        }

        // 在xml配置bean时指定factory-bean属性和factory-method以及@Bean注解
        if (mbd.getFactoryMethodName() != null) {
            return instantiateUsingFactoryMethod(beanName, mbd, args);
        }

        // Candidate constructors for autowiring?
        //寻找当前正在实例化的bean中有@Autowired注解的构造函数
        Constructor<?>[] ctors = determineConstructorsFromBeanPostProcessors(beanClass, beanName);
        if (ctors != null || mbd.getResolvedAutowireMode() == AUTOWIRE_CONSTRUCTOR ||
                mbd.hasConstructorArgumentValues() || !ObjectUtils.isEmpty(args)) {
            //如果ctors不为空,就说明构造函数上有@Autowired注解
            return autowireConstructor(beanName, mbd, ctors, args);
        }

        // Preferred constructors for default construction?
        ctors = mbd.getPreferredConstructors();
        if (ctors != null) {
            return autowireConstructor(beanName, mbd, ctors, null);
        }

        //无参构造函数的实例化,大部分的实例是采用的无参构造函数的方式实例化
        // No special handling: simply use no-arg constructor.
        return instantiateBean(beanName, mbd);
    }
在这个方法里面又做了很多判断,首先是拿到factoryMethodName,当我们在xml配置bean时指定了factory-bean属性和factory-method属性或者是使用了@Bean注解时这里就会拿到值,然后就会通过FactoryMethod去创建一个实例对象;如果不存在factoryMethodName,那么就需要通过构造函数来实例化对象,但构造函数上可能存在注解@Autowired,因此需要通过determineConstructorsFromBeanPostProcessors获取到所有带@Autowired注解的构造函数:
    protected Constructor<?>[] determineConstructorsFromBeanPostProcessors(@Nullable Class<?> beanClass, String beanName)
            throws BeansException {

        /**
         * 通过AutowiredAnnotationBeanPostProcessor(在component-scan解析时
         * 通过registerComponents方法注册的,然后又在refresh中调用registerBeanPostProcessors方法
         * 实例化的)类找到标记了@Autowired注解的构造函数
         */
        if (beanClass != null && hasInstantiationAwareBeanPostProcessors()) {
            for (BeanPostProcessor bp : getBeanPostProcessors()) {
                if (bp instanceof SmartInstantiationAwareBeanPostProcessor) {
                    SmartInstantiationAwareBeanPostProcessor ibp = (SmartInstantiationAwareBeanPostProcessor) bp;
                    Constructor<?>[] ctors = ibp.determineCandidateConstructors(beanClass, beanName);
                    if (ctors != null) {
                        return ctors;
                    }
                }
            }
        }
        return null;
    }
拿到所有带@Autowired注解的构造函数后就是通过调用autowireConstructor来进行实例化,具体则是通过委托给ConstructorResolver类进行处理,包括上面通过factoryMethod创建对象也是委托给这个类。如果没有带@Autowired的构造函数才会调用instantiateBean方法,利用反射通过无参构造函数去创建对象并返回,也是大部分对象实例化所走的流程。至此,简单对象的实例化完成。
addSingletonFactory
这个方法就是添加三级缓存解决循环依赖问题,暂时不分析。
populateBean
    protected void populateBean(String beanName, RootBeanDefinition mbd, @Nullable BeanWrapper bw) {
        boolean continueWithPropertyPopulation = true;

        // 这里可以写接口可以让所有类都不能依赖注入,没有什么实际作用
        if (!mbd.isSynthetic() && hasInstantiationAwareBeanPostProcessors()) {
            for (BeanPostProcessor bp : getBeanPostProcessors()) {
                if (bp instanceof InstantiationAwareBeanPostProcessor) {
                    InstantiationAwareBeanPostProcessor ibp = (InstantiationAwareBeanPostProcessor) bp;
                    if (!ibp.postProcessAfterInstantiation(bw.getWrappedInstance(), beanName)) {

                        //是否需要DI,依赖注入
                        continueWithPropertyPopulation = false;
                        break;
                    }
                }
            }
        }

        if (!continueWithPropertyPopulation) {
            return;
        }

        PropertyValues pvs = (mbd.hasPropertyValues() ? mbd.getPropertyValues() : null);

        if (mbd.getResolvedAutowireMode() == AUTOWIRE_BY_NAME || mbd.getResolvedAutowireMode() == AUTOWIRE_BY_TYPE) {
            MutablePropertyValues newPvs = new MutablePropertyValues(pvs);
            // Add property values based on autowire by name if applicable.
            if (mbd.getResolvedAutowireMode() == AUTOWIRE_BY_NAME) {
                autowireByName(beanName, mbd, bw, newPvs);
            }
            // Add property values based on autowire by type if applicable.
            if (mbd.getResolvedAutowireMode() == AUTOWIRE_BY_TYPE) {
                autowireByType(beanName, mbd, bw, newPvs);
            }
            pvs = newPvs;
        }

        boolean hasInstAwareBpps = hasInstantiationAwareBeanPostProcessors();
        boolean needsDepCheck = (mbd.getDependencyCheck() != AbstractBeanDefinition.DEPENDENCY_CHECK_NONE);

        PropertyDescriptor[] filteredPds = null;

        //重点看这个if代码块
        if (hasInstAwareBpps) {
            if (pvs == null) {
                pvs = mbd.getPropertyValues();
            }
            for (BeanPostProcessor bp : getBeanPostProcessors()) {
                if (bp instanceof InstantiationAwareBeanPostProcessor) {
                    InstantiationAwareBeanPostProcessor ibp = (InstantiationAwareBeanPostProcessor) bp;
                    //依赖注入过程,@Autowired的支持
                    PropertyValues pvsToUse = ibp.postProcessProperties(pvs, bw.getWrappedInstance(), beanName);
                    if (pvsToUse == null) {
                        if (filteredPds == null) {
                            filteredPds = filterPropertyDescriptorsForDependencyCheck(bw, mbd.allowCaching);
                        }

                        //老版本用这个完成依赖注入过程,@Autowired的支持
                        pvsToUse = ibp.postProcessPropertyValues(pvs, filteredPds, bw.getWrappedInstance(), beanName);
                        if (pvsToUse == null) {
                            return;
                        }
                    }
                    pvs = pvsToUse;
                }
            }
        }
        if (needsDepCheck) {
            if (filteredPds == null) {
                filteredPds = filterPropertyDescriptorsForDependencyCheck(bw, mbd.allowCaching);
            }
            checkDependencies(beanName, mbd, filteredPds, pvs);
        }

        // xml中<property>标签的依赖注入
        if (pvs != null) {
            applyPropertyValues(beanName, mbd, bw, pvs);
        }
    }
这里面主要有三个方法是完成依赖注入的:postProcessProperties(当前主要使用)、postProcessPropertyValues(老版本废弃API)、applyPropertyValues(xml中property标签)。所以主要看看postProcessProperties方法,而这个方法又是来自于InstantiationAwareBeanPostProcessor接口(希望你还记得这个接口的继承体系),主要看看AutowiredAnnotationBeanPostProcessor,这个就是解决@Autowired依赖注入的。
    public PropertyValues postProcessProperties(PropertyValues pvs, Object bean, String beanName) {
        InjectionMetadata metadata = findAutowiringMetadata(beanName, bean.getClass(), pvs);
        try {
            metadata.inject(bean, beanName, pvs);
        }
        return pvs;
    }
见名知意,findAutowiringMetadata方法就是拿到@Autowired注解的属性并封装为InjectionMetadata对象,再调用inject进行依赖注入,注意这里是包含了属性和方法的(方法也不一定是setter方法才可以,只要是标记了@Autowired且参数类型正确都能依赖成功)。这就是@Autowired的注入过程,另外还有@Resource的注入,在CommonAnnotationBeanPostProcessor类中,流程和这个基本一样,这里就不阐述了。
initializeBean
以上过程都是对Bean的实例化,以及对象中属性的注入,都完成过后这个Bean对象才是我们真正可以直接使用的对象,所以接着就是处理一些方法的调用了(包含一些事件通知)。
    protected Object initializeBean(final String beanName, final Object bean, @Nullable RootBeanDefinition mbd) {
        if (System.getSecurityManager() != null) {
            AccessController.doPrivileged((PrivilegedAction<Object>) () -> {
                invokeAwareMethods(beanName, bean);
                return null;
            }, getAccessControlContext());
        }
        else {
            // 调用Aware方法
            invokeAwareMethods(beanName, bean);
        }

        Object wrappedBean = bean;
        if (mbd == null || !mbd.isSynthetic()) {
            //对类中某些特殊方法的调用,比如@PostConstruct,Aware接口
            wrappedBean = applyBeanPostProcessorsBeforeInitialization(wrappedBean, beanName);
        }

        try {
            //InitializingBean接口,afterPropertiesSet,init-method属性调用,非常重要
            invokeInitMethods(beanName, wrappedBean, mbd);
        }
        if (mbd == null || !mbd.isSynthetic()) {
            // 这个地方可能生出代理实例,是aop的入口
            wrappedBean = applyBeanPostProcessorsAfterInitialization(wrappedBean, beanName);
        }

        return wrappedBean;
    }

    private void invokeAwareMethods(final String beanName, final Object bean) {
        if (bean instanceof Aware) {
            // 实现该接口可以在bean实例化完成后获取到bean的名称
            if (bean instanceof BeanNameAware) {
                ((BeanNameAware) bean).setBeanName(beanName);
            }

            // 实现该接口可以在bean实例化完成后获取到当前的类加载器
            if (bean instanceof BeanClassLoaderAware) {
                ClassLoader bcl = getBeanClassLoader();
                if (bcl != null) {
                    ((BeanClassLoaderAware) bean).setBeanClassLoader(bcl);
                }
            }
            // 实现该接口可以在bean实例化完成后获取到当前的AbstractAutowireCapableBeanFactory对象
            if (bean instanceof BeanFactoryAware) {
                ((BeanFactoryAware) bean).setBeanFactory(AbstractAutowireCapableBeanFactory.this);
            }
        }
    }
首先是Aware接口的方法调用,这个很简单不多说。接着就是applyBeanPostProcessorsBeforeInitialization方法调用,这个就是BeanPostProcessor接口的postProcessBeforeInitialization方法调用(看到这里你是否会发现自己之前理解错了呢,以为该方法是在对象实例化之前调用,实际上也是实例化完成之后):
    public Object applyBeanPostProcessorsBeforeInitialization(Object existingBean, String beanName)
            throws BeansException {

        Object result = existingBean;
        for (BeanPostProcessor processor : getBeanPostProcessors()) {
            Object current = processor.postProcessBeforeInitialization(result, beanName);
            if (current == null) {
                return result;
            }
            result = current;
        }
        return result;
    }
这里面着重看几个实现类的调用:ApplicationContextAwareProcessor(ApplicationEventPublisherAware、ApplicationContextAware等Aware接口的调用)、InitDestroyAnnotationBeanPostProcessor(@PostConstruct注解方法的调用)、ImportAwareBeanPostProcessor(ImportAware类型实例setImportMetadata调用,对理解SpringBoot帮助很大,这里可以暂时不看)。
紧着着又通过invokeInitMethods方法调用InitializingBean接口的afterPropertiesSet方法以及init-method属性配置的自定义初始化方法。
最后则是通过applyBeanPostProcessorsAfterInitialization方法调用BeanPostProcessor的postProcessAfterInitialization方法,因为涉及到AOP知识,这里不详细分析。
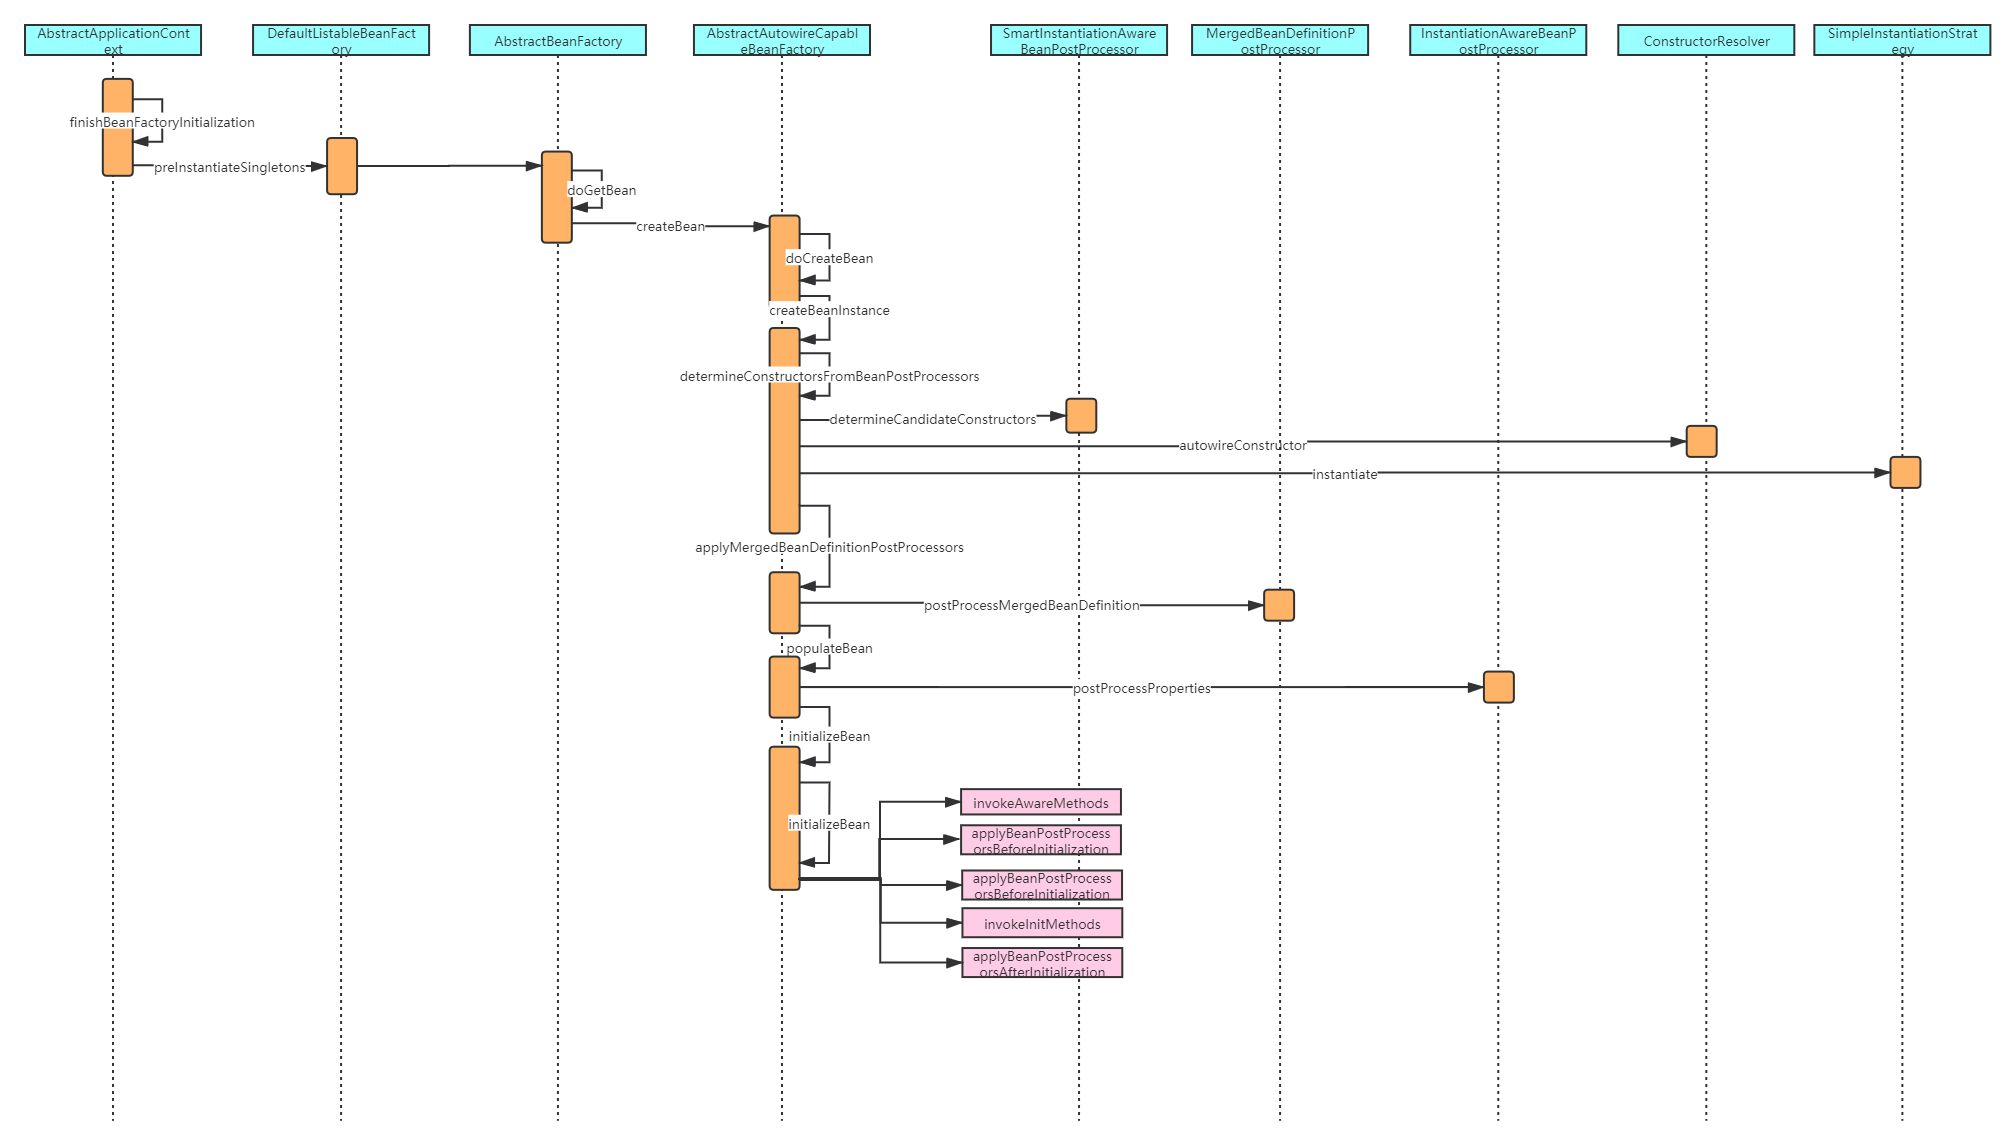
至此,Bean的整个实例化过程分析完成,看到这里,你应该对于Bean的生命周期函数有个基本的认识了,最后放上我画的Bean实例化流程时序图:
总结
本篇篇幅很长,中间很多无关痛痒的代码我都省略掉了,也有一些无关主流程但也比较重要的代码没有分析,比如ConfigurationClassPostProcessor解析@Configuration、@Bean注解的过程,FactoryMethod创建对象过程、获取@Autowired注解标记的构造函数以及通过这些构造函数实例化过程我都没有分析,一来是限于篇幅过长,二来主要是因为对理解整个流程并没有太大作用并且代码相对更简单,感兴趣的读者可在理解清楚主流程后自行分析。

