1、RestFul风格的认识
(1)概念:
是一种资源定位及资源操作的风格,不是标准也不是协议就只是一种风格,基于这种风格设计的软件更加简洁,有层次、利于实现缓存等
(2)功能:
资源:互联网上的所有事物都可以被称为资源
资源操作:使用POST(添加)、DELETE(删除)、PUT(修改)、GET(查询),使用不同的方法对资源进行操作
(3)传统的操作资源的方式:
通过不同的参数来实现不同的效果,方法单一:post和get
http://localhost:8080/StudentInf_mange/log?username=zhai&password=123&identity=%E5%AD%A6%E7%94%9F
(4)使用RestFul操作资源
可以通过不同的请求方式来实现不同的效果,请求地址一样但是功能可能不同(是通过请求方式来进行去别的,而不是通过地址)
(5)好处:
使得路径更加简洁,高效(缓存)
安全,不会暴露提交的信息
普通方式:暴露了属性和参数
http://localhost:8080/StudentInf_mange/log?username=zhai&password=123&identity=%E5%AD%A6%E7%94%9F
RestFul:只暴露了参数
http://localhost:8848/mvc_01_war_exploded/add/1/34
2、RestFul风格的使用
@RequestMapping方式:
(1)配置文件:
web.xml
<?xml version="1.0" encoding="UTF-8"?>
<web-app xmlns="http://xmlns.jcp.org/xml/ns/javaee"
         xmlns:xsi="http://www.w3.org/2001/XMLSchema-instance"
         xsi:schemaLocation="http://xmlns.jcp.org/xml/ns/javaee http://xmlns.jcp.org/xml/ns/javaee/web-app_4_0.xsd"
         version="4.0">
    <!-- 前端控制器 -->
    <servlet>
        <servlet-name>springmvc</servlet-name>
        <servlet-class>org.springframework.web.servlet.DispatcherServlet</servlet-class>
        <!--绑定springmvc的配置文件-->
        <init-param>
            <param-name>contextConfigLocation</param-name>
            <param-value>classpath:springmvc.xml</param-value>
        </init-param>
        <load-on-startup>1</load-on-startup><!--启动服务器即创建-->
    </servlet>
    <servlet-mapping>
        <servlet-name>springmvc</servlet-name>
        <url-pattern>/</url-pattern>
    </servlet-mapping>
</web-app>
springmvc.xml:
<?xml version="1.0" encoding="UTF-8"?>
<beans xmlns="http://www.springframework.org/schema/beans"
       xmlns:xsi="http://www.w3.org/2001/XMLSchema-instance"
       xmlns:context="http://www.springframework.org/schema/context"
       xmlns:mvc="http://www.springframework.org/schema/mvc"
       xsi:schemaLocation="http://www.springframework.org/schema/beans
       http://www.springframework.org/schema/beans/spring-beans.xsd
       http://www.springframework.org/schema/context
       https://www.springframework.org/schema/context/spring-context.xsd
       http://www.springframework.org/schema/mvc
       https://www.springframework.org/schema/mvc/spring-mvc.xsd">
    <!--自动扫描包,让指定包下的注解生效,由IOC容器统一管理-->
    <context:component-scan base-package="pers.zhb.controller"></context:component-scan>
    <!--让Springmvc不处理静态资源,如css、js等-->
    <mvc:default-servlet-handler></mvc:default-servlet-handler>
    <!--使得注解生效-->
    <mvc:annotation-driven></mvc:annotation-driven>
    <!--视图解析器,前缀和后缀-->
    <bean class="org.springframework.web.servlet.view.InternalResourceViewResolver" id="internalResourceViewResolver">
        <property name="prefix" value="/"></property>
        <property name="suffix" value=".jsp"></property>
    </bean>
</beans>
(2)用注解的方式配置处理器:可以约束请求的类型
里面的value和path是一样的
@Controller//代表这个类被string接管,类中的所有方法如果返回的是string,
// 并具有具体的页面进行跳转,就会被视图解析器解析
public class HelloController{
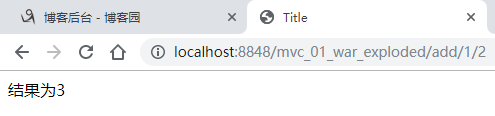
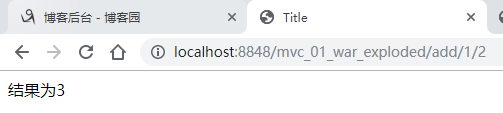
@RequestMapping(value = "/add/{a}/{b}",method = RequestMethod.GET)
public String add(@PathVariable int a, @PathVariable int b, Model model){
int result=a+b;
model.addAttribute("msg","结果为"+result);//封装数据
return "hello";//被视图解析器处理
}
}
(3)视图:
<%@ page contentType="text/html;charset=UTF-8" language="java" %>
<html>
<head>
    <title>Title</title>
</head>
<body>
${msg}
</body>
</html>
(4)测试:
@GetMapping方式:
@Controller//代表这个类被string接管,类中的所有方法如果返回的是string,
           // 并具有具体的页面进行跳转,就会被视图解析器解析
public class HelloController{
    @GetMapping("/add/{a}/{b}")
      public String add(@PathVariable int a, @PathVariable int b, Model model){
          int result=a+b;
          model.addAttribute("msg","结果为"+result);//封装数据
          return "hello";//被视图解析器处理
      }
    @PostMapping("/add/{a}/{b}")
    public String add1(@PathVariable int a, @PathVariable int b, Model model){
        int result=a+b;
        model.addAttribute("msg","result"+result);//封装数据
        return "hello";//被视图解析器处理
    }
}
测试:
因为采用的是get方式提交,因此,只能执行第一个add方法
定义一个页面,采用post方式提交:
<%@ page contentType="text/html;charset=UTF-8" language="java" %>
<html>
  <head>
    <title>$Title$</title>
  </head>
  <body>
    <form action="${pageContext.request.contextPath}/add/1/34" method="post">
      <input type="submit">
    </form>
  </body>
</html>
测试:
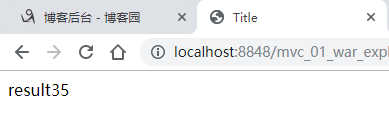
运行的是第二个add方法,这也就是为什么访问的路径相同而,执行的结果不同的原因