位图和矢量图
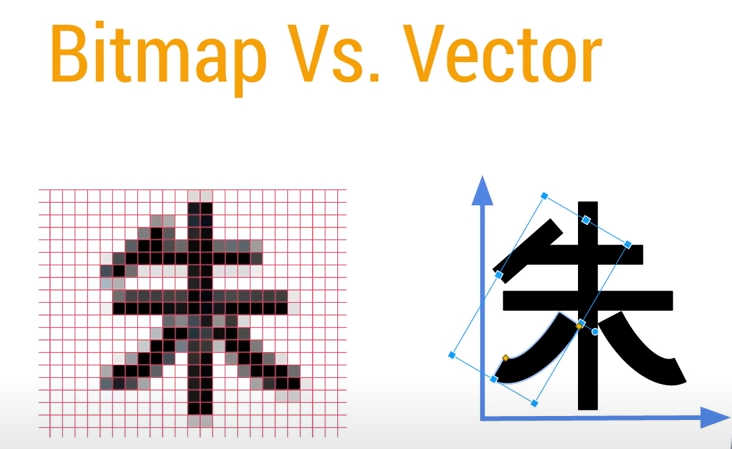
如图所示:位图是由称作像素(图片元素)的单个点组成,这些点可以进行不同的排列和染色以构成图样。而矢量图保存的是线条和图块的信息,与分辨率和图形大小无关,只与图像的复杂程度有关。
Bitmap像素数据保存位置
- 在 Android 2.3.3及更低版本上,位图的后备像素数据存储在本地内存中。它与存储在 Dalvik 堆中的位图本身是分开的。本地内存中的像素数据并不以可预测的方式释放,可能会导致应用短暂超出其内存限制并崩溃。
- 从 Android 3.0到 Android 7.1,像素数据会与关联的位图一起存储在 Dalvik 堆上。
- 在 Android 8.0及更高版本中,位图像素数据存储在native 堆中。
C/C++申请的内存空间在native 堆,而java申请的内存空间则在dalvik 堆中。
Bitmap所占内存的大小
预备知识
存储模式:
| 模式 | 介绍 |
|---|---|
| ALPHA_8 | 每个像素占用一个字节 , 只有透明度,没有颜色 |
| RGB_565: | 每个像素占用两个字节,没有透明度。通常需要压缩图片使用内存时会用到这个配置 |
| ARGB_4444: | 每个像素占用两个字节,相对RGB_565而言有透明度,但是图片质量不高,现在已废弃,在android 4.4以上设置的ARGB_4444会被系统使用ARGB_8888替换 |
| ARGB_8888 | Bitmap默认的配置,每个像素占4个字节,有透明度,能够提供较高的图片质量 |
| HARDWARE | 特殊配置,当位仅存储在图形存储器。 在这种配置中的位图总是一成不变的。 它是最佳的情况下,当与位图的唯一操作是将其拖到屏幕上 |
| RGBA_F16 | 每个像素被存储在8个字节。这种配置特别适用于宽域和HDR内容。 |
drawable目录对应的屏幕密度:
| 目录 | density | densityDpi |
|---|---|---|
| drawable-mdpi | 1 | 160 |
| drawable-hdpi | 1.5 | 240 |
| drawable-xhdpi | 2 | 320 |
| drawable-xxhdpi | 3 | 480 |
| drawable-xxxhdpi | 4 | 640 |
Bitmap在内存中的大小
bitmap内存大小 = 高 * scale * 宽 * scale * 存储模式.
scale:是缩放比例,它取决于实际上手机的densityDpi和图片存放位置的densityDpi的比值。即scale = 实际上手机的densityDpi / 图片存放位置的densityDpi。
示例:假设我们在drawable-xhdpi下的图片为144 * 144;其存储方式默认为Bitmap.Config.ARGB_8888,手机屏幕密度为420,则其占用的内存大小为:
144px * (420/320) * 144px * (420/320) * 4 = 142884 byte = 139.5 kb
注意:当图片放在assets中时,scale = 1. 即bitmap内存大小 = 高 * 宽 * 存储模式.
api
是需要计算Bitmap占用的内存大小时中,只需要调用Bitmap.getAllocationByteCount()方法即可。
Bitmap复用
当我们需要切换Bitmap时,会经过以下步骤:
1、 创建新的Bitmap对象
2、 回收旧的Bitmap对象
这看起来没有问题,但是如果操作频繁,就会引起内存抖动,可能造成UI界面卡顿。当切换Bitmap时,此时已经有一个旧的Bitmap存在,每次切换只是显示的内容不一样。这种情况,我们就可以使用Bitmap复用,重复利用已经占有的内存空间。
具体代码如下:
 /**
     * 在Android 4.4以前,只能重用相同大小的Bitmap内存区域
     * 在Android 4.4以后,你可以重用任何Bitmap的内存区域,只要这块内存比将要分配
     * 内存的Bitmap大就行
     * @param old
     * @param target
     * @return
     */
    public static boolean isCanReuseBitmap(Bitmap old,BitmapFactory.Options target){
        int width = target.outWidth/Math.max(target.inSampleSize,1);
        int height = target.outHeight/Math.max(target.inSampleSize,1);
        int byteCount = width * height * getBytesPerPixel(old.getConfig());
        if (Build.VERSION.SDK_INT > Build.VERSION_CODES.KITKAT){
            return byteCount <= old.getAllocationByteCount();
        }else return byteCount == old.getAllocationByteCount();
    }

    Bitmap bitmap;

    public Bitmap getBitmap(int id){
        BitmapFactory.Options options = new BitmapFactory.Options();
        options.inMutable = true;//必须
        if (bitmap == null){
            return BitmapFactory.decodeResource(getResources(),id,options);
        }
        options.inJustDecodeBounds = true;
        BitmapFactory.decodeResource(getResources(),id,options);
        if (!isCanReuseBitmap(bitmap,options))return BitmapFactory.decodeResource(getResources(),id,options);
        options.inBitmap = bitmap;//这里引用要复用的Bitmap
        options.inJustDecodeBounds = false;
        return BitmapFactory.decodeResource(getResources(),id,options);
    }

    private static int getBytesPerPixel(Bitmap.Config config){
        switch (config){
            case ALPHA_8:return 1;
            case RGB_565:
            case ARGB_4444:
                return 2;
            default:return 4;
        }
    }
要注意:在Android 4.4以前,只能重用相同大小的Bitmap内存区域;在Android 4.4以后,你可以重用任何Bitmap的内存区域,只要这块内存比将要分配内存的Bitmap大就行
Bitmap分片显示
当我们需要长图或者大图时,直接加载到内存中可能会造成oom。为了避免这种情况,我们可以使用分片或者压缩的方式。这里介绍图片分片显示。
在Android中,图片分片通过BitmapRegionDecoder来实现,代码如下:
    /**
     * 区域加载Bitmap
     * @param rect 显示的区域
     * @return
     */
    public Bitmap load(Rect rect){
        try {
            BitmapRegionDecoder decoder = BitmapRegionDecoder.newInstance("pathName",false);
            //控制图片的参数
            BitmapFactory.Options options = new BitmapFactory.Options();
            return decoder.decodeRegion(rect,options);
        } catch (IOException e) {
            e.printStackTrace();
        }
        return null;
    }
Bitmap压缩
基础知识
- 有损压缩:是对图像数据进行处理,去掉那些图像上会被人眼忽略的细节,然后使用附近的颜色通过渐变或其他形式进行填充。这样既能大大降低图像信息的数据量,又不会影响图像的还原效果。最典型的有损压缩格式是 jpg。
- 无损压缩:先判断图像上哪些区域的颜色是相同的,哪些是不同的,然后把这些相同的数据信息进行压缩记录,(例如一片蓝色的天空之需要记录起点和终点的位置就可以了),而把不同的数据另外保存(例如天空上的白云和渐变等数据)。常见的无损压缩格式是 png
- WebP 是 Android 4.2.1(API 级别 17)支持的较新图片格式。这种格式可为网络上的图片提供出色的无损压缩和有损压缩效果。使用 WebP,开发者可以创建更小、更丰富的图片
质量压缩
质量压缩并不改变图片像素,它是在保持像素的前提下改变图片的位深及透明度等,来达到压缩图片的目的。由于长、宽、像素等没变,由Bitmap内存大小的计算公式可知,其占用内存是不变的。
Android只支持 PNG 、 JPEG 、WEBP(Android 4.2以后加入) 三种格式的压缩,分别对应于:
- Bitmap.CompressFormat.JPEG:表示以JPEG压缩算法进行图像压缩,压缩后的格式可以是”.jpg”或者”.jpeg”,是一种有损压缩。
- Bitmap.CompressFormat.PNG:表示以PNG压缩算法进行图像压缩,压缩后的格式是”.png”,是一种无损压缩。
- Bitmap.CompressFormat.WEBP:表示以WebP压缩算法进行图像压缩,压缩后的格式是”.webp”,是一种有损压缩,质量相同的情况下,WebP格式图像的体积要比JPEG格式图像小40%。美中不足的是,WebP格式图像的编码时间“比JPEG格式图像长8倍”。
压缩代码如下:
 public void compress(){
        Bitmap bitmap1 = BitmapFactory.decodeResource(getResources(),R.drawable.copy);
        Log.d("======compress bitmap1",bitmap1.getAllocationByteCount()+"");
        ByteArrayOutputStream baos = new ByteArrayOutputStream();
        //质量压缩方法,这里100表示不压缩(取值范围为0-100),把压缩后的数据存放到baos中
        //注意这个参数只对Bitmap.CompressFormat.JPEG 格式有效
        bitmap1.compress(Bitmap.CompressFormat.JPEG, 100, baos);
        int options = 100;
        while ( baos.toByteArray().length / 1024 > 100) {  //循环判断如果压缩后图片是否大于100kb,大于继续压缩
            baos.reset();
            bitmap1.compress(Bitmap.CompressFormat.JPEG, options, baos);
            options -= 10;//每次都减少10
        }
        ByteArrayInputStream isBm = new ByteArrayInputStream(baos.toByteArray());//把压缩后的数据baos存放到ByteArrayInputStream中
        Bitmap bitmap2 = BitmapFactory.decodeStream(isBm, null, null);//把ByteArrayInputStream数据生成图片
        Log.d("======compress bitmap2",bitmap2.getAllocationByteCount()+"");
    }
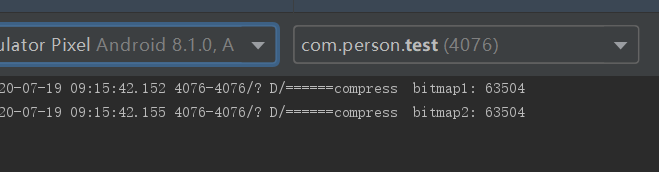
如图,Bitmap1和Bitmap2的大小是一样的:
尺寸压缩
- 改变Bitmap.Config
图片默认的显示模式是Bitmap.Config.ARGB_8888,它占用4个字节,我们可以通过将默认模式改变为Bitmap.Config.RGB_565(占用两个字节),从而将占用内存缩小到原来的一半,代码如下:
BitmapFactory.Options options = new BitmapFactory.Options();
options.inPreferredConfig = Bitmap.Config.RGB_565;
Bitmap bitmap1 = BitmapFactory.decodeResource(getResources(),R.drawable.copy,options);
- 设置inSampleSize
代码如下:
 public static int calculateInSampleSize(
                BitmapFactory.Options options, int reqWidth, int reqHeight) {
        // Raw height and width of image
        final int height = options.outHeight;
        final int width = options.outWidth;
        int inSampleSize = 1;

        if (height > reqHeight || width > reqWidth) {

            final int halfHeight = height / 2;
            final int halfWidth = width / 2;

           //计算最大的inSampleSize值,该值是2的幂,如果不为2的幂最终值将向下舍入为最接近的 2 的幂,并且
           //高度和宽度都大于等于请求的高度和宽度,避免缩放
            while ((halfHeight / inSampleSize) >= reqHeight
                    && (halfWidth / inSampleSize) >= reqWidth) {
                inSampleSize *= 2;
            }
        }
        return inSampleSize;
    }

public static Bitmap decodeSampledBitmapFromResource(Resources res, int resId,
            int reqWidth, int reqHeight) {

        final BitmapFactory.Options options = new BitmapFactory.Options();
        //设置为true,不获取图片,不分配内存,但会返回图片的高度宽度信息
        options.inJustDecodeBounds = true;
        BitmapFactory.decodeResource(res, resId, options);

        options.inSampleSize = calculateInSampleSize(options, reqWidth, reqHeight);

        options.inJustDecodeBounds = false;
        return BitmapFactory.decodeResource(res, resId, options);
    }
不足:inSampleSize只能缩放为2的整数幂的大小
- inTargetDensity/inDensity
bitmap的宽 = 原图片的宽 / inSampleSize * (inTargetDensity / inDensity+0.5f)
bitmap的高 = 原图片的高 / inSampleSize * (inTargetDensity / inDensity+0.5f)
public Bitmap load(int targetDensity){
        BitmapFactory.Options options = new BitmapFactory.Options();
        options.inJustDecodeBounds = true;
        BitmapFactory.decodeResource(getResources(),R.drawable.copy,options);
        options.inScaled = true;
        options.inTargetDensity = targetDensity;
        options.inJustDecodeBounds = false;
        return BitmapFactory.decodeResource(getResources(),R.drawable.copy,options);
    }
不足:该操作内部会对图片进行过滤操作,对于大图片会耗费大量时间。
解决方法:可以先通过inSampleSize减小图片尺寸,再使用inTargetDensity来过滤
其他
Bitmap获取
- 通过BitmapFactory获取
详细的api可以看Android Bitmap最全面详解
- 通过Glide获取
1、 Glide 3.x 获取Bitmap代码如下:
Glide.with(this).load("url").asBitmap().into(new SimpleTarget<Bitmap>() {
    @Override
    public void onResourceReady(Bitmap resource, GlideAnimation<? super Bitmap> glideAnimation) {
        image.setImageBitmap(resource);
    }
});
//需要在线程中获取
 FutureTarget<File> future = Glide.with(this)
                .load("url")
                .downloadOnly(100, 100);
1、 Glide 4.x 获取Bitmap代码如下:
//Glide 4.8 及以前设置size需要通过RequestOptions
RequestOptions requestOptions = new RequestOptions();
requestOptions.override(100,1000);
Glide.with(this)
        .asBitmap()
        .load("url")
        .apply(requestOptions)
        .into(new CustomTarget<Bitmap>() {
            @Override
            public void onResourceReady(@NonNull Bitmap resource, @Nullable Transition<? super Bitmap> transition) {
                //这里获取
            }

            @Override
            public void onLoadCleared(@Nullable Drawable placeholder) {

            }
        });

//Glide 4.9及以后,直接设置size
Glide.with(this)
    .asBitmap()
    .load("")
    .override(100,100)
    .into(new CustomTarget<Bitmap>() {
        @Override
        public void onResourceReady(@NonNull Bitmap resource, @Nullable Transition<? super Bitmap> transition) {
            //这里获取
        }

        @Override
        public void onLoadCleared(@Nullable Drawable placeholder) {

        }
    });

//需要在线程中获取,target.get()会阻塞线程
FutureTarget<Bitmap> target = Glide.with(this).asBitmap().load("").submit();
try {
   target.get();
} catch (ExecutionException | InterruptedException e) {
   e.printStackTrace();
}
Bitmap转换
详细的见Android笔记:bitmap转换与处理相关工具类,Bitmap与DrawAble与byte[]与InputStream之间的转换
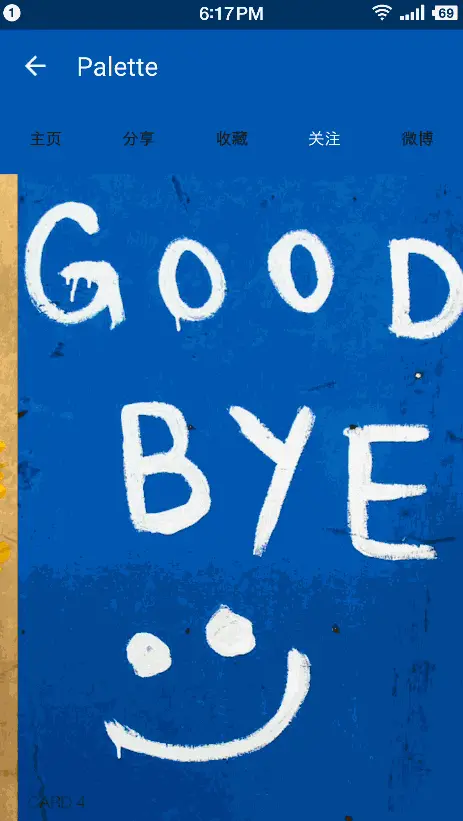
Palette
Palette 可以从图像中提取出突出的颜色(主色调),获取到颜色之后我们再将这个颜色值赋给 ActionBar、状态栏等。从而达到界面色调的统一,使界面美观协调。效果图如下(图片来源Android Palette(调色板)的使用):