mybatis入门案例自定义实现
一、需要实现的类和接口
public static void main(String[] args) throws Exception{
    //1.读取配置文件
    InputStream in = Resources.getResourceAsStream("SqlMapConfig.xml");
    //2.创建SqlSessionFactory工厂
    SqlSessionFactoryBuilder builder = new SqlSessionFactoryBuilder();
    SqlSessionFactory factory = builder.build(in);
    //3.使用工厂生产SqlSession对象
    SqlSession session = factory.openSession();
    //4.使用SqlSession创建Dao的代理对象
    IUserDao userDao = session.getMapper(IUserDao.class);
    //5.使用代理对象执行方法
    List<User> users = userDao.findAll();
    for(User user : users) {
        System.out.println(user);
    }
    //6.释放资源
    session.close();
    in.close();
}
根据测试类MybatisTest中的main函数,需要实现的类有:Resources、SqlSessionFactoryBuilder,需要实现的接口有:SqlSessionFactory、SqlSession。由于是自定义mybatis,我们将项目配置文件pom.xml中的mybatis的相关信息删除。
二、依据测试类创建缺少的接口和类
1.创建Resources类
在src/main/java目录下,创建mybatis包,在mybatis包下创建io包,在io包下新建类Resources,添加静态方法
//使用类加载器读取配置文件的类
public class Resources {

    /**
     * @description 根据传入的参数获取一个字节输入流
     * @param filePath
     * @return
     */

    public static InputStream getResourceAsStream(String filePath){
        return Resources.class.getClassLoader().getResourceAsStream(filePath);
    }

}
之所以这样子添加,我们可以查看原mybatis中,getResourcesAsStream()方法的调用层级,可以发现最终调用的就是ClassLoader类下的getResourceAsStream()方法,因此我们直接调用该方法即可。
//MybatisTest.class
 InputStream in = Resources.getResourceAsStream("SqlMapConfig.xml");

//Resources.class
 public static InputStream getResourceAsStream(String resource) throws IOException {
       return getResourceAsStream((ClassLoader)null, resource);
 }

public static InputStream getResourceAsStream(ClassLoader loader, String resource) throws IOException {
        InputStream in = classLoaderWrapper.getResourceAsStream(resource, loader);
        if (in == null) {
            throw new IOException("Could not find resource " + resource);
        } else {
            return in;
        }
 }

//ClassLoaderWrapper.class
 public InputStream getResourceAsStream(String resource, ClassLoader classLoader) {
        return this.getResourceAsStream(resource, this.getClassLoaders(classLoader));
 }

 InputStream getResourceAsStream(String resource, ClassLoader[] classLoader) {
        ClassLoader[] var3 = classLoader;
        int var4 = classLoader.length;

        for(int var5 = 0; var5 < var4; ++var5) {
            ClassLoader cl = var3[var5];
            if (null != cl) {
                InputStream returnValue = cl.getResourceAsStream(resource);
                if (null == returnValue) {
                    returnValue = cl.getResourceAsStream("/" + resource);
                }

                if (null != returnValue) {
                    return returnValue;
                }
            }
        }

        return null;
  }

//ClassLoader.class
 public InputStream getResourceAsStream(String name) {
        Objects.requireNonNull(name);
        URL url = getResource(name);
        try {
            return url != null ? url.openStream() : null;
        } catch (IOException e) {
            return null;
        }
  }
2.创建SqlSessionFactorty接口
在mybatis包下新建包sqlsession,在sqlsession包下新建接口SqlSessionFactorty,依据main()方法,该接口中需要声明方法openSession()。
public interface SqlSessionFactory {

    //用于打开一个新的SqlSession对象
    SqlSession openSession();
}
3.创建SqlSession接口
在sqlsession包下新建接口SqlSessionFactorty,依据main()方法,该接口中需要声明方法getMapper()和close()。
//自定义mybatis中和数据库交互的核心类,可以创建dao接口的代理对象
public interface SqlSession {

    /**
     * @description 根据参数创建一个代理对象
     * @param daoInterfaceClass dao的接口字节码
     * @param <T>
     * @return
     */
    <T> T getMapper(Class<T> daoInterfaceClass);

    //释放资源
    void close();
}
至于getMapper的声明为什么是这样子,可以查看我的上一篇博客:mybatis入门案例分析
4.创建SqlSessionFactoryBuilder类
在sqlsession包下创建SqlSessionFactoryBuilder类,添加一个build()方法,先返回空值,之后我们再来补全。
/* 用于创建一个SqlSessionFactory对象 */
public class SqlSessionFactoryBuilder {

    /**
     * @Description: 根据字节输入流来构建一个SqlSessionFactory工厂
     * @param config
     * @return
     */
    public SqlSessionFactory build(InputStream config){
        return null;
    }
}
在原mybatis中,build()方法调用层级为:
//MybatisTest.class
SqlSessionFactory factory = builder.build(in);

//SqlSessionFactoryBuilder.class
 public SqlSessionFactory build(InputStream inputStream) {
        return this.build((InputStream)inputStream, (String)null, (Properties)null);
 }

 public SqlSessionFactory build(InputStream inputStream, String environment, Properties properties) {
        SqlSessionFactory var5;
        try {
            XMLConfigBuilder parser = new XMLConfigBuilder(inputStream, environment, properties);
            var5 = this.build(parser.parse());
        } catch (Exception var14) {
            throw ExceptionFactory.wrapException("Error building SqlSession.", var14);
        } finally {
            ErrorContext.instance().reset();

            try {
                inputStream.close();
            } catch (IOException var13) {
            }

        }

        return var5;
 }

  public SqlSessionFactory build(Configuration config) {
        return new DefaultSqlSessionFactory(config);
  }
可以看到最后返回的是一个DefualtSqlSessionFactory对象,所以在自定义mybatis时,我们也需要返回一个DefuaultSqlSessionFactory对象。而且还用到了xml文件解析类XMLConfigBuilder,因此接下来我们需要定义xml解析类和DefuaultSqlSessionFactory类。
5.创建xml解析类XMLConfigBuilder
解析xml文件,我们采用的是dom4j技术,在查找信息时,用到了XPath。所以我们需要在项目文件pom.xml中添加上相关内容,导入jaxen是为了能够使用XPath:
<dependency>
    <groupId>dom4j</groupId>
    <artifactId>dom4j</artifactId>
    <version>1.1</version>
</dependency>
<dependency>
    <groupId>jaxen</groupId>
    <artifactId>jaxen</artifactId>
    <version>1.1.6</version>
</dependency>
在mybatis包下新建包utils,在utils包下新建类XMLConfigBuilder。解析xml不是本文重点,所以解析类的代码在这里直接给出:
/**
 *  用于解析配置文件
 */
public class XMLConfigBuilder {

    /**
     * 解析主配置文件,把里面的内容填充到DefaultSqlSession所需要的地方
     * 使用的技术:dom4j+xpath
     */
    public static Configuration loadConfiguration(InputStream config){
        try{
            //定义封装连接信息的配置对象(mybatis的配置对象)
            Configuration cfg = new Configuration();

            //1.获取SAXReader对象
            SAXReader reader = new SAXReader();
            //2.根据字节输入流获取Document对象
            Document document = reader.read(config);
            //3.获取根节点
            Element root = document.getRootElement();
            //4.使用xpath中选择指定节点的方式,获取所有property节点
            List<Element> propertyElements = root.selectNodes("//property");
            //5.遍历节点
            for(Element propertyElement : propertyElements){
                //判断节点是连接数据库的哪部分信息
                //取出name属性的值
                String name = propertyElement.attributeValue("name");
                if("driver".equals(name)){
                    //表示驱动
                    //获取property标签value属性的值
                    String driver = propertyElement.attributeValue("value");
                    cfg.setDriver(driver);
                }
                if("url".equals(name)){
                    //表示连接字符串
                    //获取property标签value属性的值
                    String url = propertyElement.attributeValue("value");
                    cfg.setUrl(url);
                }
                if("username".equals(name)){
                    //表示用户名
                    //获取property标签value属性的值
                    String username = propertyElement.attributeValue("value");
                    cfg.setUsername(username);
                }
                if("password".equals(name)){
                    //表示密码
                    //获取property标签value属性的值
                    String password = propertyElement.attributeValue("value");
                    cfg.setPassword(password);
                }
            }
            //取出mappers中的所有mapper标签,判断他们使用了resource还是class属性
            List<Element> mapperElements = root.selectNodes("//mappers/mapper");
            //遍历集合
            for(Element mapperElement : mapperElements){
                //判断mapperElement使用的是哪个属性
                Attribute attribute = mapperElement.attribute("resource");
                if(attribute != null){
                    System.out.println("使用的是XML");
                    //表示有resource属性,用的是XML
                    //取出属性的值
                    String mapperPath = attribute.getValue();//获取属性的值"dao/IUserDao.xml"
                    //把映射配置文件的内容获取出来,封装成一个map
                    Map<String,Mapper> mappers = loadMapperConfiguration(mapperPath);
                    //给configuration中的mappers赋值
                    cfg.setMappers(mappers);
                }
            }
            //返回Configuration
            return cfg;
        }catch(Exception e){
            throw new RuntimeException(e);
        }finally{
            try {
                config.close();
            }catch(Exception e){
                e.printStackTrace();
            }
        }

    }

    /**
     * 根据传入的参数,解析XML,并且封装到Map中
     * @param mapperPath    映射配置文件的位置
     * @return  map中包含了获取的唯一标识(key是由dao的全限定类名和方法名组成)
     *          以及执行所需的必要信息(value是一个Mapper对象,里面存放的是执行的SQL语句和要封装的实体类全限定类名)
     */
    private static Map<String,Mapper> loadMapperConfiguration(String mapperPath)throws IOException {
        InputStream in = null;
        try{
            //定义返回值对象
            Map<String,Mapper> mappers = new HashMap<String,Mapper>();
            //1.根据路径获取字节输入流
            in = Resources.getResourceAsStream(mapperPath);
            //2.根据字节输入流获取Document对象
            SAXReader reader = new SAXReader();
            Document document = reader.read(in);
            //3.获取根节点
            Element root = document.getRootElement();
            //4.获取根节点的namespace属性取值
            String namespace = root.attributeValue("namespace");//是组成map中key的部分
            //5.获取所有的select节点
            List<Element> selectElements = root.selectNodes("//select");
            //6.遍历select节点集合
            for(Element selectElement : selectElements){
                //取出id属性的值      组成map中key的部分
                String id = selectElement.attributeValue("id");
                //取出resultType属性的值  组成map中value的部分
                String resultType = selectElement.attributeValue("resultType");
                //取出文本内容            组成map中value的部分
                String queryString = selectElement.getText();
                //创建Key
                String key = namespace+"."+id;
                //创建Value
                Mapper mapper = new Mapper();
                mapper.setQueryString(queryString);
                mapper.setResultType(resultType);
                //把key和value存入mappers中
                mappers.put(key,mapper);
            }
            return mappers;
        }catch(Exception e){
            throw new RuntimeException(e);
        }finally{
            in.close();
        }
    }

}
6.创建配置类Configuration
解析xml文件啊返回的包含有数据库的连接信息、SQL语句和查询结果的封装信息。在mybatis包下创建包config,在config包下新建类Configuration。结合我们之前的入门案例分析,这个类中的属性应该包括:driver,url,username,password,映射信息mappers。
/* 自定义mybatis的配置类 */
public class Configuration {

    private String driver;
    private String url;
    private String username;
    private String password;

    private Map<String,Mapper> mappers = new HashMap<>();

    public Map<String, Mapper> getMappers() {
        return mappers;
    }

    public void setMappers(Map<String, Mapper> mappers) {
        this.mappers.putAll(mappers);
    }

    public String getDriver() {
        return driver;
    }

    public void setDriver(String driver) {
        this.driver = driver;
    }

    public String getUrl() {
        return url;
    }

    public void setUrl(String url) {
        this.url = url;
    }

    public String getUsername() {
        return username;
    }

    public void setUsername(String username) {
        this.username = username;
    }

    public String getPassword() {
        return password;
    }

    public void setPassword(String password) {
        this.password = password;
    }
}
注意:映射信息我们是存放在一个HashMap中,这样可以更加方便地通过完整的id找到SQL语句和查询结果的封装信息。因此接下来我们要定义一个Mapper类,并且setMapper()方法实际上是一个添加新元素并且去重的方法,所以我们不是直接赋值,而是调用putAll()方法。
7.创建Mapper类
结合我们对入门案例的分析,我们知道Mapper类中应该有两大属性,一个是queryString,即我们要执行的SQL语句;另一个是resultType,即封装查询信息的类。在config包下新建类Mapper,如下:
/*用于封装执行的SQL语句和结果类型的全限定类名*/
public class Mapper {

    private String queryString;
    private String resultType;

    public String getQueryString() {
        return queryString;
    }

    public void setQueryString(String queryString) {
        this.queryString = queryString;
    }

    public String getResultType() {
        return resultType;
    }

    public void setResultType(String resultType) {
        this.resultType = resultType;
    }
}
8.创建SqlSessionFactory接口的实现类DefualtSqlSessionFactory
在mybatis包下新建包defualts,在defualts包下创建类DefualtSqlSessionFactory,openSession()方法返回的是一个操作数据库的对象,要想操作数据库,我们需要提供数据库的连接信息,因此需要添加Configuration类型的字段。
public class DefualtSqlSessionFactory implements SqlSessionFactory {
    private Configuration cfg;
    public  DefualtSqlSessionFactory(Configuration cfg){
        this.cfg = cfg;
    }
    /* 用于创建一个新的操作数据库对象*/
    @Override
    public SqlSession openSession() {
        return new DefualtSqlSession(cfg);
    }
}
9.创建SqlSession接口的实现类DefualtSqlSession
在defualts包下创建类DefualtSqlSession。在该类中,我们同样需要配置信息,因此需要添加Configuration类型的字段。为了连接数据库,我们需要添加Connection类型的字段。结合上篇文章的分析,在创建代理对象时,我们需要指定代理方式。接下来我们要实现的就是连接数据库的类DataSourceUtil和调用selectList()方法的InvocationHandler接口的实现类。
public class DefualtSqlSession implements SqlSession {

    private Configuration cfg;
    private Connection connection;

    public DefualtSqlSession(Configuration cfg){
        this.cfg = cfg;
        connection = DataSourceUtil.getConnection(cfg);
    }

    /* 用于创建代理对象*/
    @Override
    public <T> T getMapper(Class<T> daoInterfaceClass) {
       return (T) Proxy.newProxyInstance(daoInterfaceClass.getClassLoader(),
                new Class[]{daoInterfaceClass}, new MapperProxy(cfg.getMappers(), connection));
    }

    /*Description: 用于释放资源*/
    @Override
    public void close(){
        if(connection != null){
            try {
                connection.close();
            }catch (Exception e){
                e.printStackTrace();
            }
        }
    }
}
10.创建连接数据库的类DataSourceUtil
在utils包下新建类DataSourceUtil:
 /* 创建数据源的工具类 */
public class DataSourceUtil {
    /* 用于获取一个连接 */
    public static Connection getConnection(Configuration cfg){
        try {
            Class.forName(cfg.getDriver());
            return DriverManager.getConnection(cfg.getUrl(),cfg.getUsername(),cfg.getPassword());
        }catch (Exception e){
            throw new RuntimeException(e);
        }
    }
}
11.创建InvocationHandler接口的实现类MapperProxy
在mybatis包下新建包proxy,在proxy包下新建类MapperProxy,该类中要对数据库进行查询,所以需要映射信息和数据库连接。在执行查询操作时,我们调用了Executor().selectList(mapper,conn)静态方法,所以接下来我们要定义工具类Executor。
public class MapperProxy implements InvocationHandler {

    private Map<String, Mapper> mappers;
    private Connection conn;

    public MapperProxy(Map<String,Mapper> mappers, Connection conn){
        this.mappers = mappers;
        this.conn = conn;
    }
    /* 用于对方法进行增强的,其实就是调用selectList方法 */
    @Override
    public Object invoke(Object proxy, Method method, Object[] args) throws Throwable {
        //1.获取方法名
        String methodName = method.getName();
        //2.获取方法所在类的名称
        String className = method.getDeclaringClass().getName();
        //3.组合key
        String key = className+"."+methodName;
        //4.获取mappers中的Mapper对象
        Mapper mapper = mappers.get(key);
        //5.判断是否有mapper
        if(mapper == null){
            throw new IllegalArgumentException("传入的参数有误");
        }
        //6.调用工具类执行查询所有
        return new Executor().selectList(mapper,conn);
    }
}
12.创建查询工具类Executor
在utils包下,新建类Executor:
 /* 执行查询封装的工具类 */
public class Executor {
    public <E> List<E> selectList(Mapper mapper, Connection conn) {
        PreparedStatement pstm = null;
        ResultSet rs = null;
        try {
            //1.取出mapper中的数据
            String queryString = mapper.getQueryString();//select * from user
            String resultType = mapper.getResultType();//domain.User
            Class domainClass = Class.forName(resultType);
            //2.获取PreparedStatement对象
            pstm = conn.prepareStatement(queryString);
            //3.执行SQL语句,获取结果集
            rs = pstm.executeQuery();
            //4.封装结果集
            List<E> list = new ArrayList<E>();//定义返回值
            while(rs.next()) {
                //实例化要封装的实体类对象
                E obj = (E)domainClass.getDeclaredConstructor().newInstance();
                //取出结果集的元信息:ResultSetMetaData
                ResultSetMetaData rsmd = rs.getMetaData();
                //取出总列数
                int columnCount = rsmd.getColumnCount();
                //遍历总列数
                for (int i = 1; i <= columnCount; i++) {
                    //获取每列的名称,列名的序号是从1开始的
                    String columnName = rsmd.getColumnName(i);
                    //根据得到列名,获取每列的值
                    Object columnValue = rs.getObject(columnName);
                    //给obj赋值:使用Java内省机制(借助PropertyDescriptor实现属性的封装)
                    PropertyDescriptor pd = new PropertyDescriptor(columnName,domainClass);//要求:实体类的属性和数据库表的列名保持一种
                    //获取它的写入方法
                    Method writeMethod = pd.getWriteMethod();
                    //把获取的列的值,给对象赋值
                    writeMethod.invoke(obj,columnValue);
                }
                //把赋好值的对象加入到集合中
                list.add(obj);
            }
            return list;
        } catch (Exception e) {
            throw new RuntimeException(e);
        } finally {
            release(pstm,rs);
        }
    }

    private void release(PreparedStatement pstm,ResultSet rs){
        if(rs != null){
            try {
                rs.close();
            }catch(Exception e){
                e.printStackTrace();
            }
        }

        if(pstm != null){
            try {
                pstm.close();
            }catch(Exception e){
                e.printStackTrace();
            }
        }
    }
}
13.补全SqlSessionFactoryBuilder类的build方法
build()方法是根据字节输入流来构建一个SqlSessionFactory工厂,因此首先要对xml文件进行解析,读取配置文件,然后返回一个DefualtSqlSessionFactory类的实例。
public SqlSessionFactory build(InputStream config){
    Configuration cfg = XMLConfigBuilder.loadConfiguration(config);
    return new DefualtSqlSessionFactory(cfg);
}
三、项目结果和执行结果
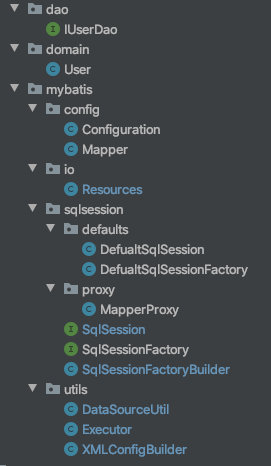
到这里,我们就完成了自定义mybatis的通过xml文件进行配置的实现,之后我们还可以添加提供注解进行配置的实现,项目结构如下;
最后运行测试类的结果为:

四、添加注解的实现
1.修改主配置文件SqlMapConfig
将mapper标签修改为;
<mappers>
    <mapper class="dao.IUserDao" />
</mappers>
2.添加注解类
在mybatis包下新建包annocations,在annocations包下新建注解Select,如下:
/* 查询的注解 */
@Retention(RetentionPolicy.RUNTIME)
@Target(ElementType.METHOD)
public @interface Select {

    //配置SQL语句
    String value();
}
3.在dao接口中添加注解
public interface IUserDao {
    @Select("select * from user")
    List<User> findAll();
}
4.在xml解析类中添加对注解的解析
1、添加通过注解创建映射的函数loadMapperAnnotation()
注意在dao接口中添加注解时,我们并没有添加resultType,因此这里我们获取resultType时运用了反射技术,findAll()方法的返回值是一个List,我们只需找到这个List当中元素的类型即为resultType。
/**
 * 根据传入的参数,得到dao中所有被select注解标注的方法。
 * 根据方法名称和类名,以及方法上注解value属性的值,组成Mapper的必要信息
 * @param daoClassPath
 * @return
 */
private static Map<String,Mapper> loadMapperAnnotation(String daoClassPath)throws Exception{
    //定义返回值对象
    Map<String,Mapper> mappers = new HashMap<String, Mapper>();

    //1.得到dao接口的字节码对象
    Class daoClass = Class.forName(daoClassPath);
    //2.得到dao接口中的方法数组
    Method[] methods = daoClass.getMethods();
    //3.遍历Method数组
    for(Method method : methods){
        //取出每一个方法,判断是否有select注解
        boolean isAnnotated = method.isAnnotationPresent(Select.class);
        if(isAnnotated){
            //创建Mapper对象
            Mapper mapper = new Mapper();
            //取出注解的value属性值
            Select selectAnno = method.getAnnotation(Select.class);
            String queryString = selectAnno.value();
            mapper.setQueryString(queryString);
            //获取当前方法的返回值,还要求必须带有泛型信息
            Type type = method.getGenericReturnType();//List<User>
            //判断type是不是参数化的类型
            if(type instanceof ParameterizedType){
                //强转
                ParameterizedType ptype = (ParameterizedType)type;
                //得到参数化类型中的实际类型参数
                Type[] types = ptype.getActualTypeArguments();
                //取出第一个
                Class domainClass = (Class)types[0];
                //获取domainClass的类名
                String resultType = domainClass.getName();
                //给Mapper赋值
                mapper.setResultType(resultType);
            }
            //组装key的信息
            //获取方法的名称
            String methodName = method.getName();
            String className = method.getDeclaringClass().getName();
            String key = className+"."+methodName;
            //给map赋值
            mappers.put(key,mapper);
        }
    }
    return mappers;
}
2、修改loadConfiguration()方法
注解和xml文件进行配置调用的方法是不一样的,这里我们取出mapper标签,判断mapperElement使用的是哪个属性。将第二个循环体修改为:
//取出mappers中的所有mapper标签,判断他们使用了resource还是class属性
List<Element> mapperElements = root.selectNodes("//mappers/mapper");
//遍历集合
for(Element mapperElement : mapperElements){
    //判断mapperElement使用的是哪个属性
    Attribute attribute = mapperElement.attribute("resource");
    if(attribute != null){
        System.out.println("使用的是XML");
        //表示有resource属性,用的是XML
        //取出属性的值
        String mapperPath = attribute.getValue();//获取属性的值"dao/IUserDao.xml"
        //把映射配置文件的内容获取出来,封装成一个map
        Map<String,Mapper> mappers = loadMapperConfiguration(mapperPath);
        //给configuration中的mappers赋值
        cfg.setMappers(mappers);
    }else{
        System.out.println("使用的是注解");
        //表示没有resource属性,用的是注解
        //获取class属性的值
        String daoClassPath = mapperElement.attributeValue("class");
        //根据daoClassPath获取封装的必要信息
        Map<String,Mapper> mappers = loadMapperAnnotation(daoClassPath);
        //给configuration中的mappers赋值
        cfg.setMappers(mappers);
    }
}
5.运行结果

博客链接: