一、背景
音视频服务器有一种架构模式叫MCU,在这种模式下,服务器会把从各个客户端收到的视频流进行混屏,然后把混合后的视频分发给客户端。客户端收到混合后的视频流,其他每个人都占混合流中的一个小窗口(像下图)。但是客户端无法对这些小窗口进行标识,比如每个人的名字、哪个人在说话等等。
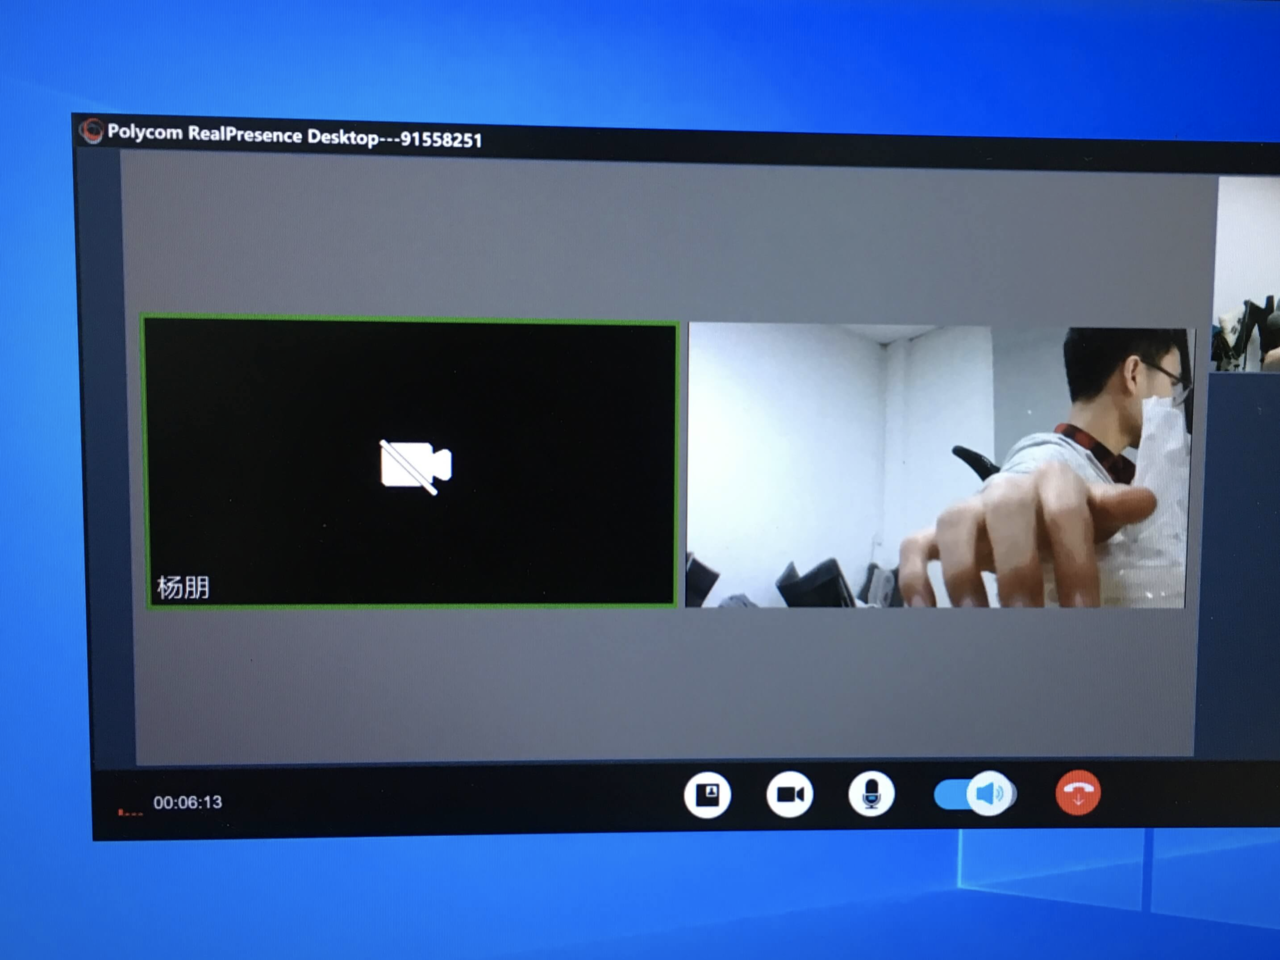
上图是三人会议,一方看到另外两人的经过混合后的视频流(两个小窗口的画面、连同灰色背景,都在一帧YUV中)。
基于以上需求,需要MCU服务器在混屏时对混合后的视频进行处理。比如:
- 把每个窗口的人的名字写到该窗口的左下角;
- 如果哪个人声音最大,就把他的窗口用一个绿框标识出来。
能完成这些功能的,据我所知有OpenCV、FFmpeg。但OpenCV比较重,不适合用在后台;而且音视频服务器做一些图像处理、视频转码等功能时通常会选择FFmpeg。那FFmpeg似乎就成了必然的选择。
二、FFmpeg filter基础介绍
已经封装好的FFmpeg filter示例代码,参考 FfmpegFilter
这一部分主要对如何使用、使用过程中有哪些坑做一些说明。
1、编译
如果要使用FFmpeg的filter,需要在configure阶段加入开启filter选项。
(1) 开启filter
- 使用
./configure --list-filters查看FFmpeg支持的filter名字; - 使用文字功能,需要开启
drawtext这个filter:--enable-filter=drawtext;同时,drawtext依赖freetype,需要安装freetype库并且开启--enable-libfreetype; - 使用画框功能,需要开启
drawbox这个filter:--enable-filter=drawbox; - 以上两个filter都需要
scale这个filter,因此还需要--enable-filter=scale;
(2) 使用--disable-everything而不是--disable-all
FFmpeg库功能比较多,光filter就有上百个。通常编译FFmpeg时,会先使用--disable-all禁止所有功能,然后根据需要再--enable-xxx开启必要的功能。 亲测: 如果在configure阶段使用--disable-all,即使开启filter也不能生成对应的avfilter库。必须使用--disable-everything,然后把多生成的可执行文件禁掉,比如--disable-everything --disable-program等;
(3) 安利一个C++库管理工具Conan
以上编译通常比较耗时,而且编出来的库还只能在特定平台、特定编译器环境下使用。可以考虑使用Conan管理FFmpeg的构建。只需要编写一个conanfile.py菜谱文件,就可以在各个平台编译FFmpeg的不同版本,做到一劳永逸。 关于Conan的介绍和使用,可以参考另外的文档:
2、一些踩的坑
(1) 中文乱码
开始时我用了Console.ttf这个字体文件用来做字体渲染。发现英文比较丑,但是还能忍,中文乱码就不能忍了。然后想是不是换个字体就好了呢?换成微软雅黑后,不仅中文不乱码了,而且英文字符也比之前更加平滑好看些。
3、可能会有帮助的一段代码
有时候需要把一个小的YUV图像拷贝到一个大的YUV图像的指定位置上。比如上面一幅图左边窗口的白色摄像头,就是附在组合窗口中的一个静态图片。下面一段代码可以完成该功能,使用了libyuv的接口:
以下是工程中实际用到的代码,不能直接运行,但可以提供一些思路。
class FrontFramePosInfo
{
public:
    int width = 0;
    int height = 0;
    int leftTopPointX = 0;
    int leftTopPointY = 0;
};

/*
 * Brief:指定背景图像的宽高 和 前景图左上角的位置,计算前景图左上角的Y、U、V三个分量的偏移
 * Param composedWidth: 宽
 * Param composedHeight: 高
 * Param pointX: 位置横坐标(距离左上角水平距离)
 * Param pointY: 位置纵坐标(距离左上角垂直距离)
 * Return: 指定点在YUV图像上距离左上角的三个分量的偏移
 */
FrameProcessor::I420OffsetInfo FrameProcessorImpl::getOffsetByPoint(int composedWidth, int composedHeight,
                                                                    int pointX, int pointY)
{
    int startY = 0;
    int startU = composedWidth * composedHeight;
    int startV = composedWidth * composedHeight * 5 / 4;

    int offsetH = pointY;
    int offsetW = pointX;
    int offsetYA = offsetH * composedWidth;
    int offsetUVA = offsetH / 2 * composedWidth / 2;
    int offsetHW = offsetW;

    return FrameProcessor::I420OffsetInfo(startY + offsetYA + offsetHW,
                                          startU + offsetUVA + offsetHW / 2,
                                          startV + offsetUVA + offsetHW / 2);
}

/*
 * Brief:把一个前景图拷贝到背景图指定位置
 * Param backFrame: 背景图YUV
 * Param frontFrame: 前景图YUV
 * Param posInfo: 前景图在背景图的位置信息
 * Param proportionFixed: 是否固定前景图的宽高比,若为true,前景图可能会出现左右或上下留黑边的情况
 */
void FrameProcessorImpl::I420Copy(rtc::scoped_refptr<webrtc::I420Buffer>& backFrame,
                                  const rtc::scoped_refptr<webrtc::I420Buffer>& frontFrame,
                                  const FrontFramePosInfo& posInfo, bool proportionFixed)
{
    FrontFramePosInfo adjustedPosInfo = posInfo;
    if (proportionFixed)
    {
        bool topAndBottomBlack = (static_cast<float>(frontFrame->width()) / posInfo.width) >
                                 (static_cast<float>(frontFrame->height()) / posInfo.height);
        if (topAndBottomBlack)
        {
            adjustedPosInfo.width = posInfo.width;
            adjustedPosInfo.height = frontFrame->height() * posInfo.width / frontFrame->width();
            adjustedPosInfo.leftTopPointX = posInfo.leftTopPointX;
            adjustedPosInfo.leftTopPointY = posInfo.leftTopPointY + (posInfo.height - adjustedPosInfo.height) / 2;
        }
        else
        {
            adjustedPosInfo.height = posInfo.height;
            adjustedPosInfo.width = frontFrame->width() * posInfo.height / frontFrame->height();
            adjustedPosInfo.leftTopPointX = posInfo.leftTopPointX + (posInfo.width - adjustedPosInfo.width) / 2;
            adjustedPosInfo.leftTopPointY = posInfo.leftTopPointY;
        }
    }

    const I420OffsetInfo targetOffsetInfo = getOffsetByPoint(backFrame->width(), backFrame->height(),
                                                             adjustedPosInfo.leftTopPointX, adjustedPosInfo.leftTopPointY);

    rtc::scoped_refptr<webrtc::I420Buffer> srcFrame = frontFrame;
    if (srcFrame->width() != adjustedPosInfo.width || srcFrame->height() != adjustedPosInfo.height)
    {
        rtc::scoped_refptr<webrtc::I420Buffer> scaledBuffer = _bufferManager.getFreeBuffer(adjustedPosInfo.width, adjustedPosInfo.height);

        libyuv::I420Scale(srcFrame->DataY(), srcFrame->StrideY(),
                          srcFrame->DataU(), srcFrame->StrideU(),
                          srcFrame->DataV(), srcFrame->StrideV(),
                          srcFrame->width(), srcFrame->height(),
                          scaledBuffer->MutableDataY(), scaledBuffer->StrideY(),
                          scaledBuffer->MutableDataU(), scaledBuffer->StrideU(),
                          scaledBuffer->MutableDataV(), scaledBuffer->StrideV(),
                          scaledBuffer->width(), scaledBuffer->height(),
                          libyuv::FilterMode::kFilterBox);

        srcFrame = scaledBuffer;
    }

    libyuv::I420Copy(srcFrame->DataY(), srcFrame->StrideY(),
                     srcFrame->DataU(), srcFrame->StrideU(),
                     srcFrame->DataV(), srcFrame->StrideV(),
                     backFrame->MutableDataY() + targetOffsetInfo.offsetY, backFrame->width(),
                     backFrame->MutableDataY() + targetOffsetInfo.offsetU, backFrame->width() / 2,
                     backFrame->MutableDataY() + targetOffsetInfo.offsetV, backFrame->width() / 2,
                     srcFrame->width(), srcFrame->height());
}
参考文档
1、 官网Demo
2、 官网文档 drawbox
3、 官网文档 drawtext
4、 最简单的基于FFmpeg的AVfilter的例子-纯净版
5、 FFmpeg filter简介
6、 FFmpeg ‘scale’ filter not present, cannot convert pixel formats.