引入
本文主要是分析SpringMVC中DispatchServlet的初始化流程, 从Servlet的init方法调用开始, 到
WebApplicationCotext创建结束即本文的主要内容, 在web容器被初始化完成后, 就会开始初始化SpringMVC的九大
组件, 之后的文章便是对这九大组件的初始化进行分析,本文的最后, 在Web容器初始化完成后, 会引出SpringMVC是如
何开启九大组件的初始化过程的, 为了能够更好的理解, 笔者在之前已经分析了Spring监听器的源码, 有兴趣的话可以
先去看看哈
注意: 笔者分析源码时, 对于一些没有意义的代码都不会贴出来, 比如日志的打印以及try…catch
先来看看BeanWrapper的作用
public class User {
    private String name;

    .......getter/setter......
}

public static void main(String[] args) {
    User user = new User();
    BeanWrapper beanWrapper = new BeanWrapperImpl( user );
    System.out.println( user.getName() );
    beanWrapper.setPropertyValue( "name", "张三" );
    System.out.println( user.getName() );
}

分析:
    如果看过笔者之前分析Spring源码的同学可能就会清晰的了解到, Spring在创建完一个Bean对象的时候, 即在推
    断构造方法被调用完成之后, 会将创建好的bean实例用BeanWrapper这个类封装起来, 其实很简单, 就是
    new BeanWrapperImpl(bean), 这个类是Spring用来操作一个bean对象属性的工具, 使用它可以直接修改一个
    对象的属性

    如上面的main方法的代码, 执行后会有两行输出, 一行是null, 一行是"张三", 由此可见, 通过将一个对象包装
    成一个BeanWrapper后, 就能通过setPropertyValue来直接设置对象属性, 其底层就是利用反射来操作set方法
    而已
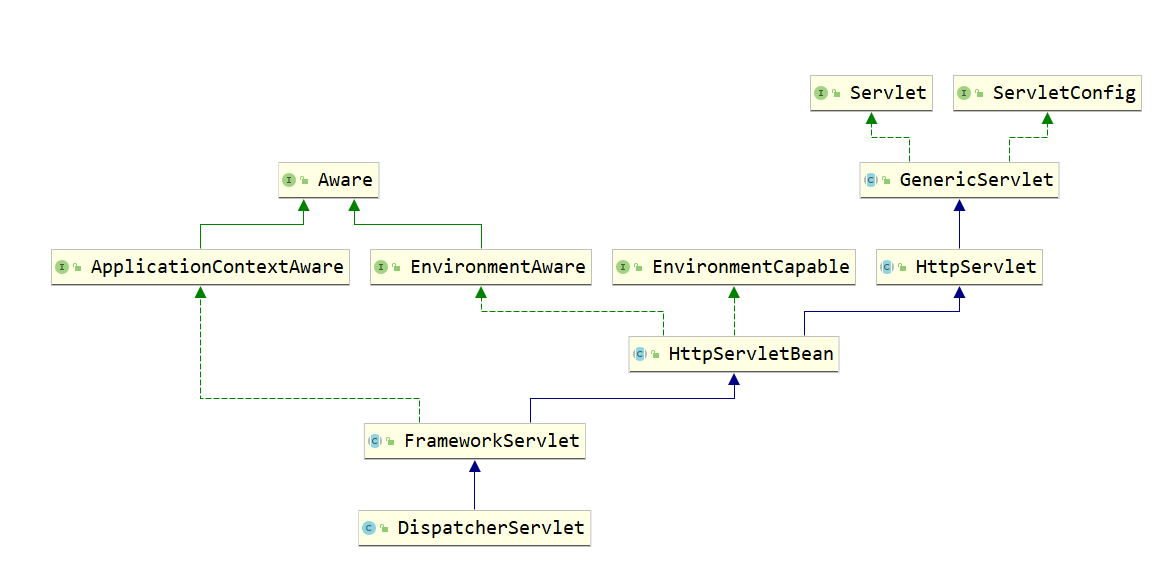
DispatcherServlet的继承体系结构
整个DispatcherServlet的继承体系如下图所示, 先来看看右边一块关于HttpServlet的继承体系, 在上篇文章中,笔
者深入的分析了整个HttpServlet的继承体系, 对每一个类主要完成的功能进行了详细的分析, 这里简单的回顾一下,
Servlet作为其顶层接口, 其直接实现类为GenericServlet, 在该类中, 主要是为了将init(ServletConfig config)
方法在被Tomcat等容器调用时传入的ServletConfig对象给保存下来, 并且提供了空参的init重载方法供子类完成初
始化工作, 与此同时, 该类实现了ServletConfig接口, 利用保存下来的ServletConfig属性对这些接口的实现进行
了填充, GenericServlet的直接子类HttpServlet, 主要是对父类的service方法进行了实现, 对不同类型的请求进
行判断, 调用不同的doXXX方法, 从而我们可以直接实现HttpServlet来配置我们请求被执行的逻辑

再来看看左半部分的内容, 在左半部分中, 主要的继承关系是HttpServletBean <#### FrameworkServlet
<#### DispatcherServlet, 而其他接口都是Spring中提供的扩展点, 实现XXXAware接口, 那么在Spring容器初始化过
程中, 合适的时机就会调用该对象的setXX方法, 如果有看过笔者之前分析Spring文章的同学应该就可以清晰的知道,
在initializeBean方法就是完成这些功能的

所以主要的核心就是HttpServletBean、FrameworkServlet、DispatcherServlet三个类了, 接下来我们就会开始
分析这三个类完成的功能
HttpServletBean
init方法触发Servlet的生命周期
回顾了下原来的Servlet继承体系, 我们得到一个重要的消息, 子类继承HttpServlet, 实现空参init方法, 则该方
法在Tomcat等web容器初始化Servlet的时候会调用该init方法, 于是我们可以联想到, 好像仅仅只有这个方式才能让
程序主动的执行我们提前写好的代码了

public final void init() throws ServletException {
    PropertyValues pvs = new ServletConfigPropertyValues(getServletConfig(), this.requiredProperties);
    if (!pvs.isEmpty()) {
        BeanWrapper bw = PropertyAccessorFactory.forBeanPropertyAccess(this);
        ResourceLoader resourceLoader = new ServletContextResourceLoader(getServletContext());
        bw.registerCustomEditor(Resource.class, new ResourceEditor(resourceLoader, getEnvironment()));
        initBeanWrapper(bw);
        bw.setPropertyValues(pvs, true);
    }

    initServletBean();
}

分析:
    首先我们可以看到, init方法一开始就创建了一个ServletConfigPropertyValues类, 参数是ServletConfig,
    大家现在应该很清楚这个里面是一定能获得ServletConfig的吧, 至于ServletConfig在哪里以及怎么放进去的
    之前已经说的很详细了

    可以看到ServletConfigPropertyValues是PropertyValues子类, 我们先不用管这个new的过程做了什么事情,
    主要明白一个事情,PropertyValues保存了key-value, 即属性名-属性值, 接着往下看:
        PropertyAccessorFactory.forBeanPropertyAccess(this)
    this指的是当前的DispatcherSerlvet本身, 因为HttpServletBean是一个抽象类, 在DispatcherServlet被创
    建时会调用到init方法, 这段代码里面很简单, 就是return new BeanWrapperImpl(target)

    到现在,相信大家应该会很清楚了,将DispatcherServlet对象封装成一个BeanWrapper,从而能够直接操作其属性

    initBeanWrapper是一个空方法, 子类没有对其进行任何的处理, 通过bw.setPropertyValues(pvs, true);
    我们可以联想到, 一定是往DispatcherServlet中设置了属性的值, 那么到底设置了什么呢?这就要看
    PropertyValues中保存了什么了
ServletConfigPropertyValues的构造方法的调用
private static class ServletConfigPropertyValues extends MutablePropertyValues {}

public ServletConfigPropertyValues(ServletConfig config, Set<String> requiredProperties) {

    Set<String> missingProps = (!CollectionUtils.isEmpty(requiredProperties) ?
            new HashSet<>(requiredProperties) : null);

    Enumeration<String> paramNames = config.getInitParameterNames();
    while (paramNames.hasMoreElements()) {
        String property = paramNames.nextElement();
        Object value = config.getInitParameter(property);
        addPropertyValue(new PropertyValue(property, value));
        if (missingProps != null) {
            missingProps.remove(property);
        }
    }

    // Fail if we are still missing properties.
    if (!CollectionUtils.isEmpty(missingProps)) {
        ....抛出异常.....
    }
}

分析:
    首先我们先不管第二个参数requiredProperties, 仅仅看SerlvetConfig做了什么事情, 获取所有的
    initParameterNames, 遍历一个个的paramNames, 取得其value, 将其封装成一个PropertyValue, 放入到
    MutablePropertyValues中的集合中

    在web.xml中配置DispatcherServlet的时候, 我们是可以指定initParam参数的, 如下:
        <servlet>
            <servlet-name>dispatchServlet</servlet-name>
            <servlet-class>org.springframework.web.servlet.DispatcherServlet</servlet-class>
            <init-param>
                <param-name>contextConfigLocation</param-name>
                <param-value>classpath:spring-mvc.xml</param-value>
            </init-param>
        </servlet>
    所以这个new方法做的事情就很清晰了, 获取ServletConfig中的所有init-param, 将其封装成PropertyValue,
    在之后调用BeanWrapper的setPropertyValue的时候, 将其设置到DispatcherServlet中, 所以说其实就是将
    contextConfigLocation的值设置到了DispatcherServlet中

    而这个requiredProperties的作用也很简单, 表示必须要设置哪些属性, 或者说, Servlet在配置的时候必须提
    供哪些初始化参数
总结
HttpServletBean这个类实现了HttpServlet, 实现了init空参方法, 在空参方法中, 将ServletConfig中配置的
initParam值设置到DispatcherServlet中的属性中(也有可能在父类), 然后调用了initServletBean模板方法就结
束了, 这个方法将会由子类实现
FrameworkServlet
initServletBean
protected final void initServletBean() throws ServletException {
    this.webApplicationContext = initWebApplicationContext();
    initFrameworkServlet();
}

分析:
    initServletBean的代码就两行, 一行是初始化Web版本的Spring容器, 一行是调用initFrameworkServlet方
    法, 该方法是一个空方法, 子类可以通过实现该方法进行一定的操作, 所以核心就是
    initWebApplicationContext, 将初始化完成的web容器设置到this.webApplicationContext, 即
    DispatcherServlet会持有一个指向web容器的引用
initWebApplicationContext初始化Web容器-第一部分
protected WebApplicationContext initWebApplicationContext() {
    WebApplicationContext rootContext =
            WebApplicationContextUtils.getWebApplicationContext(getServletContext());

    ..................................
}

分析:
    首先我们来看看initWebApplicationContext方法的第一部分, getServletContext方法获取ServletContext,
    在之前分析Servlet继承体系的时候, 笔者也深入分析了Servlet上下文的获取方式, 这里就不再讲解

    获取到Servlet上下文后, 调用getWebApplicationContext先获取一次web容器, 根据变量名可以看到, 叫做根
    容器, 于是我们可以联想联想到, Spring好像是可以设置父子容器的, 那么这个rootContext可能就会被作为我
    们web容器的父容器吗?

public static WebApplicationContext getWebApplicationContext(ServletContext sc) {
    return getWebApplicationContext(sc, WebApplicationContext.ROOT_WEB_APPLICATION_CONTEXT_ATTRIBUTE);
}

WebApplicationContext.ROOT_WEB_APPLICATION_CONTEXT_ATTRIBUTE = WebApplicationContext.class.getName() + ".ROOT";

public static WebApplicationContext getWebApplicationContext(ServletContext sc, String attrName) {
    Object attr = sc.getAttribute(attrName);
    if (attr == null) {
        return null;
    }
    return (WebApplicationContext) attr;
}

分析:
    可以清晰的看到, 其实getWebApplicationContext方法很简单, 就是从Servlet上下文中获取key为
    WebApplicationContext.ROOT的值而已, 也就是说, 我们可以通过Servlet上下文ServletContext的
    setAttribute方法设置一个根容器, 很显然, 从之前的代码分析中, 此时attr为null, 所以这个方法返回的
    是null
initWebApplicationContext初始化Web容器-第二部分
protected WebApplicationContext initWebApplicationContext() {
    ...................

    WebApplicationContext wac = null;

    if (this.webApplicationContext != null) {
        wac = this.webApplicationContext;
        if (wac instanceof ConfigurableWebApplicationContext) {
            ConfigurableWebApplicationContext cwac = (ConfigurableWebApplicationContext) wac;
            if (!cwac.isActive()) {
                if (cwac.getParent() == null) {
                    cwac.setParent(rootContext);
                }
                configureAndRefreshWebApplicationContext(cwac);
            }
        }
    }

    ...................
}

分析:
    this.webApplicationContext不为空并且其parent为null的时候, 那么会将this.webApplicationContext设
    置父容器为上面我们获取到的值, 通常情况下为null, 然后调用configureAndRefreshWebApplicationContext
    方法开始刷新容器

    我们首先联想一下什么时候this.webApplicationContext不为null, 可以看看FrameWorkServlet的构造方法,
    发现可以传入一个WebApplicationContext参数, 这个参数的值就被设置到了this.webApplicationContext,
    我们仔细想想, 好像这个构造方法我们也没机会调用啊, 那是因为采用了xml的配置方式来完成DispatcherServlet
    的初始化而已啊, 如果对无xml完成SpringMVC环境搭建有所了解的话, 就会知道, 在通过无XML配置的时候, 我
    们会手动创建DispatcherServlet, 并且传入一个Spring上下文, 如:
       AnnotationConfigWebApplicationContext context = new AnnotationConfigWebApplicationContext();
       context.register(SpringConfig.class);
       DispatcherServlet dispatcherServlet = new DispatcherServlet( context );
    这里笔者先不会去讲解如何实现无xml配置, 仅仅是为了通过这个引出什么时候this.webApplicationContext不
    为空而已, 在整个SpringMVC的源码分析的最后, 笔者会写一篇如何实现无xml完成SpringMVC环境搭建的文章,
    并且是无web.xml的吼,可以期待下哈

    所以通常情况下this.webApplicationContext是为null的
initWebApplicationContext初始化Web容器-第三部分
protected WebApplicationContext initWebApplicationContext() {
    ...................

    if (wac == null) {
        wac = findWebApplicationContext();
    }
    if (wac == null) {
        wac = createWebApplicationContext(rootContext);
    }

    if (!this.refreshEventReceived) {
        onRefresh(wac);
    }

    if (this.publishContext) {
        String attrName = getServletContextAttributeName();
        getServletContext().setAttribute(attrName, wac);
    }

    return wac;
}

分析:
    通过上面的流程, 我们已经知道了, wac是null的, 因为此时我们是采用xml的配置方式, 于是就会进入第一个对
    wac为null的判断

protected WebApplicationContext findWebApplicationContext() {
    String attrName = getContextAttribute();
    if (attrName == null) {
        return null;
    }
    WebApplicationContext wac =
            WebApplicationContextUtils.getWebApplicationContext(getServletContext(), attrName);
    if (wac == null) {
        throw new IllegalStateException("No WebApplicationContext found: initializer not registered?");
    }
    return wac;
}

分析:
    很简单, 就是获取ServletContext即Servlet上下文中的key为"WebApplicationContext..ROOT"的值嘛, 跟获
    取rootContext是一模一样的, 因为此时还没找到web容器, 就先看看Servlet上下文中存不存在程序员主动设置
    的, 如果存在, 就直接用就好了, 如果不存在, 那么就进入到了第二次wac == null的判断

    即调用createWebApplicationContext方法创建一个web上下文, 通常情况下我们的web上下文就是通过这个方式
    创建的

    再来看看最后两个判断:
        if (!this.refreshEventReceived) {
            onRefresh(wac);
        }

        if (this.publishContext) {
            String attrName = getServletContextAttributeName();
            getServletContext().setAttribute(attrName, wac);
        }

    很简单, 如果this.refreshEventReceived为false, 则调用onRefresh方法, 此时调用一次, 如果
    this.publishContext为true则将当前的web容器设置到Servlet上下文中, 就像我们之前从Servlet上下文中获
    取web容器一样, 通常情况下这个值为true, 接下来我们来说说, this.refreshEventReceived默认为false,
    什么时候this.refreshEventReceived为true呢?

小小的总结:
    首先经过对这个initWebApplicationContext的判断, 我们知道, web容器有三个来源, 一个是通过构造方法传
    进DispatcherServlet,通常用于无xml配置SpringMVC环境, 一个是设置在ServletContext中的, 还有一个是
    主动创建的, 第一种和第三种都会调用configureAndRefreshWebApplicationContext方法, 在该方法中, 就将
    这个this.refreshEventReceived设置为了true, 之后我们也能通过代码看到, 而通过从ServletContext中获
    取的就没有这个操作, 所以这个值仍然为false, 所以会进入判断, 从而调用onRefresh方法, 这个方法里面就完
    成了SpringMVC的九大组件的初始化, 相应的, 在configureAndRefreshWebApplicationContext方法中, 设置
    了this.refreshEventReceived为true后, 也会调用onRefresh方法, 正是因为这个时候调用了, 所以才要设置
    this.refreshEventReceived为true, 防止多次调用
createWebApplicationContext方法创建web容器
protected WebApplicationContext createWebApplicationContext(@Nullable ApplicationContext parent) {
    Class<?> contextClass = getContextClass();
    if (!ConfigurableWebApplicationContext.class.isAssignableFrom(contextClass)) {
        throw new ApplicationContextException();
    }
    ConfigurableWebApplicationContext wac =
            (ConfigurableWebApplicationContext) BeanUtils.instantiateClass(contextClass);

    wac.setEnvironment(getEnvironment());
    wac.setParent(parent);
    String configLocation = getContextConfigLocation();
    if (configLocation != null) {
        wac.setConfigLocation(configLocation);
    }
    configureAndRefreshWebApplicationContext(wac);

    return wac;
}

分析:
    getContextClass方法获取到FrameWorkServlet中的contextClass属性值, 这个属性值表示了需要创建的web
    容器类型, 默认值是XmlWebApplicationContext.class, 但是我们可以通过在web.xml中配置init-param初始
    化参数, key为contextClass, value为我们期望创建的web容器, 而在HttpServletBean中就会将这个值设置
    到contextClass属性中

    如果我们设置的contextClass不是ConfigurableWebApplicationContext类型的, 就会抛出一个异常, 否则通
    过BeanUtils工具类以反射的方式创建web容器, 与此同时设置Environment, 父容器, 并且将init-param中的
    contextConfigLocation的值(在HttpServletBean中已经将这个值设置到了DispatcherServlet中)设置到容器
    中, 因为之后容器会解析这个xml, 从而获取里面的bean等, 之后边便调用了
    configureAndRefreshWebApplicationContext方法
configureAndRefreshWebApplicationContext方法完成容器的刷新动作
protected void configureAndRefreshWebApplicationContext(ConfigurableWebApplicationContext wac) {
    wac.setServletContext(getServletContext());
    wac.setServletConfig(getServletConfig());
    wac.setNamespace(getNamespace());
    wac.addApplicationListener(new SourceFilteringListener(wac, new ContextRefreshListener()));

    ConfigurableEnvironment env = wac.getEnvironment();
    if (env instanceof ConfigurableWebEnvironment) {
        ((ConfigurableWebEnvironment) env).initPropertySources(getServletContext(), getServletConfig());
    }

    postProcessWebApplicationContext(wac);
    applyInitializers(wac);
    wac.refresh();
}

分析:
    前四行, 往容器中主动的设置了Servlet上下文, ServletConfig, Namespace, 以及一个
    SourceFilteringListener监听器, 这个监听器是核心, 之后我们会重点讲解其作用, 与此同时, 取出容器中的
    Environment, 传入Servlet上下文和ServletConfig, 作用就是在环境中保存这两个值而已

    postProcessWebApplicationContext方法是一个空方法, 提供给程序员扩展使用的, applyInitializers方法
    笔者不太清楚其作用, 这里不进行展开, 并且这个貌似很少用到.....

    ok, 又见到了我们熟悉的refresh方法了, 在笔者的Spring源码分析文章中, 已经对该方法进行了详细讲解, 该
    方法就是完成Spring容器的初始化流程的, 这里就不进行展开了
SourceFilteringListener监听器
private class ContextRefreshListener implements ApplicationListener<ContextRefreshedEvent> {
    @Override
    public void onApplicationEvent(ContextRefreshedEvent event) {
        FrameworkServlet.this.onApplicationEvent(event);
    }
}

public SourceFilteringListener(Object source, ApplicationListener<?> delegate) {
    this.source = source;
    this.delegate = (delegate instanceof GenericApplicationListener ?
            (GenericApplicationListener) delegate : new GenericApplicationListenerAdapter(delegate));
}

分析:
    查看ContextRefreshListener和SourceFilteringListener, 核心便是ContextRefreshListener, 可以看到
    该监听器是对ContextRefreshedEvent事件感兴趣的, 结合之前笔者对监听器源码分析的文章, 可以很容易的想
    到, 在refresh方法的最后, Spring就是主动的触发了这个事件, 这里用SourceFilteringListener包了一层,
    作用很简单, 期望在监听器中增加一个source属性, 将web容器保存下来而已, 这个就是一个典型的装饰者模式
    了!!!!

    当调用SourceFilteringListener的onApplicationEvent方法的时候, 就会委派给ContextRefreshListener,
    从而调用的是ContextRefreshListener的onApplicationEvent方法, 如下:
        public void onApplicationEvent(ApplicationEvent event) {
            if (event.getSource() == this.source) {
                onApplicationEventInternal(event);
            }
        }

        protected void onApplicationEventInternal(ApplicationEvent event) {
            this.delegate.onApplicationEvent(event);
        }

    接下来我们看看ContextRefreshListener.onApplicationEvent方法的做的事情!!!

    public void onApplicationEvent(ContextRefreshedEvent event) {
        this.refreshEventReceived = true;
        onRefresh(event.getApplicationContext());
    }

    大家是不是觉得突然清晰了, 先将this.refreshEventReceived设置为了true, 然后调用onRefresh方法, 设置
    为了true后就可以防止多次调用了!!!而onRefresh方法就完成了九大组件的初始化
总结
HttpServletBean的功能: 将ServletConfig中配置的初始化参数设置到DispatcherServlet中
FrameworkServlet的功能: 完成容器的初始化, 容器可以有三种方式获取, 通过构造方法传入(用于无xml实现Spring
                        MVC配置), 通过在Servlet上下文中设置attribute, 手动创建, 通常情况下是手动创建
                        容器, 在容器调用refresh方法的时候, 会触发ContextRefreshedEvent事件, 从而触
                        发ContextRefreshListener的onApplicationEvent方法的调用, 从而调用
                        DispatcherServlet的onRefresh方法
DispatcherServlet的功能: 完成九大组件的初始化