简介
- Future
Future表示异步计算的结果。 提供一些方法来检查,如果计算完成,等待它的完成,并获取计算的结果。
Future的结构:
public interface Future<V> {
 // 取消任务
    boolean cancel(boolean mayInterruptIfRunning);
    // 是否被取消
    boolean isCancelled();
 // 是否结束 boolean isDone(); // 获取任务执行的结果 V get() throws InterruptedException, ExecutionException; // 获取异步执行结果,有超时时间的限制,时间到了就会返回结果。 V get(long timeout, TimeUnit unit) throws InterruptedException, ExecutionException, TimeoutException; }
- FutureTask
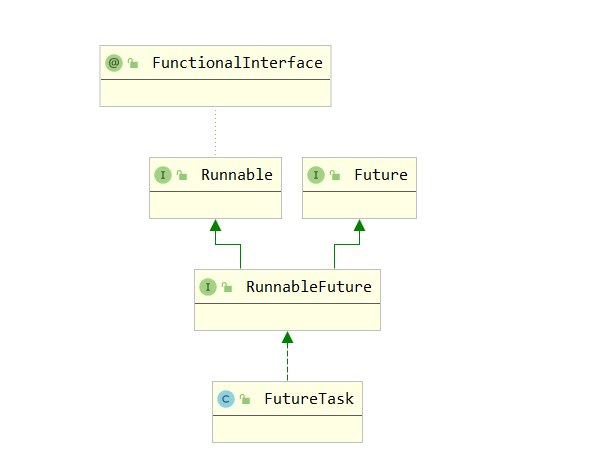 FutureTask类图
FutureTask实现了Runnable和Future接口,说明它具有两者的属相和表现形式,即:既可以当作一个任务交给线程去执行,又可以获取这个任务的各种执行状态和结果。
FutureTask就是个任务
使用
  public class MainDemo {
      public static void main(String[] args) throws Exception {
        //创建任务
          Callable callable = new callJob();
          FutureTask<String> futureTask = new FutureTask<String>(callable);
 // 开始运行任务 Thread thread = new Thread(futureTask); thread.start(); } private static class callJob implements Callable<String> { @Override public String call() throws Exception { System.out.println("callJob doing something........."); return "success"; } } }
1、 创建Callable任务,这是带有返回值的任务,泛型参数的类型就表示返回值的类型,这里简单的用字符串代替了。
2、 创建FutureTask,将Callable交给FutureTask。
3、 将FutureTask交给线程执行。
FutureTask有多个构造函数:
public FutureTask(Callable<V> callable) {
    if (callable == null)
        throw new NullPointerException();
    this.callable = callable;
    this.state = NEW;       // ensure visibility of callable
}
public FutureTask(Runnable runnable, V result) {
    this.callable = Executors.callable(runnable, result);
    this.state = NEW;       // ensure visibility of callable
}
第一种使用Callable,泛型代表返回值类型;第二种使用runnable和result,返回值类型由参数传入,Executors.callable(runnable, result)将参数包装成一个RunnableAdapter。
static final class RunnableAdapter<T> implements Callable<T> {
    final Runnable task;
    final T result;
    RunnableAdapter(Runnable task, T result) {
        this.task = task;
 this.result = result; } public T call() { // 最终执行的任务就是Runnable的run() task.run(); return result; } }
FutureTask在线程池中也有应用,submit()方法就是将任务包装成FutureTask然后返回一个Future对象用于获取任务的执行状态和结果。
源码分析
分析源码前可能需要熟悉相关知识和原理: 1.volatile 关键字,保证变量的内存可见性。 2.CAS原理,compareAndSwapObject、getDeclaredField()方法的作用。
FutureTask的成员变量和方法:
public class FutureTask<V> implements RunnableFuture<V> {
 // 任务状态
  private volatile int state;
    private static final int NEW          = 0;
    private static final int COMPLETING   = 1;
 private static final int NORMAL = 2; private static final int EXCEPTIONAL = 3; private static final int CANCELLED = 4; private static final int INTERRUPTING = 5; private static final int INTERRUPTED = 6; // 任务 private Callable<V> callable; // 结果 private Object outcome; // non-volatile, protected by state reads/writes // 运行任务的线程 private volatile Thread runner; // 等待任务的头节点 private volatile WaitNode waiters; // 原子操作的UNSAFE类以及state、runner、waiters的偏移量 private static final sun.misc.Unsafe UNSAFE; private static final long stateOffset; private static final long runnerOffset; private static final long waitersOffset; static { try { UNSAFE = sun.misc.Unsafe.getUnsafe(); Class<?> k = FutureTask.class; stateOffset = UNSAFE.objectFieldOffset (k.getDeclaredField("state")); runnerOffset = UNSAFE.objectFieldOffset (k.getDeclaredField("runner")); waitersOffset = UNSAFE.objectFieldOffset (k.getDeclaredField("waiters")); } catch (Exception e) { throw new Error(e); } } /*************************主要方法*********************/ // 返回结果 private V report(int s); // 是否取消了 public boolean isCancelled(); // 是否完成了 public boolean isDone(); // 取消任务 public boolean cancel(boolean mayInterruptIfRunning); // 获取结构 public V get(); public V get(long timeout, TimeUnit unit); // 正常执行情况下设置结果 protected void set(V v); // 执行中出现异常时设置异常 protected void setException(Throwable t); // 线程的run() public void run(); protected boolean runAndReset(); // 结束后的处理 private void finishCompletion() ; // 等待完成 private int awaitDone(boolean timed, long nanos); // 移除等待获取结果的线程 private void removeWaiter(WaitNode node);
变量
1、 state、 runner、 waiters三个成员变量是 volatile修饰的,也就是说这几个变量的具有内存可见性,当变量的值发生变化后,系统会立即将最新的值刷新回主内存,即使在不同的线程中,看到的变量的值也是一样的,都是最新的。
2、 state、runner、waiters的偏移量offset,在静态块中就初始化的,偏移量代表该变量的相对于对象的指针的相对位置,通过这个就可以得到对象中该变量的值。
状态
一共有7中状态,不同情况下状态的变化是不同的。任务初始状态是NEW
public FutureTask(Callable<V> callable) {
    if (callable == null)
        throw new NullPointerException();
    this.callable = callable;
    // 设置初始状态
 this.state = NEW; }
不同情况下的状态转变:
1、 正常执行:NEW -> COMPLETING -> NORMAL
2、 出现异常: NEW -> COMPLETING -> EXCEPTIONAL
3、 取消:NEW -> CANCELLED
4、 线程中断:NEW -> INTERRUPTING -> INTERRUPTED
方法
我们一个一个的分析FutureTask的方法:
1、 run()和runAndReset():
runAndReset()这里不分析,不过这个方法在schedule线程池中有用到,有时间可以研究一下。只分析run():
public void run() {
    if (state != NEW || !UNSAFE.compareAndSwapObject(this, runnerOffset,null, Thread.currentThread()))
        return;
    try {
        Callable<V> c = callable;
 if (c != null && state == NEW) { // 需要返回的结果 V result; // 是否正常执行 boolean ran; try { // 直接调用callable的call()方法,也就是我们的逻辑代码。 result = c.call(); // 如果代码执行到这里,说明没有异常,正常执行了 ran = true; } catch (Throwable ex) { // 出现异常时的处理 result = null; ran = false; // 设置异常结果 setException(ex); } if (ran) set(result); } } finally { // 这里清空了执行的线程变量,与方法开头的判断对应。 runner = null; // 任务状态 int s = state; if (s >= INTERRUPTING) handlePossibleCancellationInterrupt(s); } }
1、 任务能开始执行的条件有两个,一个是状态 state==NEW,一个是执行该任务的线程 runner==null。因为状态初始是NEW,直到任务执行完了state才会变成 COMPLETING ,光靠state==NEW一个条件是不可靠的,有可能此时其他线程正在执行该任务,但状态依然还是NEW,runner==null 说明没有其他线程在执行这个任务。所以需要两个条件结合起来判断。
2、 UNSAFE.compareAndSwapObject(this, runnerOffset,null, Thread.currentThread()),如果 runner==null,runner就被设置成当前线程。
出现异常时调用setException(ex):
protected void setException(Throwable t) {
 // 如果状态是NEW,就把状态改成COMPLETING
    if (UNSAFE.compareAndSwapInt(this, stateOffset, NEW, COMPLETING)) {
     // 保存异常结果
        outcome = t;
 // 把状态改成EXCEPTIONAL UNSAFE.putOrderedInt(this, stateOffset, EXCEPTIONAL); // final state finishCompletion(); } }
如果出现异常,则状态的转移为: NEW -> COMPLETING -> EXCEPTIONAL。
正常情况下调用set(result):
protected void set(V v) {
 // 如果状态是NEW,就把状态改成COMPLETING
    if (UNSAFE.compareAndSwapInt(this, stateOffset, NEW, COMPLETING)) {
     // 这是call()返回的结果
        outcome = v;
 // 把状态改成NORMAL UNSAFE.putOrderedInt(this, stateOffset, NORMAL); // final state // todo finishCompletion(); } }
正常情况下状态转移为:NEW -> COMPLETING -> NORMAL。
COMPLETING 只是个瞬时的过渡状态。
2、 cancel(boolean mayInterruptIfRunning):
public boolean cancel(boolean mayInterruptIfRunning) {
    if (!(state == NEW &&
          UNSAFE.compareAndSwapInt(this, stateOffset, NEW,
              mayInterruptIfRunning ? INTERRUPTING : CANCELLED)))
        return false;
 try { // in case call to interrupt throws exception if (mayInterruptIfRunning) { try { Thread t = runner; if (t != null) t.interrupt(); } finally { // final state UNSAFE.putOrderedInt(this, stateOffset, INTERRUPTED); } } } finally { finishCompletion(); } return true; }
- 如果是cancle(false),将state设置为 CANCELLED,然后结束。
- 如果是cancle(true),表明是由于线程中断,将state设置为 INTERRUPTING,然后走try代码块,调用当前线程的 interrupt(),设置线程的中断标志位true。这里只是给个中断的标记,并不真正终止线程,所以任务还是要继续。最后将将state设置为 INTERRUPTED, INTERRUPTING在这里也只是个瞬时的过渡状态。
这里可以取消的条件是state == NEW,通过run()可以得知,直到任务执行完了才把状态改为COMPLETING,之前一直是NEW,所以在任务执行的中途也是可以调用cancle()取消的。
3、get()和get(timeout,unit):
public V get(long timeout, TimeUnit unit)
    throws InterruptedException, ExecutionException, TimeoutException {
    if (unit == null)
        throw new NullPointerException();
    int s = state;
 // 判断是否执行完了 if (s <= COMPLETING && (s = awaitDone(true, unit.toNanos(timeout))) <= COMPLETING) throw new TimeoutException(); return report(s); }
这里判断任务是否执行完了是通过s <= COMPLETING,因为不管任务执行正常执行,还是出现异常,获取取消,state都是>COMPLETING的。
核心方法awaitDone(true, unit.toNanos(timeout))):
private int awaitDone(boolean timed, long nanos)
    throws InterruptedException {
    final long deadline = timed ? System.nanoTime() + nanos : 0L;
    // 当前线程被包装的等待队列节点
    WaitNode q = null;
 // 是否加入了等待的队列 boolean queued = false; for (;;) { if (Thread.interrupted()) { ------------------ 1 // q!=null是移除节点 removeWaiter(q); throw new InterruptedException(); } int s = state; // 任务结束了,返回 if (s > COMPLETING) { ----------------------------2 if (q != null) q.thread = null; return s; } // 如果正在完成,就等一下。。。 else if (s == COMPLETING) // cannot time out yet -------3 Thread.yield(); // 将当前线程包装成一个节点 else if (q == null) ------------------------------4 q = new WaitNode(); // 如果没有加入等待队列,就将自身加入链表的头部 else if (!queued)-----------------------------------5 queued = UNSAFE.compareAndSwapObject(this, waitersOffset, q.next = waiters, q); else if (timed) { -----------------------------------6 // 超时处理 nanos = deadline - System.nanoTime(); if (nanos <= 0L) { removeWaiter(q); return state; } // 使当前线程进入等待 LockSupport.parkNanos(this, nanos); } else ----------------------------------7 LockSupport.park(this); } }
- 执行任务的runner只能有一个,但是获取结果的waiter线程可以有多个。多个线程同时去调用get()获取结果,这些线程被包装成WaitNode并形成一个链表。
queued = UNSAFE.compareAndSwapObject(this, waitersOffset,q.next = waiters, q)原子性的将当前节点加入等待的队列头部。此时可能会有多个线程争相成为队列的头节点,所以需要防并发。
这里的分支较多,容易混乱。捋一下从开始到最后的执行过程:
假定任务此刻没有执行完,也没有通过cancle(true)取消,即state == NEW:
第一次:1、2、3都是false,进入到4,由于只能进入一个分支,开启第二次循环
第二次:1、2、3、4都是false,进入到5,如果加入队列不成功,下一次循环依然会进到这里,直到
queued==true
………………..
…………………
第N次:1、2、3、4、5都是false,如果有超时限制,进入到6,判断超时与否,如果超时就返回;没有的话就使线程进入等待。如果没有超时,直接让线程进入等待状态。
处于等待状态的线程等待其他线程将其唤醒。这个过程在 finishCompletion()中。
finishCompletion():
private void finishCompletion() {
    // assert state > COMPLETING;
    for (WaitNode q; (q = waiters) != null;) {
        if (UNSAFE.compareAndSwapObject(this, waitersOffset, q, null)) {
            for (;;) {
 Thread t = q.thread; if (t != null) { q.thread = null; LockSupport.unpark(t); } WaitNode next = q.next; if (next == null) break; q.next = null; // unlink to help gc q = next; } break; } } done(); callable = null; // to reduce footprint }
该方法就是依次从队列中拿出等待的线程,用LockSupport.unpark(t)将其唤醒。唤醒的线程就可以去执行report(int s):
private V report(int s) throws ExecutionException {
    Object x = outcome;
    if (s == NORMAL)
        return (V)x;
    if (s >= CANCELLED)
 throw new CancellationException(); throw new ExecutionException((Throwable)x); }
执行到这里的时候,表明任务已经执行完了,但是我们前面讲到过cancle()取消执行,将状态改为了CANCELLED或者INTERRUPTED,但并没有真正阻止任务执行。这里s >= CANCELLED就是处理这种情况的,如果任务中间被取消了,这里就抛出异常,不给出返回结果。
总结:
1、 只能有一个线程执行异步任务,当异步任务执行结束后,此时可能正常结束,异常结束或被取消。
2、 可以多个线程并发获取异步任务执行结果,当异步任务还未执行完,此时获取异步任务的线程将加入线程等待列表进行等待。
3、 当我们调用FutureTask.cancel方法时并不能真正停止执行异步任务的线程,只是发出中断线程的信号。但是只要cancel方法返回true,此时即使异步任务能正常执行完,此时我们调用get方法获取结果时依然会抛出CancellationException异常。
本文使用 tech.souyunku.com 排版