Feign简介
- Feign是一种声明式、模板化的HTTP客户端。声明式调用就像调用本地方法一样调用远程方法,无感知远程HTTP请求,让我们无需关注与远程的交互细节,更无需关注分布式环境开发。
- 集成 Ribbon 和 Eureka 提供的负载均衡的客户端,支持断路器Hystrix,实现服务熔断和降级 。
基本使用
1.引入jar包
<dependency>
    <groupId>org.springframework.cloud</groupId>
    <artifactId>spring-cloud-starter-openfeign</artifactId>
    <version>2.1.2.RELEASE</version>
</dependency>
2.启动类加注解EnableFeignClients
@SpringBootApplication
@ComponentScan(basePackages = {"com.example","com.mock"})
@EnableFeignClients(basePackages = {"com.example"})
public class DemoApplication {
    public static void main(String[] args) {
        SpringApplication.run(DemoApplication.class, args);
    }
}
3.定义接口及方法
@FeignClient(value = "userService")
public interface UserFeignClient {
    @RequestMapping("/user/id")
    String findById(String id);
}
4.业务中调用
@Resource
private UserFeignClient userFeignClient;
@Override
public String findUser(String id) {
    return userFeignClient.findById(id);
}
通过以上方式,让我们在微服务之间调用就如同调用本地方法一般,内部的HTTP远程调用细节全部封装在Feign客户端中。
源码解读
1.启动扫描过程
启动类注解EnableFeignClients引入FeignClientsRegistrar,这个类实现了ImportBeanDefinitionRegistrar接口,在IOC容器的启动过程中,会扫描到该接口是实现类并注册为bean definition,最终添加到容器中。
@Override
    public void registerBeanDefinitions(AnnotationMetadata metadata,
            BeanDefinitionRegistry registry) {
            // 注册默认的配置
        registerDefaultConfiguration(metadata, registry);
        // 为每一个添加了FeignClient的接口注册一个FeignClientFactoryBean
        registerFeignClients(metadata, registry);
    }
这个过程并没有实例化bean到容器中,只是先解析成BeanDefinition。default.com.example.demo.DemoApplication
第一步,registerDefaultConfiguration()方法:
private void registerDefaultConfiguration(AnnotationMetadata metadata,
      BeanDefinitionRegistry registry) {
      // 获取启动类EnableFeignClients注解的属性
   Map<String, Object> defaultAttrs = metadata
         .getAnnotationAttributes(EnableFeignClients.class.getName(), true);
    // 如果存在defaultConfiguration,则解析EnableFeignClients配置类
    // 然后构造beanName,为default+启动类的全限定名
   if (defaultAttrs != null && defaultAttrs.containsKey("defaultConfiguration")) {
      String name;
      if (metadata.hasEnclosingClass()) {
         name = "default." + metadata.getEnclosingClassName();
      }
      else {
         name = "default." + metadata.getClassName();
      }
      // 这里执行注册配置类到容器中(这个方法在下面其他地方还有用到)
      registerClientConfiguration(registry, name,
            defaultAttrs.get("defaultConfiguration"));
   }
}
registerClientConfiguration()方法:
private void registerClientConfiguration(BeanDefinitionRegistry registry, Object name,
      Object configuration) {
   BeanDefinitionBuilder builder = BeanDefinitionBuilder
         .genericBeanDefinition(FeignClientSpecification.class);
   // 添加name
   builder.addConstructorArgValue(name);
   // 添加指定的配置
   builder.addConstructorArgValue(configuration);
   registry.registerBeanDefinition(
         name + "." + FeignClientSpecification.class.getSimpleName(),
         builder.getBeanDefinition());
}
这里将EnableFeignClients上配置的defaultConfiguration属性值包装成一个FeignClientSpecification放到容器中。
我们来看FeignClientSpecification这个类的结构,name就是default,configuration就是我们defaultConfiguration属性指定的配置类。
class FeignClientSpecification implements NamedContextFactory.Specification {
   private String name;
   private Class<?>[] configuration;
 }
需要注意的是,这里是将我们配置的类包装进一个FeignClientSpecification对象中,即使我们在启动类注解上没有指定配置类,这里仍然会存在一个FeignClientSpecification,只是它的configuration为空而已。
注册默认配置的过程结束。
第二步,registerFeignClients()方法:
EnableFeignClients有几个属性是用来指定FeignClient的,registerFeignClients方法前面部分就是在解析获取需要扫描包的,这里不做细说。
String[] basePackages() default {};
Class<?>[] basePackageClasses() default {};
Class<?>[] clients() default {};
我们来看真正注册FeignClient的代码:
- 解析每个客户端的配置
for (String basePackage : basePackages) {
   Set<BeanDefinition> candidateComponents = scanner
         .findCandidateComponents(basePackage);
   for (BeanDefinition candidateComponent : candidateComponents) {
      if (candidateComponent instanceof AnnotatedBeanDefinition) {
         // verify annotated class is an interface
         AnnotatedBeanDefinition beanDefinition = (AnnotatedBeanDefinition) candidateComponent;
         AnnotationMetadata annotationMetadata = beanDefinition.getMetadata();
         Assert.isTrue(annotationMetadata.isInterface(),
               "@FeignClient can only be specified on an interface");
        // 获取FeignClient注解的属性
         Map<String, Object> attributes = annotationMetadata
               .getAnnotationAttributes(
                     FeignClient.class.getCanonicalName());
        // 按照优先级将配置的contextId,value,name,,serviceId值当做FeignClint的唯一的名称,这个名称会与该客户端绑定。
         String name = getClientName(attributes);
         // 如同解析启动类注解的配置类一样,这里解析各个Feign客户端指定的配置类。再一次调用了registerClientConfiguration方法。
         registerClientConfiguration(registry, name,
               attributes.get("configuration"));
        // 注册客户端
         registerFeignClient(registry, annotationMetadata, attributes);
      }
   }
}
这里再一次调用了registerClientConfiguration方法,会为每一个FeignClient生成一个FeignClientSpecification。所以,如果我们的的程序中有N个Feign客户端,那么IOC容器中就会有N+1个FeignClientSpecification。
- 注册客户端
private void registerFeignClient(BeanDefinitionRegistry registry,
      AnnotationMetadata annotationMetadata, Map<String, Object> attributes) {
   String className = annotationMetadata.getClassName();
   // 这里是将每个客户端解析后包装成FeignClientFactoryBean
   BeanDefinitionBuilder definition = BeanDefinitionBuilder
         .genericBeanDefinition(FeignClientFactoryBean.class);
   validate(attributes);
   definition.addPropertyValue("url", getUrl(attributes));
   definition.addPropertyValue("path", getPath(attributes));
   String name = getName(attributes);
   definition.addPropertyValue("name", name);
   String contextId = getContextId(attributes);
   definition.addPropertyValue("contextId", contextId);
   definition.addPropertyValue("type", className);
   definition.addPropertyValue("decode404", attributes.get("decode404"));
   definition.addPropertyValue("fallback", attributes.get("fallback"));
   definition.addPropertyValue("fallbackFactory", attributes.get("fallbackFactory"));
   definition.setAutowireMode(AbstractBeanDefinition.AUTOWIRE_BY_TYPE);
   String alias = contextId + "FeignClient";
   AbstractBeanDefinition beanDefinition = definition.getBeanDefinition();
   boolean primary = (Boolean) attributes.get("primary"); // has a default, won't be
   beanDefinition.setPrimary(primary);
   String qualifier = getQualifier(attributes);
   if (StringUtils.hasText(qualifier)) {
      alias = qualifier;
   }
   BeanDefinitionHolder holder = new BeanDefinitionHolder(beanDefinition, className,
         new String[] { alias });
   BeanDefinitionReaderUtils.registerBeanDefinition(holder, registry);
}
这里是将客户端配置的各种属性解析后放到FeignClientFactoryBean对象中,如同之前包装配置类一样,这里将客户端信息再一次进行了包装。如同BeanDefinition是对bean进行描述,FeignClientFactoryBean是对feign客户端进行描述。
class FeignClientFactoryBean implements FactoryBean<Object>, InitializingBean, ApplicationContextAware {
   private Class<?> type;
   private String name;
   private String url;
   private String contextId;
   private String path;
   private boolean decode404;
   private ApplicationContext applicationContext;
   private Class<?> fallback = void.class;
   private Class<?> fallbackFactory = void.class;
  }
FeignClientFactoryBean的属性与FeignClient对应。
启动过程执行流程图:
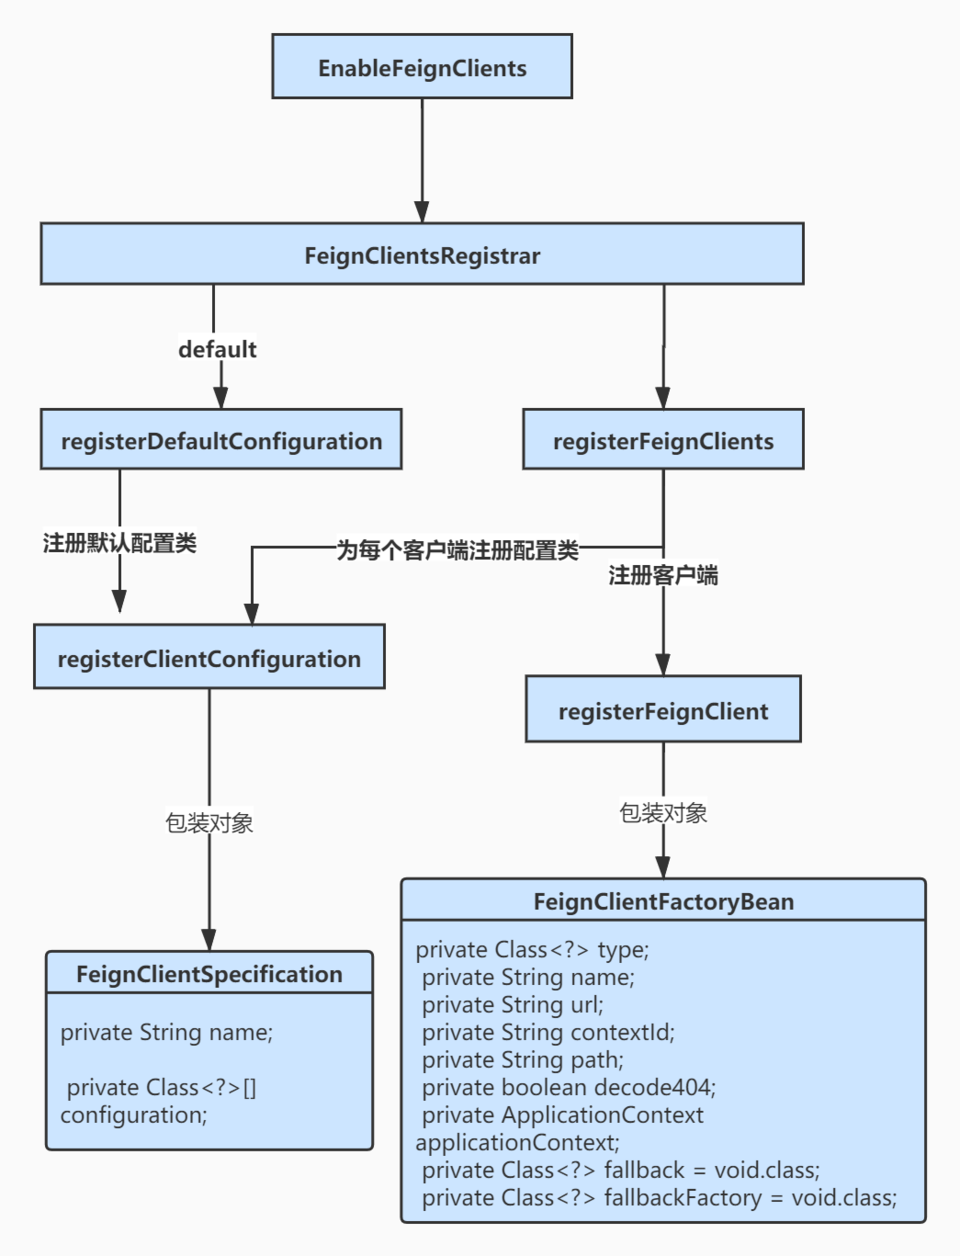 启动加载流程图
总结:1.注册N+1个配置描述类FeignClientSpecification
2、注册客户端描述类FeignClientFactoryBean
3、因为feign是面向接口,接口不能实例化,所以将客户端信息包装后,再通过这个包装类获取代理类
2.实例化客户端代理类
FeignClientFactoryBean这个类是Feign中核心的类,获取代理类的入口就在这里。
getTarget方法最终会返回一个代理类,这个代理类最终被注入IOC容器中。
<T> T getTarget() {
   FeignContext context = this.applicationContext.getBean(FeignContext.class);
   Feign.Builder builder = feign(context);
   if (!StringUtils.hasText(this.url)) {
      if (!this.name.startsWith("http")) {
         this.url = "http://" + this.name;
      }
      else {
         this.url = this.name;
      }
      this.url += cleanPath();
      return (T) loadBalance(builder, context,
            new HardCodedTarget<>(this.type, this.name, this.url));
   }
   if (StringUtils.hasText(this.url) && !this.url.startsWith("http")) {
      this.url = "http://" + this.url;
   }
   String url = this.url + cleanPath();
   Client client = getOptional(context, Client.class);
   if (client != null) {
      if (client instanceof LoadBalancerFeignClient) {
         // not load balancing because we have a url,
         // but ribbon is on the classpath, so unwrap
         client = ((LoadBalancerFeignClient) client).getDelegate();
      }
      builder.client(client);
   }
   Targeter targeter = get(context, Targeter.class);
   return (T) targeter.target(this, builder, context,
         new HardCodedTarget<>(this.type, this.name, url));
}
2.1 FeignContext
FeignContext的类图:
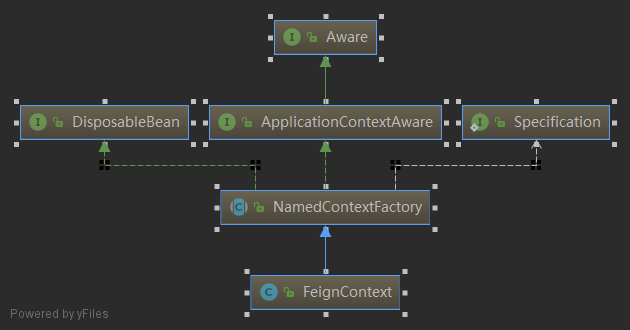 feigncontext类图
FeignAutoConfiguration:
根据springboot的starter机制,在feign的META-INF目录的spring.factories文件中可以找到FeignAutoConfiguration,
org.springframework.boot.autoconfigure.EnableAutoConfiguration=\
org.springframework.cloud.openfeign.ribbon.FeignRibbonClientAutoConfiguration,\
org.springframework.cloud.openfeign.FeignAutoConfiguration,\
org.springframework.cloud.openfeign.encoding.FeignAcceptGzipEncodingAutoConfiguration,\
org.springframework.cloud.openfeign.encoding.FeignContentGzipEncodingAutoConfiguration
public class FeignAutoConfiguration {
   @Autowired(required = false)
   private List<FeignClientSpecification> configurations = new ArrayList<>();
   @Bean
   public FeignContext feignContext() {
      FeignContext context = new FeignContext();
      context.setConfigurations(this.configurations);
      return context;
   }
 }
在这个自动装配的类中,会通过容器得到所有的FeignClientSpecification实例(就是在启动扫描中注册的默认配置和每个客户端配置),存入集合configurations中,在FeignContext构造方法中将这些配置设置进去。setConfigurations()方法是FeignContext父类NamedContextFactory中的方法。
NamedContextFactory:
public abstract class NamedContextFactory<C extends NamedContextFactory.Specification>
      implements DisposableBean, ApplicationContextAware {
   private final String propertySourceName;
   private final String propertyName;
    // 存放子容器的地方
   private Map<String, AnnotationConfigApplicationContext> contexts = new ConcurrentHashMap<>();
    // 这里存放的是所有的FeignClientSpecification,N+1
   private Map<String, C> configurations = new ConcurrentHashMap<>();
   private ApplicationContext parent;
   private Class<?> defaultConfigType;
所以,所有的FeignClientSpecification都存入了configurations集合中。我们还需要关注的是contexts这个属性,存放的是为每个客户端创建的子容器。
FeignContext为feign上下文,全局只有一个,里面保存了各个客户端的配置以及子容器。
2.2 Feign.Builder
Builder是Feign的一个内部类。我们看一下他们的结构。
public abstract class Feign {
    public static class Builder {
      private final List<RequestInterceptor> requestInterceptors =
          new ArrayList<RequestInterceptor>();
      private Logger.Level logLevel = Logger.Level.NONE;
      private Contract contract = new Contract.Default();
      private Client client = new Client.Default(null, null);
      private Retryer retryer = new Retryer.Default();
      private Logger logger = new NoOpLogger();
      private Encoder encoder = new Encoder.Default();
      private Decoder decoder = new Decoder.Default();
      private QueryMapEncoder queryMapEncoder = new QueryMapEncoder.Default();
      private ErrorDecoder errorDecoder = new ErrorDecoder.Default();
      private Options options = new Options();
      private InvocationHandlerFactory invocationHandlerFactory =
          new InvocationHandlerFactory.Default();
      private boolean decode404;
      private boolean closeAfterDecode = true;
      private ExceptionPropagationPolicy propagationPolicy = NONE;
      }
}
Feign的大部分功能都是通过Builder实现的,我们只需要关注Builder即可。Builder中包含客户端发送和接收请求重要的组件,包括编码器encoder、解码器decoder以及最终执行的Client。feign可以针对每个客户端做不同的配置,所以,这里就是保存了每个客户端需要的组件,如果程序中没有显式的指定组件,那么就使用默认的。Builder中的组件最终也会保存到我们生成的代理类中,在执行请求或者解析响应结果是会用到各自的组件。
接下来我们进入Feign.Builder builder = feign(context)分析具体过程:
protected Feign.Builder feign(FeignContext context) {
    // 从子容器中获取decoder、encoder等组件。
   FeignLoggerFactory loggerFactory = get(context, FeignLoggerFactory.class);
   Logger logger = loggerFactory.create(this.type);
   Feign.Builder builder = get(context, Feign.Builder.class)
         // required values
         .logger(logger)
         .encoder(get(context, Encoder.class))
         .decoder(get(context, Decoder.class))
         .contract(get(context, Contract.class));
    // 加载配置文件定义的decoder、encoder组件
   configureFeign(context, builder);
   return builder;
}
该方法具体过程可分为两步:一是从子容器中获取组件配置,二是从配置文件中获取组件配置。所以,配置文件的配置会覆盖代码中配置的,这样可以让我们通过更改配置文件来更改客户端使用的组件,变得更灵活。
- 从容器中加载配置
这里多次调用了get()方法,如下所示:
protected <T> T get(FeignContext context, Class<T> type) {
   T instance = context.getInstance(this.contextId, type);
   if (instance == null) {
      throw new IllegalStateException(
            "No bean found of type " + type + " for " + this.contextId);
   }
   return instance;
}
调用FeignContext父类NamedContextFactory中的方法:
public <T> T getInstance(String name, Class<T> type) {
   AnnotationConfigApplicationContext context = getContext(name);
   if (BeanFactoryUtils.beanNamesForTypeIncludingAncestors(context,
         type).length > 0) {
      return context.getBean(type);
   }
   return null;
}
虽然get()方法的入参是FeignContext,但并没有直接从FeignContext获取组件的实例,而是先从FeignContext获取当前客户端的子容器,然后从子容器中获取相应实例。
再看getContext(name)方法:
protected AnnotationConfigApplicationContext getContext(String name) {
   if (!this.contexts.containsKey(name)) {
      synchronized (this.contexts) {
         if (!this.contexts.containsKey(name)) {
         // 创建子容器
            this.contexts.put(name, createContext(name));
         }
      }
   }
   // 返回当前客户端的子容器
   return this.contexts.get(name);
}
子容器保存在map中,如果有的化直接返回,没有的话会使用createContext(name)创建一个。
创建子容器的过程:
protected AnnotationConfigApplicationContext createContext(String name) {
    //创建一个上下文实例
   AnnotationConfigApplicationContext context = new AnnotationConfigApplicationContext();
   // 注册当前客户端的配置类。之前提到的为每个客户端创建的**FeignClientSpecification**,里面包含了我们指定的配置类
   if (this.configurations.containsKey(name)) {
      for (Class<?> configuration : this.configurations.get(name)
            .getConfiguration()) {
         context.register(configuration);
      }
   }
   // 注册默认的配置类,即名称是以default开头的(启动类EnabledFeignClients注解上的)。
   for (Map.Entry<String, C> entry : this.configurations.entrySet()) {
      if (entry.getKey().startsWith("default.")) {
         for (Class<?> configuration : entry.getValue().getConfiguration()) {
            context.register(configuration);
         }
      }
   }
   context.setDisplayName(generateDisplayName(name));
   // 刷新当前的容器,会将我们配置的bean添加到子容器中。关于spring中refresh()方法的过程,太复杂,不细说。
   context.refresh();
   return context;
}
创建子容器后,会把默认的以及我们为每个FeignClient配置的类加载的到子容器中,然后刷新子容器。
Feign会为每个客户端创建一个子容器,这个容器中保存了各自的组件配置,包括编码器、解码器等,做到配置隔离。
获取到子容器后,就可以从中获取配置类中指定的组件。
Feign.Feign.Builder builder = get(context, Feign.Builder.class)
                // required values
                .logger(logger)
                .encoder(get(context, Encoder.class))
                .decoder(get(context, Decoder.class))
                .contract(get(context, Contract.class)); builder = get(context, Feign.Builder.class)
      // required values
      .logger(logger)
      .encoder(get(context, Encoder.class))
      .decoder(get(context, Decoder.class))
      .contract(get(context, Contract.class));
通过链式编程将各种组件设置到Builder中。
- 从配置文件中加载配置
protected void configureFeign(FeignContext context, Feign.Builder builder) {
   FeignClientProperties properties = this.applicationContext
         .getBean(FeignClientProperties.class);
         // 使用配置文件
   if (properties != null) {
   // 这里要判断defaultConfig的值。
   // 下面分支里面执行的代码基本一样,只是顺序不一样,后面的会把前面相同的配置给覆盖。
   // 所以,如果defaultConfig为true的,那么优先使用配置文件。这也是默认配置
   // 如果defaultConfig为false,那么优先使用代码的配置。
      if (properties.isDefaultToProperties()) {
         configureUsingConfiguration(context, builder);
         configureUsingProperties(
               properties.getConfig().get(properties.getDefaultConfig()),
               builder);
         configureUsingProperties(properties.getConfig().get(this.contextId),
               builder);
      }
      else {
         configureUsingProperties(
               properties.getConfig().get(properties.getDefaultConfig()),
               builder);
         configureUsingProperties(properties.getConfig().get(this.contextId),
               builder);
         configureUsingConfiguration(context, builder);
      }
   }
   else {
    //使用代码中配置的
      configureUsingConfiguration(context, builder);
   }
}
FeignClientProperties的内部类FeignClientConfiguration就是的配置文件类,配置项会解析到这个类中。
public class FeignClientProperties {
    // 是否使用默认的配置
   private boolean defaultToProperties = true;
    // 配置文件参数对应的前缀
   private String defaultConfig = "default";
    // 保存各个配置的集合,key是配置文件中读取的。
   private Map<String, FeignClientConfiguration> config = new HashMap<>();
在properties或yaml配置文件中使用,上面是默认default的配置,下面是userService的配置,default和userService可以根据具体的服务更改。示例:
# default
feign.client.config.default.decode404=true
feign.client.config.default.connect-timeout=1000
feign.client.config.default.decoder=com.example.demo.feign.config.DefaultDecoder
# userService
feign.client.config.userService.connect-timeout=111
feign.client.config.userService.decode404=false
feign.client.config.userService.decoder=com.example.demo.feign.config.UserDecoder
配置项会读取到Map<String, FeignClientConfiguration> config = new HashMap<>()中,例如上面的配置,key就是default和userService。
如果没有在文件中配置,就会直接使用代码的配置。如果在配置文件中配置了,要视defaultConfig的值而定,影响到优先级问题,不过无论如果在配置文件中配置的针对某个服务单独配置的总是优先于default的。
2.3 获取代理类
我们现在只分析不考虑负载均衡的情况:
return targeter.target(this, builder, context, new HardCodedTarget<>(this.type, this.name, url));
首先是创建了HardCodedTarget对象,保存了type,name,url。
DefaultTargeter中:
class DefaultTargeter implements Targeter {
   @Override
   public <T> T target(FeignClientFactoryBean factory, Feign.Builder feign,
         FeignContext context, Target.HardCodedTarget<T> target) {
      return feign.target(target);
   }
}
然后会调用Feign.Builder的target方法。我们前面分析过,Feign.Builder中保存了我们客户端需要的各种组件,现在代理类也是通过它来创建的。
public <T> T target(Target<T> target) {
  return build().newInstance(target);
}
public Feign build() {
    //创建MethodHandler的工厂()
  SynchronousMethodHandler.Factory synchronousMethodHandlerFactory =
      new SynchronousMethodHandler.Factory(client, retryer, requestInterceptors, logger,
          logLevel, decode404, closeAfterDecode, propagationPolicy);
  MethodHandler handlersByName =
      new ParseHandlersByName(contract, options, encoder, decoder, queryMapEncoder,
          errorDecoder, synchronousMethodHandlerFactory);
  return new ReflectiveFeign(handlersByName, invocationHandlerFactory, queryMapEncoder);
}
build()中首先是创建了一个工厂实例,这个工厂是用来创建MethodHandler的;然后创建MethodHandler,这是用来解析feign接口中的方法的。然后返回了一个
ReflectiveFeign。
newInstance(target):
public <T> T newInstance(Target<T> target) {
    // 解析接口的方法,每个方法都有一个MethodHandler
  Map<String, MethodHandler> nameToHandler = targetToHandlersByName.apply(target);
   // 将前面的名称与MethodHandler的映射转换为method与MethodHandler的映射。
  Map<Method, MethodHandler> methodToHandler = new LinkedHashMap<Method, MethodHandler>();
  List<DefaultMethodHandler> defaultMethodHandlers = new LinkedList<DefaultMethodHandler>();
  for (Method method : target.type().getMethods()) {
    // 判断是否是Object中的方法。
    if (method.getDeclaringClass() == Object.class) {
      continue;
    } else if (Util.isDefault(method)) {
    // 判断是否是接口中default方法。接口中不仅可以有抽象方法,还可以有default方法,具体的逻辑可以在其中实现。
      DefaultMethodHandler handler = new DefaultMethodHandler(method);
      defaultMethodHandlers.add(handler);
      methodToHandler.put(method, handler);
    } else {
    // 将转换后的存入另一个map中
      methodToHandler.put(method, nameToHandler.get(Feign.configKey(target.type(), method)));
    }
  }
  // JDK中动态代理的辅助类,通过factoy创建的。
  InvocationHandler handler = factory.create(target, methodToHandler);
  // 动态代理类
  T proxy = (T) Proxy.newProxyInstance(target.type().getClassLoader(),
      new Class<?>[] {target.type()}, handler);
 for (DefaultMethodHandler defaultMethodHandler : defaultMethodHandlers) {
defaultMethodHandler.bindTo(proxy);
}
return proxy;
}
1、 targetToHandlersByName.apply(target)。targetToHandlersByName是ReflectiveFeign的内部类,
public Map<String, MethodHandler> apply(Target key) {
    // 解析方法形成元数据
  List<MethodMetadata> metadata = contract.parseAndValidatateMetadata(key.type());
  Map<String, MethodHandler> result = new LinkedHashMap<String, MethodHandler>();
  for (MethodMetadata md : metadata) {
    // create()构造出一个MethodHandler
    result.put(md.configKey(),factory.create(key, md, buildTemplate, options, decoder, errorDecoder));
  }
  return result;
}
之前提到过SynchronousMethodHandler是MehodHandler是实现类,而SynchronousMethodHandler.Factory是负责创建它的工厂。
final class SynchronousMethodHandler implements MethodHandler {
  private static final long MAX_RESPONSE_BUFFER_SIZE = 8192L;
  private final MethodMetadata metadata;
  private final Target<?> target;
  private final Client client;
  private final Retryer retryer;
  private final List<RequestInterceptor> requestInterceptors;
  private final Logger logger;
  private final Logger.Level logLevel;
  private final RequestTemplate.Factory buildTemplateFromArgs;
  private final Options options;
  private final Decoder decoder;
  private final ErrorDecoder errorDecoder;
  private final boolean decode404;
  private final boolean closeAfterDecode;
  private final ExceptionPropagationPolicy propagationPolicy;
}
创建出来的SynchronousMethodHandler对象中就包含了客户端的各种组件、参数以及方法元数据。至此,我们可以分析一下,客户端的各种参数配置,不管是代码里面也好,还是通过配置文件配的也好,它最终都被封装到了这个对象中。这个对象的Invoke()也是最终执行远程调用的方法,到时候都会用到这些组件参数。
1、 我们知道JDK的动态代理需要一个辅助类,这里的辅助类就是 InvocationHandler handler = factory.create(target, methodToHandler)这里创建的。这也有个专门创建辅助类的工厂,create()创建的是FeignInvocationHandler对象,它也是ReflectiveFeign的内部类,不过这个类中有两个属性target和dispatch,target中有feign接口的type,name,url,dispatch则是接口中所有方法的映射。
private final Target target;
private final Map<Method, MethodHandler> dispatch;
1、 创建代理类并返回
2.4 接口调用
我们知道JDK动态代理在调用目标类的方法时总是会调用InvocationHandler 辅助类的invoke()方法。在这里,创建的是FeignInvocationHandler的实现类对象,所以我们调用feign接口方法是调用的就是FeignInvocationHandler的invoke()方法。
@Override
public Object invoke(Object proxy, Method method, Object[] args) throws Throwable {
  // 入参method就是当前被调用方法对应的Method实例。
  return dispatch.get(method).invoke(args);
}
1、 dispatch.get(method)得到的是当前方法对应的MethodHandler
2、 invoke(args)执行的是MethodHandler的方法,这里是 MethodHandler的实现类SynchronousMethodHandler对象,所以我们看SynchronousMethodHandler的invoke()方法。
@Override
public Object invoke(Object[] argv) throws Throwable {
  RequestTemplate template = buildTemplateFromArgs.create(argv);
  Retryer retryer = this.retryer.clone();
  while (true) {
    try {
    // 真正去执行HTTP请求了
      return executeAndDecode(template);
    } catch (RetryableException e) {
      try {
        retryer.continueOrPropagate(e);
      } catch (RetryableException th) {
        Throwable cause = th.getCause();
        if (propagationPolicy == UNWRAP && cause != null) {
          throw cause;
        } else {
          throw th;
        }
      }
      if (logLevel != Logger.Level.NONE) {
        logger.logRetry(metadata.configKey(), logLevel);
      }
      continue;
    }
  }
}
executeAndDecode(template)是真正去执行HTTP请求了。
整个过程可以用一个时序图来表示:
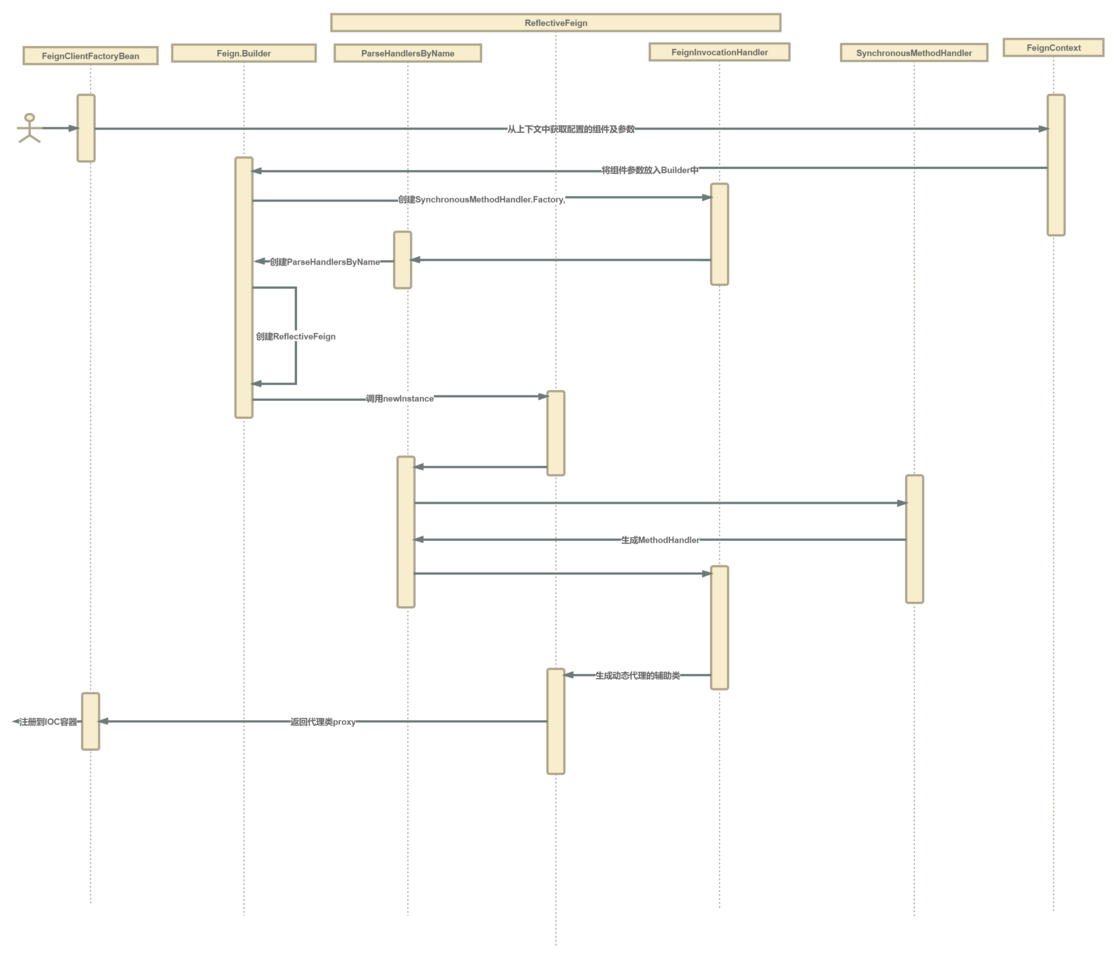 Feign代理类创建过程
总体流程就是:启动时加载配置文件及每个客户端的组件,封装到Feign.Builder中,然后创建ReflectiveFeign实例,将method与MethodHandler进行映射存入FeignInvocationHandler中。调用FeignClient方法时只需要根据method取出对应的MethodHandler实例,然后执行invoke即可。