前提:
我们先来体验下npm包http-server的功能
 访问下试试,有点牛皮的样子
  访问下html试试
  直接展示出来,是不是有种后台中出渲染的感觉
实现
下面我们来整一个吧
我们先来整理下步骤:
1、 创建一个http服务应用
2、 可显示文件直接显示
3、 目录文件我们要列出目录里面所有的目录和文件 大家可能会有疑问,第3个怎么展示呢,我们可以使用模板呀
开发第一步:开发语法选择问题
- 有的人会说,我不会node呀,我可以使用es6语法么,答案肯定是可以的
- 下面我来介绍下,我们可以使用babel来转义成node支持的commonjs语法呀
@babel/core 主要是babel的核心模块
@babel/preset-env env这个预设是es6转es5的插件集合
babel-loader 是webpack和loader的桥梁
说到用到babel,那肯定少不了配置文件.babelrc文件啦,配置如下
{
  "presets": [
    ["@babel/preset-env", {
      "targets":{
        "node": "current"
      }
    }]
  ]
}
例如我们使用es6编写的代码是放在src目录下,我们可以写一个npm scripts 通过babel转成commonjs
"scripts": {
    "babel:dev": "babel ./src -d ./dist --watch",
    "babel": "babel ./src -d ./dist"
  },
这边是将我们的源码babel转移后到dist目录,用户使用到的其实就是我们dist目录内容了
npm包的使用习惯
正常我们开发的npm包怎么调试呢
答案可能有很多哈,我这边的话主要是推荐使用npm link 或者是sync-files(只是同步文件,需要配置node_modules对应的文件目录)
npm link是一种软链的方式去把当前目录 做一个软链到node全局安装的目录下,这样我们无论在哪里都可以使用了,其实真正访问的还是本地npm包的目录
 sync-files模式
//scripts指令:
sync-files --verbose ./lib $npm_config_demo_path
// 这边用到了npm的变量$npm_config_demo_path,需要配置.npmrc的文件
// demo_path = 实际要替换的依赖包地址
上面的npm link 还没说完,npm包要告诉我当前的包要从哪里开始执行怎么整呢
配置bin或者main方法
"bin": {
  "server": "./bin/www"
}, // 这边的指令名称可以随便起哈
第一步我们都介绍完了,我们要真正开始来实现了
第二步 代码实现
模板文件template.html
<!DOCTYPE html>
<html lang="en">
<head>
  <meta charset="UTF-8">
  <meta name="viewport" content="width=device-width, initial-scale=1.0">
  <title>模板数据</title>
</head>
<body>
  <ul>
    <% dirs.forEach(dir => {%>
      <li><a href="<%=pathname%>/<%=dir%>"><%=dir%></a></li>
    <% }) %>
  </ul>
</body>
</html>
main.js文件主要是让我们做一个类似于http-server脚手架的一个展示信息,我们接收参数,可以引用commander这个包
import commander from "commander";
import Server from './server';

commander.option('-p, --port <val>', "please input server port").parse(process.argv);
let config = {
  port: 3000
}
Object.assign(config, commander);
const server = new Server(config);
server.start();
这个文件里面我们只是监听了命令的入参,可以使用-p 或者–p来传一个参数
如果不传,我这边会有个初始的端口
然后我们传给了server.js
import fs from "fs";
import http from 'http';
import mime from 'mime';
import path from 'path';
import chalk from "chalk";
import url from 'url';
import ejs from 'ejs';
const { readdir, stat } = fs.promises;
// 同步读取下template.html文件内容
const template = fs.readFileSync(path.join(process.cwd(), 'template.html'), 'utf8');
class Server {
  constructor(config){
    this.port = config.port;
    this.template = template;
  }
  /**
   * 处理请求响应
   */
  async handleRequest(req, res){
    // 获取请求的路径和传参
    let {pathname, query} = url.parse(req.url, true);
    // 转义中文文件名处理(解决中文字符转义问题)
    pathname = decodeURIComponent(pathname);
    // 下面是解决 // 访问根目录的问题
    let pathName = pathname === '/' ? '': pathname;
    let filePath = path.join(process.cwd(), pathname);
    try {
      // 获取路径的信息
      const statObj = await stat(filePath);
      // 判断是否是目录
      if(statObj.isDirectory()) {
        // 先遍历出所有的目录节点
        const dirs = await readdir(filePath);
        // 如果当前是目录则通过模板来解析出来
        const content = ejs.render(this.template, {
          dirs,
          pathname:pathName
        });
        res.setHeader('Content-Type', 'text/html;charset=utf-8');
        res.statusCode = 200;
        res.end(content);
      } else {
        // 如果是文件的话要先读取出来然后显示出来
        this.sendFile(filePath, req, res, statObj);
      }
    }catch(e) {
      // 出错了则抛出404
      this.handleErr(e, res);
    }
  }
  /**
   * 处理异常逻辑
   * @param {*} e
   * @param {*} res
   */
  handleErr(e, res){
    console.log(e);
    res.setHeader('Content-Type', 'text/plain;charset=utf-8');
    res.statusCode = 404;
    res.end('资源未找到')
  }

  /**
   * 处理文件模块
   */
  sendFile(filePath, req, res, statObj){
    console.log(chalk.cyan(filePath));
    res.statusCode = 200;
    let type = mime.getType(filePath);
    // 当前不支持压缩的处理方式
    res.setHeader('Content-Type', `${type};charset=utf-8`);
    fs.createReadStream(filePath).pipe(res);
  }
  start(){
    // 创建http服务
    let server = http.createServer(this.handleRequest.bind(this));
    server.listen(this.port, () => {
      console.log(`${chalk.yellow('Starting up http-server, serving')} ${chalk.cyan('./')}
${chalk.yellow('Available on:')}
  http://127.0.0.1:${chalk.green(this.port)}
Hit CTRL-C to stop the server`)
    })
  }
}

export default Server;
总计下:
1、 获取到请求过来的路径pathname,首先我们要处理下中文兼容性的问题,浏览器会帮我们urlEncode,所以我们要decodeURIComponent一下
还有pathname默认为’/’,我们要判断下,为了模板里面跳转逻辑准备的, // 会指向到根目录去
2、 判断当前的路径对应的是文件夹还是文件
3、 文件的话,使用mime包查询到当前文件的类型,设置Content-type,把文件读出来的流给到响应流返回
4、 如果是文件夹的话,我们需要使用模板文件内容通过ejs传入readdir的目录结果和pathname去渲染页面,res返回的Content-type设置为text/html
5、 如果没有找到直接返回http 404 code码
上面其实就实现了个简单的http-server
那么我们想下我们能做些什么优化呢???
优化点
1、 压缩
2、 http缓存
优化点一:压缩方案
怎么压缩呢,我们来看下http请求内容吧,里面可能会注意到
Accept-Encoding: gzip, deflate, br
浏览器支持什么方式我们就是什么方式
我们使用zlib包来做压缩操作吧
代码走一波
import fs from "fs";
import http from 'http';
import mime from 'mime';
import crypto from 'crypto';
import path from 'path';
import chalk from "chalk";
import url from 'url';
import ejs from 'ejs';
import zlib from 'zlib';
const { readdir, stat } = fs.promises;
const template = fs.readFileSync(path.join(process.cwd(), 'template.html'), 'utf8');
class Server {
  constructor(config){
    this.port = config.port;
    this.template = template;
  }
  /**
   * 压缩文件处理
   */
  zipFile(filePath, req, res){
    // 使用zlib库去压缩对应的文件
    // 获取请求头数据Accept-Encoding来识别当前浏览器支持哪些压缩方式
    const encoding = req.headers['accept-encoding'];
    console.log('encoding',encoding);
    // 如果当前有accept-encoding 属性则按照匹配到的压缩模式去压缩,否则不压缩 gzip, deflate, br 正常几种压缩模式有这么几种
    if(encoding) {
      // 匹配到gzip了,就使用gzip去压缩
      if(/gzip/.test(encoding)) {
        res.setHeader('Content-Encoding', 'gzip');
        return zlib.createGzip();
      } else if (/deflate/.test(encoding)) { // 匹配到deflate了,就使用deflate去压缩
        res.setHeader('Content-Encoding', 'deflate');
        return zlib.createDeflate();
      }
      return false;
    } else {
      return false;
    }
  }
  /**
   * 处理请求响应
   */
  async handleRequest(req, res){
    let {pathname, query} = url.parse(req.url, true);
    // 转义中文文件名处理
    pathname = decodeURIComponent(pathname);
    let pathName = pathname === '/' ? '': pathname;
    let filePath = path.join(process.cwd(), pathname);
    try {
      const statObj = await stat(filePath);
      if(statObj.isDirectory()) {
        // 先遍历出所有的目录节点
        const dirs = await readdir(filePath);
        // 如果当前是目录则通过模板来解析出来
        const content = ejs.render(this.template, {
          dirs,
          pathname:pathName
        });
        res.setHeader('Content-Type', 'text/html;charset=utf-8');
        res.statusCode = 200;
        res.end(content);
      } else {
        // 如果是文件的话要先读取出来然后显示出来
        this.sendFile(filePath, req, res, statObj);
      }
    }catch(e) {
      // 出错了则抛出404
      this.handleErr(e, res);
    }
  }
  /**
   * 处理异常逻辑
   * @param {*} e
   * @param {*} res
   */
  handleErr(e, res){
    console.log(e);
    res.setHeader('Content-Type', 'text/plain;charset=utf-8');
    res.statusCode = 404;
    res.end('资源未找到')
  }
  /**
   * 处理文件模块
   */
  sendFile(filePath, req, res, statObj){
    let zip = this.zipFile(filePath, req, res);
    res.statusCode = 200;
    let type = mime.getType(filePath);
    if(!zip) {
      // 当前不支持压缩的处理方式
      res.setHeader('Content-Type', `${type};charset=utf-8`);
      fs.createReadStream(filePath).pipe(res);
    } else {
      fs.createReadStream(filePath).pipe(zip).pipe(res);
    }
  }
  start(){
    let server = http.createServer(this.handleRequest.bind(this));
    server.listen(this.port, () => {
      console.log(`${chalk.yellow('Starting up http-server, serving')} ${chalk.cyan('./')}
${chalk.yellow('Available on:')}
  http://127.0.0.1:${chalk.green(this.port)}
Hit CTRL-C to stop the server`)
    })
  }
}

export default Server;
这边加个方法zipFile,来匹配浏览器支持的类型来做压缩,压缩也要给res告诉浏览器我服务端是根据什么来压缩的res.setHeader(‘Content-Encoding’, ‘***’);
压缩之前:
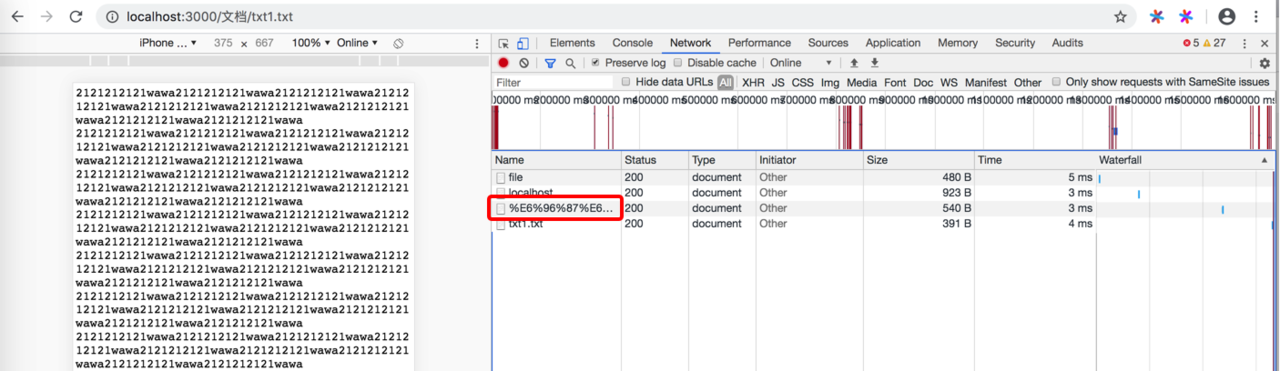
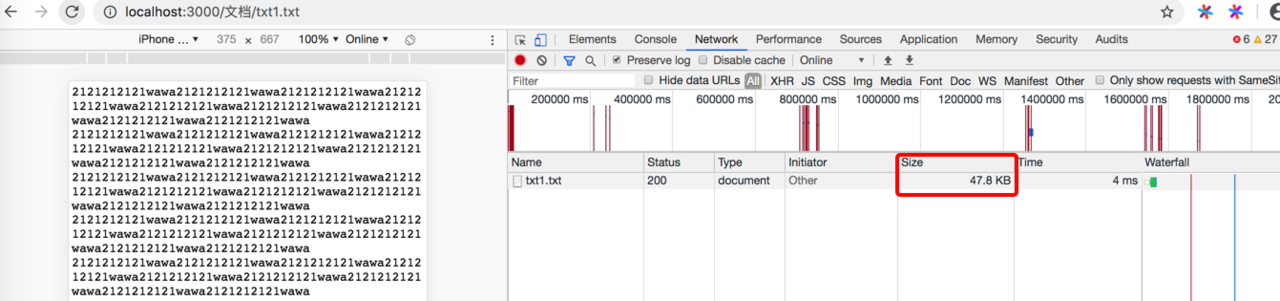 压缩之后:
压缩之后:
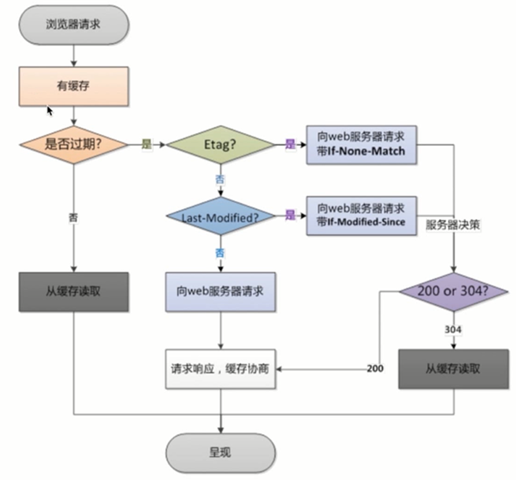
优化点二:http缓存 强缓存和协商缓存
我们整理下
强缓存是http 200
cache-control 可以设置max-age 相对时间 几秒
     no-cache 是请求下来的内容还是会保存到缓存里,每次都还是要请求数据
     no-store  代表不会将数据缓存下来
Expires 绝对时间,需要给出一个特定的值 协商缓存是http 304
Etag 判断文件内容是否有修改
Last-Modified 文件上一次修改时间 根据这个方案我们来做优化
import fs from "fs";
import http from 'http';
import mime from 'mime';
import crypto from 'crypto';
import path from 'path';
import chalk from "chalk";
import url from 'url';
import ejs from 'ejs';
import zlib from 'zlib';
const { readdir, stat } = fs.promises;
const template = fs.readFileSync(path.join(process.cwd(), 'template.html'), 'utf8');
class Server {
  constructor(config){
    this.port = config.port;
    this.template = template;
  }
  /**
   * 压缩文件处理
   */
  zipFile(filePath, req, res){
    // 使用zlib库去压缩对应的文件
    // 获取请求头数据Accept-Encoding来识别当前浏览器支持哪些压缩方式
    const encoding = req.headers['accept-encoding'];
    console.log('encoding',encoding);
    // 如果当前有accept-encoding 属性则按照匹配到的压缩模式去压缩,否则不压缩 gzip, deflate, br 正常几种压缩模式有这么几种
    if(encoding) {
      // 匹配到gzip了,就使用gzip去压缩
      if(/gzip/.test(encoding)) {
        res.setHeader('Content-Encoding', 'gzip');
        return zlib.createGzip();
      } else if (/deflate/.test(encoding)) { // 匹配到deflate了,就使用deflate去压缩
        res.setHeader('Content-Encoding', 'deflate');
        return zlib.createDeflate();
      }
      return false;
    } else {
      return false;
    }
  }
  /**
   * 处理请求响应
   */
  async handleRequest(req, res){
    let {pathname, query} = url.parse(req.url, true);
    // 转义中文文件名处理
    pathname = decodeURIComponent(pathname);
    let pathName = pathname === '/' ? '': pathname;
    let filePath = path.join(process.cwd(), pathname);
    try {
      const statObj = await stat(filePath);
      if(statObj.isDirectory()) {
        // 先遍历出所有的目录节点
        const dirs = await readdir(filePath);
        // 如果当前是目录则通过模板来解析出来
        const content = ejs.render(this.template, {
          dirs,
          pathname:pathName
        });
        res.setHeader('Content-Type', 'text/html;charset=utf-8');
        res.statusCode = 200;
        res.end(content);
      } else {
        // 如果是文件的话要先读取出来然后显示出来
        this.sendFile(filePath, req, res, statObj);
      }
    }catch(e) {
      // 出错了则抛出404
      this.handleErr(e, res);
    }
  }
  /**
   * 处理异常逻辑
   * @param {*} e
   * @param {*} res
   */
  handleErr(e, res){
    console.log(e);
    res.setHeader('Content-Type', 'text/plain;charset=utf-8');
    res.statusCode = 404;
    res.end('资源未找到')
  }
  /**
   * 缓存文件
   * @param {*} filePath
   * @param {*} req
   * @param {*} res
   */
  cacheFile(filePath, statObj, req, res) {
    // 读出上一次文件中的变更时间
    const lastModified = statObj.ctime.toGMTString();
    const content = fs.readFileSync(filePath);
    // 读取出当前文件的数据进行md5加密得到一个加密串
    const etag = crypto.createHash('md5').update(content).digest('base64');
    res.setHeader('Last-Modified', lastModified);
    res.setHeader('Etag', etag);
    // 获取请求头的数据 If-Modified-Since 对应上面res返回的Last-Modified
    const ifLastModified = req.headers['if-modified-since'];
    // 获取请求头的数据 If-None-Match 对应上面res返回的Etag
    const ifNoneMatch = req.headers['if-none-match'];
    console.log(ifLastModified,lastModified);
    console.log(ifNoneMatch,etag);
    if(ifLastModified && ifNoneMatch) {
      if(ifLastModified === lastModified || ifNoneMatch === etag) {
        return true;
      }
      return false;
    }
    return false;
  }
  /**
   * 处理文件模块
   */
  sendFile(filePath, req, res, statObj){
    console.log(chalk.cyan(filePath));
    // 设置cache的时间间隔,表示**s内不要在访问服务器
    res.setHeader('Cache-Control', 'max-age=3');
    // 如果强制缓存,首页是不会缓存的 访问的页面如果在强制缓存,则会直接从缓存里面读取,不会再请求了
    // res.setHeader('Expires', new Date(Date.now()+ 3*1000).toGMTString())
    // res.setHeader('Cache-Control', 'no-cache'); // no-cache 是请求下来的内容还是会保存到缓存里,每次都还是要请求数据
    // res.setHeader('Cache-Control', 'no-store'); // no-store 代表不会将数据缓存下来
    // 在文件压缩之前可以先走缓存,查看当前的文件是否是走的缓存出来的数据
    const isCache = this.cacheFile(filePath, statObj, req, res);
    if(isCache) {
      res.statusCode = 304;
      return res.end();
    }
    let zip = this.zipFile(filePath, req, res);
    res.statusCode = 200;
    let type = mime.getType(filePath);
    if(!zip) {
      // 当前不支持压缩的处理方式
      res.setHeader('Content-Type', `${type};charset=utf-8`);
      fs.createReadStream(filePath).pipe(res);
    } else {
      fs.createReadStream(filePath).pipe(zip).pipe(res);
    }
  }
  start(){
    let server = http.createServer(this.handleRequest.bind(this));
    server.listen(this.port, () => {
      console.log(`${chalk.yellow('Starting up http-server, serving')} ${chalk.cyan('./')}
${chalk.yellow('Available on:')}
  http://127.0.0.1:${chalk.green(this.port)}
Hit CTRL-C to stop the server`)
    })
  }
}

export default Server;
总结下:
正常来说强缓存和协商缓存是一起用的
强缓存设置cache-control 我们设置下缓存时间是3S,这边设置的是相对时间3S,不加协商缓存,我们试下看看
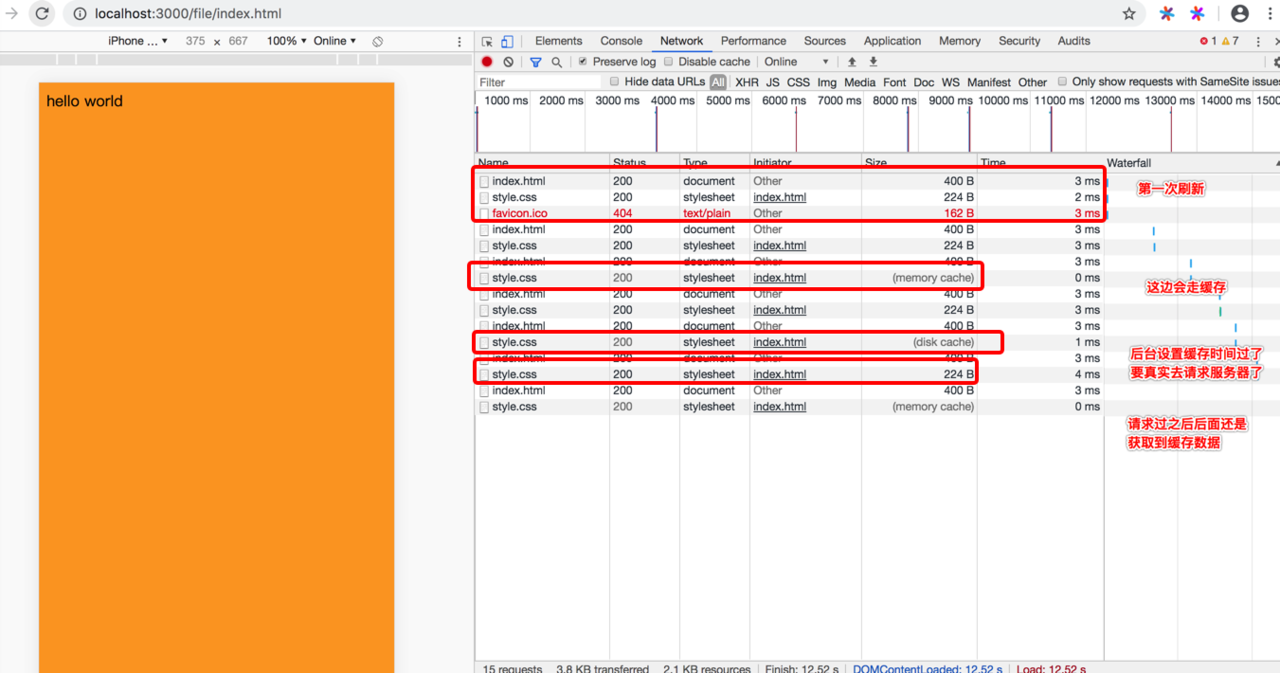 首页index.html入口文件是不会被缓存的,如果首页被缓存了,那么很多人断网的时候还能访问就是有问题了
Expires 使用是一样的,这个是传的绝对时间,过了这个时间就会失效的
下面我们加下协商缓存试下吧
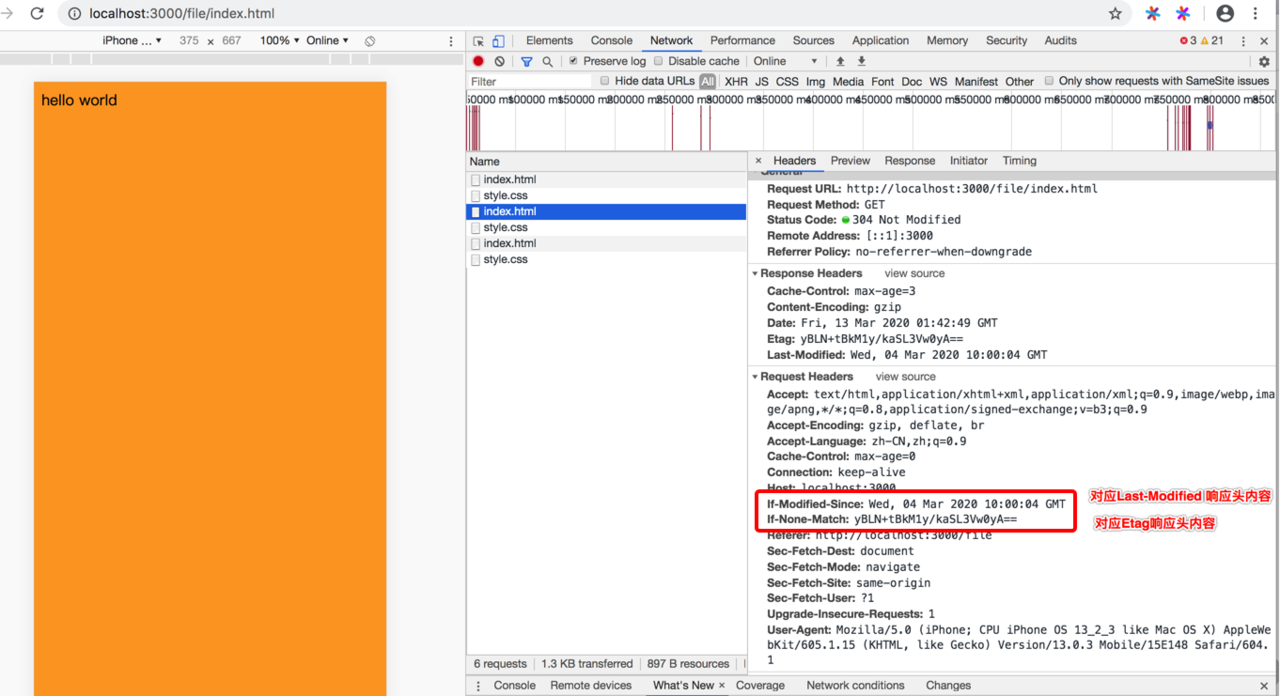
Last-Modified 这个正常来说这个值是放的文件的更新时间,我们这边使用stat获取到文件的ctime
Etag 官方说这个是一个新鲜复杂度的算法,这边为了方便处理,我的Etag没做什么算法处理,只是用文件内容md5加密成base64,内容长度固定,不会太大
我们第一次访问会将这2个值塞入到res响应头里面去
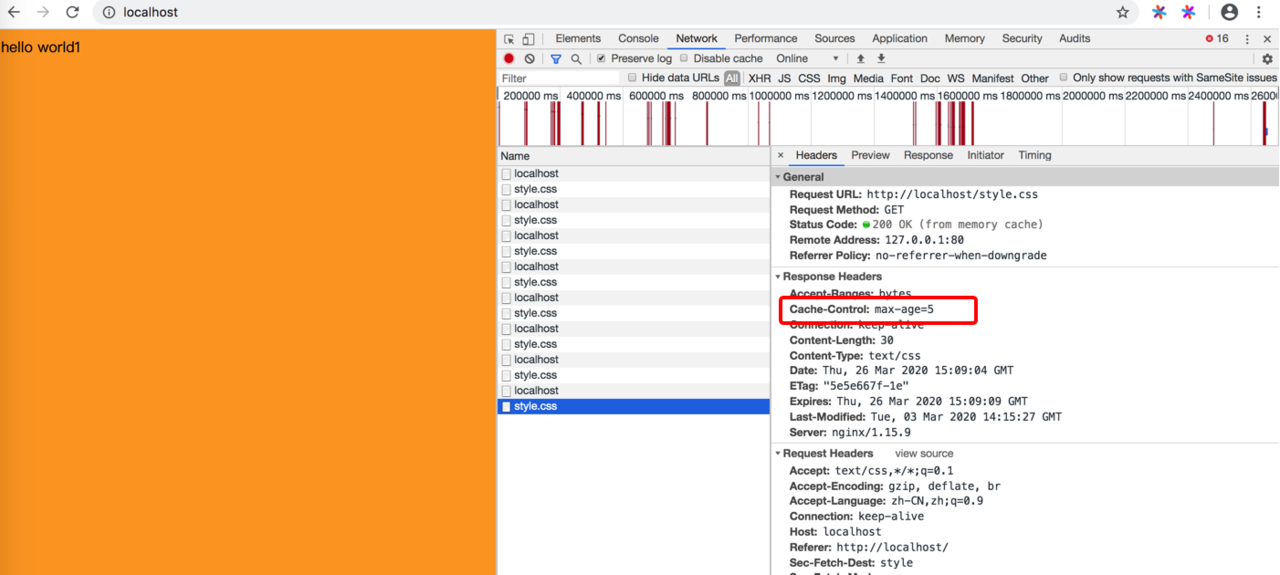
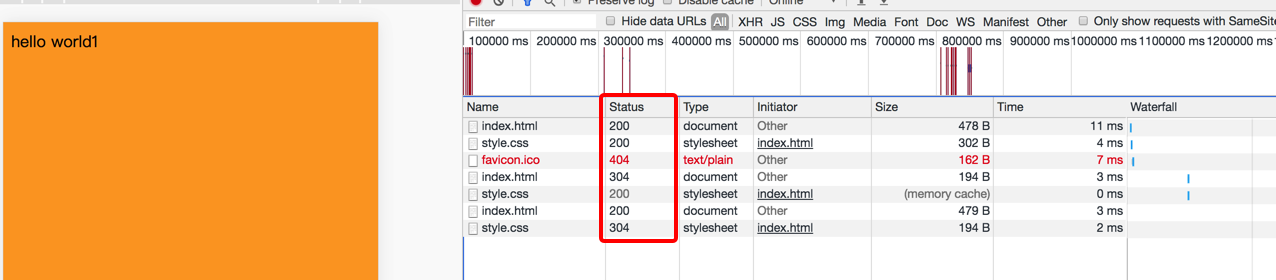
我们看来看下请求的内容
 我们来分析下:
第一次进来会是200,服务端响应头塞入了Etag,Last-Modified
在cache-control时间之内,我们请求头会有
If-Modified-Since -> Last-Modified
If-None-Match -> Etag
我们在服务端能拿到请求头,去跟读取出来的文件进行比较,如果没有改变会走304协商缓存
所有说304协商缓存一定会请求到服务端比较文件信息,200的话则不一定,有可能直接从缓存里面读取了
这样的好处是什么?
每次都去请求比较,没有变化就不管,有变化了就去重新请求数据
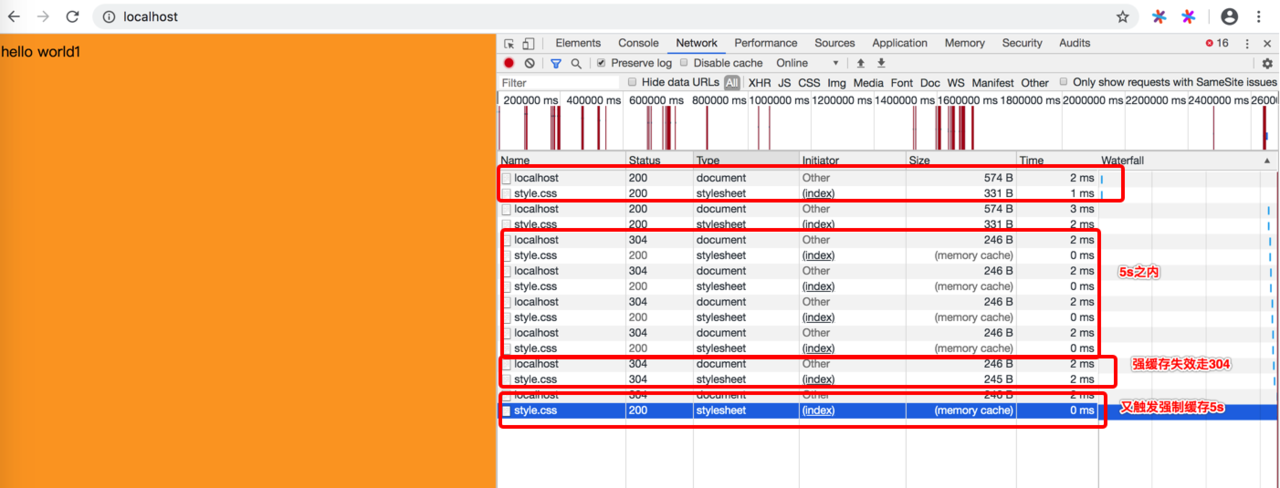
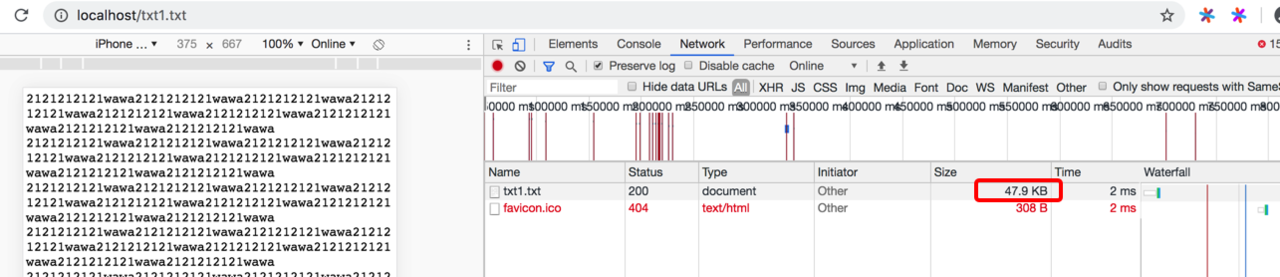
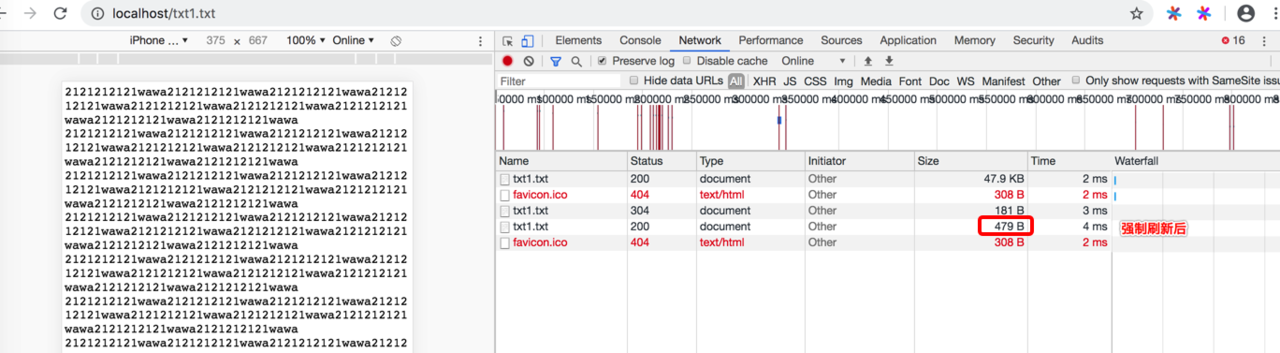
我们来试下看看 先请求,然后html文件内容改变了再去请求看看,就是下面这样
 我们来看看效果:

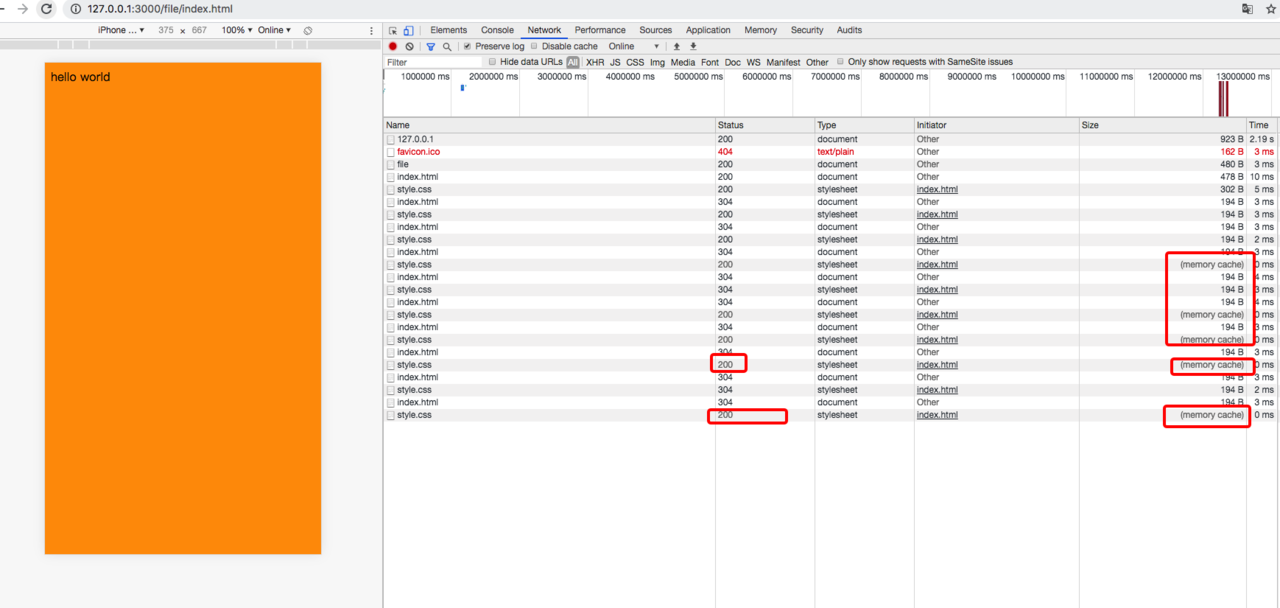
总结图:
nginx配置
nginx也可以配置缓存和gzip压缩哦
gzip配置
我们用txt文件来模拟比较清晰 大众通用配置
#开启gzip压缩
gzip on;
#http的协议版本
gzip_http_version 1.0;
#IE版本1-6不支持gzip压缩,关闭
gzip_disable 'MSIE[1-6].';
#需要压缩的文件格式 text/html默认会压缩,不用添加
gzip_types text/css text/javascript application/javascript image/jpeg image/png image/gif;
#设置压缩缓冲区大小,此处设置为4个8K内存作为压缩结果流缓存
gzip_buffers 4 8k;
#压缩文件最小大小
gzip_min_length 1k;
#压缩级别1-9
gzip_comp_level 9;
#给响应头加个vary,告知客户端能否缓存
gzip_vary on;
#反向代理时使用
gzip_proxied off;
我们本次测试配置
location ~ .*\.(txt)$ {
        #expires 5s;
        #proxy_cache_valid 200 5s;
        #开启gzip压缩
        gzip on;
        #需要压缩的文件格式 text/html默认会压缩,不用添加
        gzip_types text/plain;
        #压缩级别1-9
        gzip_comp_level 9;
        #设置压缩缓冲区大小,此处设置为4个8K内存作为压缩结果流缓存
        gzip_buffers 4 8k;

        root  /Users/peiwang/work/front/project/study/share/FunctionProgramming/node-learn/http-server/file;
    }
我们看下效果展示
缓存配置
缓存如何配置呢?
location ~ .*\.(htm|html|css)$ {
        #proxy_cache:指定使用哪个共享内存区存储缓存信息。
        #proxy_cache_key :设置缓存使用的key,默认为完整的访问URL,根据实际情况设置缓存key。
        #proxy_cache_valid :为不同的响应状态码设置缓存时间。如果是proxy_cache_valid 5s,则200、301、302响应都将被缓存。
        #proxy_cache_valid不是唯一设置缓存时间的,还可以通过如下方式(优先级从上到下)。
            #1.以秒为单位的“X-Accel-Expires”响应头来设置响应缓存时间。
            #2.如果没有“X-Accel-Expires”,则可以根据“Cache-Control”、“Expires”来设置响应缓存时间。
            #3.否则,使用proxy_cache_valid设置缓存时间。
        expires 5s;
        proxy_cache_valid 200 5s;
        #proxy_cache_key $host$uri$is_args$args;
        #add_header  Nginx-Cache "$upstream_cache_status";

        root  /Users/peiwang/work/front/project/study/share/FunctionProgramming/node-learn/http-server/file;
        #清理缓存
        #有时缓存的内容是错误的,需要手工清理,Nginx企业版提供了purger功能,对于社区版Nginx可以考虑使用ngx_cache_purge(ngx_cache_purge)模块进行清理缓存
        #proxy_cache_purge cache$1$is_args$args;
    }
我们看下效果展示