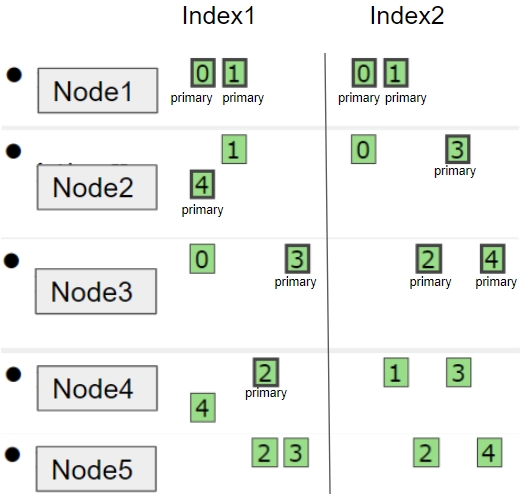
Elasticsearch 的数据存储使用主从模式,数据被分别保存在多个主分片中,每个主分片可能对应多个副分片,同一块数据对应的所有分片通常保存在不同的节点上,这样在部分节点出错时可以保证整个集群的正常运行。
在处理客户端请求时,Elasticsearch 集群中的每个节点都可以作为协调节点处理来自客户端的请求,但是写入数据的请求需要转发给目标主分片所在的节点执行,该主分片所在的节点管理其所有的副分片完成写入后再响应给协调节点。
Elasticsearch 执行批量写入流程:
TransportBulkAction::doExecute
1、 由 Ingest Node 执行 pipeline 指定的操作
2、 检查写入请求,自动创建缺失的索引
protected void doExecute(Task task, BulkRequest bulkRequest, ActionListener<BulkResponse> listener) {
    // 检查是否指定了 Pipeline 操作
    if (bulkRequest.hasIndexRequestsWithPipelines()) {
        if (clusterService.localNode().isIngestNode()) {
            // 本身是 Ingest Node,直接处理 pipeline
            processBulkIndexIngestRequest(task, bulkRequest, listener);
        } else {
            // 本身不是 Ingest Node,转发给 Ingest Node 处理
            ingestForwarder.forwardIngestRequest(BulkAction.INSTANCE, bulkRequest, listener);
        }
        return;
    }

    if (needToCheck()) {
        // 配置中设定了检查请求涉及的 index,并自动创建缺失的 index

        // Step 1: 统计请求中涉及的 index
        final Set<String> indices = bulkRequest.requests.stream()
            // 排除没有版本信息的 DELETE 请求(不需要创建 index)
            .filter(request -> request.opType() != DocWriteRequest.OpType.DELETE
                    || request.versionType() == VersionType.EXTERNAL
                    || request.versionType() == VersionType.EXTERNAL_GTE)
            .map(DocWriteRequest::index)
            .collect(Collectors.toSet());
        // Step 2: 筛选出可以自动创建的 index (由于要创建的 index 已存在或者名字被其他 index 的 alias 占用或者配置不支持等原因而不能创建)
        final Map<String, IndexNotFoundException> indicesThatCannotBeCreated = new HashMap<>();
        Set<String> autoCreateIndices = new HashSet<>();
        ClusterState state = clusterService.state();
        for (String index : indices) {
            boolean shouldAutoCreate;
            try {
                shouldAutoCreate = shouldAutoCreate(index, state);
            } catch (IndexNotFoundException e) {
                shouldAutoCreate = false;
                // 不可创建的 index 存放在 indicesThatCannotBeCreated,这是个 HashMap,key 是 index 的名字,value 是不可创建的原因
                indicesThatCannotBeCreated.put(index, e);
            }
            if (shouldAutoCreate) {
                // 需要自动创建的 index 放在 autoCreateIndices
                autoCreateIndices.add(index);
            }
        }
        // Step 3: 创建需要自动创建的 index,创建完成后再继续执行请求的操作
        if (autoCreateIndices.isEmpty()) {
            // 无需创建 index,直接执行请求的操作
            executeBulk(task, bulkRequest, startTime, listener, responses, indicesThatCannotBeCreated);
        } else {
            // 这里使用了一个原子性的计数器,用于在多线程执行的环境下记录已成功创建的 index 的数量
            final AtomicInteger counter = new AtomicInteger(autoCreateIndices.size());
            for (String index : autoCreateIndices) {
                // 执行创建 index
                createIndex(index, bulkRequest.timeout(), new ActionListener<CreateIndexResponse>() {
                    @Override
                    public void onResponse(CreateIndexResponse result) {
                        // 成功创建 index,当计数器为 0,即所有 index 都已创建完成后执行请求的任务
                        if (counter.decrementAndGet() == 0) {
                            executeBulk(task, bulkRequest, startTime, listener, responses, indicesThatCannotBeCreated);
                        }
                    }

                    @Override
                    public void onFailure(Exception e) {
                        // 创建 index 失败,将涉及这个 index 的请求响应设为失败
                        if (!(ExceptionsHelper.unwrapCause(e) instanceof ResourceAlreadyExistsException)) {
                            // fail all requests involving this index, if create didn't work
                            for (int i = 0; i < bulkRequest.requests.size(); i++) {
                                DocWriteRequest request = bulkRequest.requests.get(i);
                                if (request != null && setResponseFailureIfIndexMatches(responses, i, request, index, e)) {
                                    bulkRequest.requests.set(i, null);
                                }
                            }
                        }
                        // 对成功创建的 index 继续执行请求的操作
                        if (counter.decrementAndGet() == 0) {
                            executeBulk(task, bulkRequest, startTime, ActionListener.wrap(listener::onResponse, inner -> {
                                inner.addSuppressed(e);
                                listener.onFailure(inner);
                            }), responses, indicesThatCannotBeCreated);
                        }
                    }
                });
            }
        }
    } else {
        // 不需要检查 index 是否存在,直接执行请求的操作
        executeBulk(task, bulkRequest, startTime, listener, responses, emptyMap());
    }
}
TransportBulkAction.BulkOperation::doRun
1、 获取集群状态,检查 mapping、routing、id等信息
2、 将请求按照 shard 分组,构造一个 shardID 和对应 shardID 所有请求的 hashmap
protected void doRun() throws Exception {
    // 将请求按照 shard 分组,构造一个 shardID 和对应 shardID 所有请求的 hashmap
    Map<ShardId, List<BulkItemRequest>> requestsByShard = new HashMap<>();
    for (int i = 0; i < bulkRequest.requests.size(); i++) {
        DocWriteRequest request = bulkRequest.requests.get(i);
        if (request == null) {
            continue;
        }
        // 根据 index 名或者 alias 名获取真正的 index 名
        String concreteIndex = concreteIndices.getConcreteIndex(request.index()).getName();
        // 计算 shardID
        ShardId shardId = clusterService.operationRouting().indexShards(clusterState, concreteIndex, request.id(), request.routing()).shardId();
        // 将请求加入其对应的 shardID 的列表
        List<BulkItemRequest> shardRequests = requestsByShard.computeIfAbsent(shardId, shard -> new ArrayList<>());
        shardRequests.add(new BulkItemRequest(i, request));
}
计算 shardID的流程:
1、 由于自定义 routing 可能影响文档分布的均匀性,因此引入了一个 partitionOffset 参数。
2、 当使用自定义 routing 时,将 id 的 hash 值对配置中的 routing_partition_size 取模作为 partitionOffset。使用默认 routing 时 partitionOffset 值为 0
3、 shardID 计算公式 ((hash(id 或 routing 参数) + partitionOffset) % number_of_routing_shards) / (number_of_routing_shards/number_of_shards),number_of_shards 是配置文件中设置的总的 shard 的数量,number_of_routing_shards 也可以进行配置,默认与 number_of_shards 相同
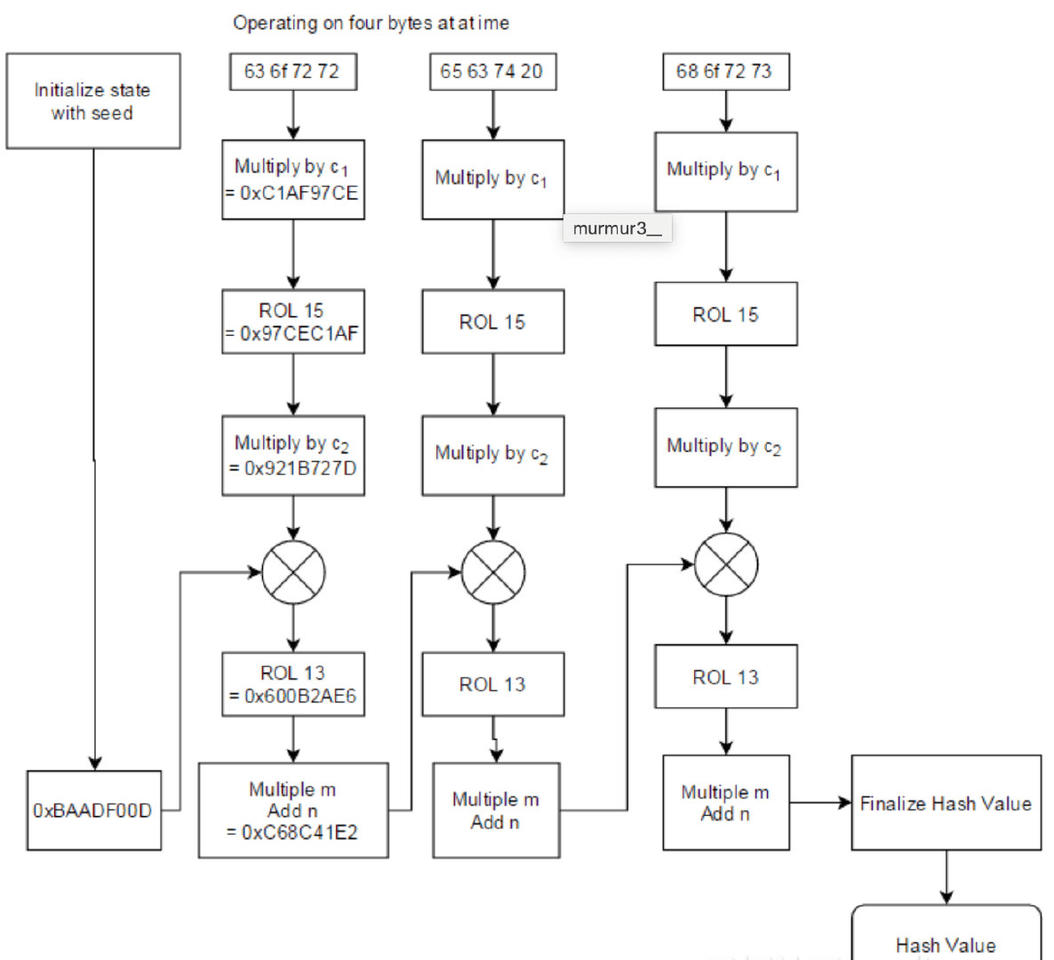
4、 Hash 函数使用 Murmur3,Murmur3 是非加密散列函数,不适用于加密目的,其流程和实现如下
// Murmur3HashFunction::hash
public static int hash(String routing) {
    final byte[] bytesToHash = new byte[routing.length() * 2];
    for (int i = 0; i < routing.length(); ++i) {
        final char c = routing.charAt(i);
        final byte b1 = (byte) c, b2 = (byte) (c >>> 8);
        assert ((b1 & 0xFF) | ((b2 & 0xFF) << 8)) == c; // no information loss
        bytesToHash[i * 2] = b1;
        bytesToHash[i * 2 + 1] = b2;
    }
    return hash(bytesToHash, 0, bytesToHash.length);
}
1、 利用 TransportAction::execute 将写请求标记为 “transport”, 由 TransportReplicationAction.ReroutePhase::doRun 转发给主分片
ReplicationOperation::execute
1、 主分片收到请求后执行请求检查,然后检查主分片是否发生了变化,接着检查活跃分片数,保证多数副分片可以接受到写操作,最后调用 Lucene 中 IndexWriter::addDocument 完成主分片上的写操作,写入成功后更新 translog(GlobalCheckpointSyncAction::maybeSyncTranslog)。
为了减轻写硬盘的压力和提高效率,Elasticsearch 每次完成写入后 Lucene 并不会马上写入硬盘,从此时到下一次 commit 这段时间内如果集群故障就丢失这段时间内的数据,因此引入了 Translog 用来在每次 Lucene commit 之间记录请求的操作,便于故障恢复。Translog 的更新策略可以设置为 request(每次请求成功之后更新)或者 async(根据设置的间隔时间异步更新)
public void execute() throws Exception {
    // 检查活跃分片数
    final String activeShardCountFailure = checkActiveShardCount();
    final ShardRouting primaryRouting = primary.routingEntry();
    final ShardId primaryId = primaryRouting.shardId();
    if (activeShardCountFailure != null) {
        finishAsFailed(new UnavailableShardsException(primaryId,
            "{} Timeout: [{}], request: [{}]", activeShardCountFailure, request.timeout(), request));
        return;
    }

    totalShards.incrementAndGet();
    // 每有一个任务加一次计数,完成后在后面的 decPendingAndFinishIfNeeded 中减掉
    pendingActions.incrementAndGet();

    // 在主分片上执行请求
    primaryResult = primary.perform(request);
    // 完成请求后更新 checkpoint,在集群出现问题需要恢复时可以从 checkpoint 开始恢复,避免大量重建操作
    primary.updateLocalCheckpointForShard(primaryRouting.allocationId().getId(), primary.localCheckpoint());
    final ReplicaRequest replicaRequest = primaryResult.replicaRequest();
    if (replicaRequest != null) {
        final long globalCheckpoint = primary.globalCheckpoint();
        final ReplicationGroup replicationGroup = primary.getReplicationGroup();
        // 标记无法接收本次请求的分片,被标记的分片在主分片挂掉后不会被选为新的主分片,避免数据不一致
        markUnavailableShardsAsStale(replicaRequest, replicationGroup.getInSyncAllocationIds(), replicationGroup.getRoutingTable());
        // 在副本上执行操作
        performOnReplicas(replicaRequest, globalCheckpoint, replicationGroup.getRoutingTable());
    }

    // 主分片也算一次成功写入分片,计数加一
    successfulShards.incrementAndGet();
    // 检查写入操作是否执行完成
    decPendingAndFinishIfNeeded();
}
1、 主分片完成写入后开始写副分片,通过 primary.getReplicationGroup().getRoutingTable()获取所有副本的路由,然后用replicasProxy::performOn在副本上执行
2、 ReplicationOperation::decPendingAndFinishIfNeeded 在所有副本响应后返回消息给协调节点