Spring Boot Starter 简介
Spring Boot Starter是一组方便使用的依赖关系描述符,可以在应用程序中包含这些描述符。借助Spring Boot Starter开发人员可以获得所需的所有 Spring 及相关技术的一站式服务,而无需查看示例代码或复制粘贴依赖的库文件。譬如,如果需要 Spring JPA 访问数据库,则可以在工程中直接饮用spring-boot-starter-data-jpa- 有关
starter命名规范,所有官方的starter都遵循以下命名模式spring-boot-starter-*,其中*指特定的应用程序代号或名称。任何第三方提供的starter都不能以spring-boot作为前缀,应该将应用程序代号或名称作为前缀,譬如mybatis-spring-boot-starter
Spring Boot Starter 开发步骤
本次以 redisson 为例,开发自己的 starter ,命名为redisson-spring-boot-starter
第一步 新建 maven 工程 redisson-spring-boot-starter
相信各位小伙都非常熟练,不多说了,省略
第二步 添加 pom 依赖,完整 pom.xml 文件如下
<?xml version="1.0" encoding="UTF-8"?>
<project xmlns="http://maven.apache.org/POM/4.0.0"
         xmlns:xsi="http://www.w3.org/2001/XMLSchema-instance"
         xsi:schemaLocation="http://maven.apache.org/POM/4.0.0 http://maven.apache.org/xsd/maven-4.0.0.xsd">
    <modelVersion>4.0.0</modelVersion>

    <groupId>com.lushwe</groupId>
    <artifactId>redisson-spring-boot-starter</artifactId>
    <version>1.0</version>

    <parent>
        <groupId>org.springframework.boot</groupId>
        <artifactId>spring-boot-starter-parent</artifactId>
        <version>2.0.4.RELEASE</version>
        <relativePath/> <!-- lookup parent from repository -->
    </parent>

    <properties>
        <project.build.sourceEncoding>UTF-8</project.build.sourceEncoding>
        <java.version>1.8</java.version>
        <spring.boot.version>2.0.4.RELEASE</spring.boot.version>
        <redisson.version>3.4.4</redisson.version>
    </properties>

    <dependencies>

        <!-- spring boot autoconfigure 依赖 -->
        <dependency>
            <groupId>org.springframework.boot</groupId>
            <artifactId>spring-boot-autoconfigure</artifactId>
            <version>${spring.boot.version}</version>
            <scope>compile</scope>
            <optional>true</optional>
        </dependency>

        <!-- redisson 依赖 -->
        <dependency>
            <groupId>org.redisson</groupId>
            <artifactId>redisson</artifactId>
            <version>${redisson.version}</version>
            <scope>compile</scope>
            <optional>true</optional>
        </dependency>

    </dependencies>

</project>
备注:
<optional>true</optional>表示当前依赖包是可选的,也就是说,我们引入redisson-spring-boot-starter默认不会引入redisson依赖,好处就是,我们可以先引入redisson-spring-boot-starter, 然后在需要用到redisson功能时再引入redisson包
第二步 新建 redisson 的配置属性类,完整 RedissonProperties 类如下
package org.redisson.spring.boot.autoconfigure;

import org.springframework.boot.context.properties.ConfigurationProperties;

/**
 * 说明:Redisson的配置属性
 *
 * @author Jack Liu
 * @date 2019-06-13 15:31
 * @since 1.0
 */
@ConfigurationProperties(prefix = RedissonProperties.MYBATIS_PREFIX)
public class RedissonProperties {

    /**
     * 配置文件前缀
     */
    public static final String MYBATIS_PREFIX = "redisson";

    /**
     * 配置文件路径
     */
    private String configLocation;

    public String getConfigLocation() {
        return configLocation;
    }

    public void setConfigLocation(String configLocation) {
        this.configLocation = configLocation;
    }

}
备注:
@ConfigurationProperties(prefix = RedissonProperties.MYBATIS_PREFIX)表示前缀为redisson的属性才会注入到RedissonProperties
第三步 新建 redisson 的自动配置类,完整 RedissonAutoConfiguration 类如下
package org.redisson.spring.boot.autoconfigure;

import org.redisson.Redisson;
import org.redisson.api.RedissonClient;
import org.redisson.config.Config;
import org.springframework.boot.autoconfigure.condition.ConditionalOnClass;
import org.springframework.boot.autoconfigure.condition.ConditionalOnMissingBean;
import org.springframework.boot.autoconfigure.condition.ConditionalOnProperty;
import org.springframework.boot.context.properties.EnableConfigurationProperties;
import org.springframework.context.annotation.Bean;
import org.springframework.context.annotation.Configuration;
import org.springframework.core.io.Resource;
import org.springframework.core.io.ResourceLoader;

import java.io.IOException;

/**
 * 说明:Redisson自动配置
 *
 * @author Jack Liu
 * @date 2019-06-13 15:31
 * @since 1.0
 */
@Configuration
@ConditionalOnClass({RedissonClient.class})
@ConditionalOnProperty(prefix = "redisson", name = "config-location")
@EnableConfigurationProperties({RedissonProperties.class})
public class RedissonAutoConfiguration {

    private final ResourceLoader resourceLoader;

    private final RedissonProperties properties;

    // 构造方法注入
    public RedissonAutoConfiguration(RedissonProperties properties, ResourceLoader resourceLoader) {
        this.properties = properties;
        this.resourceLoader = resourceLoader;
    }

    @Bean(destroyMethod = "shutdown")
    @ConditionalOnMissingBean
    public RedissonClient redissonClient() throws IOException {
        Resource resource = this.resourceLoader.getResource(this.properties.getConfigLocation());
        Config config = null;
        if (this.properties.getConfigLocation().endsWith(".yaml")) {
            config = Config.fromYAML(resource.getFile());
        } else if (this.properties.getConfigLocation().endsWith(".json")) {
            config = Config.fromJSON(resource.getFile());
        }
        return config != null ? Redisson.create(config) : Redisson.create();
    }

}
备注:
@ConditionalOnClass({RedissonClient.class})表示classpath下有RedissonClient类才会启用RedissonAutoConfiguration。也就是说,没有引入redisson依赖包,RedissonAutoConfiguration不会生效@ConditionalOnProperty(prefix = "redisson", name = "config-location")表示配置文件有redisson.config-location属性, 才会启用RedissonAutoConfiguration。
第四步 创建配置,新建 redisson 的自动配置类,完整 RedissonAutoConfiguration 类如下
resource目录下,创建META-INF目录META-INF目录下创建spring.factories文件
# Auto Configure
org.springframework.boot.autoconfigure.EnableAutoConfiguration=\
org.redisson.spring.boot.autoconfigure.RedissonAutoConfiguration
META-INF目录下创建spring.provides文件
provides: redisson-spring-boot-starter
第五步 至此,redisson starter 开发完成,打包结束
Spring Boot Starter 使用
resisson-spring-boot-starter 已经开发完成,下面演示如何使用我们自己开发的 starter
- 新建一个工程,引入上面开发好的
resisson-spring-boot-starter,完整pom.xml如下
<?xml version="1.0" encoding="UTF-8"?>
<project xmlns="http://maven.apache.org/POM/4.0.0"
         xmlns:xsi="http://www.w3.org/2001/XMLSchema-instance"
         xsi:schemaLocation="http://maven.apache.org/POM/4.0.0 http://maven.apache.org/xsd/maven-4.0.0.xsd">
    <parent>
        <artifactId>learn-spring-boot</artifactId>
        <groupId>com.lushwe.learn</groupId>
        <version>1.0-SNAPSHOT</version>
    </parent>
    <modelVersion>4.0.0</modelVersion>

    <artifactId>spring-boot-starter-test</artifactId>

    <properties>
        <spring.boot.version>2.0.4.RELEASE</spring.boot.version>
        <redisson.version>3.4.4</redisson.version>
    </properties>

    <dependencies>

        <dependency>
            <groupId>org.springframework.boot</groupId>
            <artifactId>spring-boot-starter</artifactId>
            <version>${spring.boot.version}</version>
        </dependency>

        <dependency>
            <groupId>com.lushwe</groupId>
            <artifactId>redisson-spring-boot-starter</artifactId>
            <version>1.0</version>
        </dependency>

        <dependency>
            <groupId>org.redisson</groupId>
            <artifactId>redisson</artifactId>
            <version>${redisson.version}</version>
        </dependency>

    </dependencies>

</project>
- 创建
application.properties文件,配置redisson.config-location,详细如下
# Redisson 配置
redisson.config-location=classpath:redisson-redis.yaml
- 创建
redisson-redis.yaml文件,详细如下
masterSlaveServersConfig:
  slaveAddresses:
    - "redis://10.0.10.23:15489"
  masterAddress: "redis://10.0.10.23:15389"
  password: codis*23
  idleConnectionTimeout: 10000
  pingTimeout: 1000
  connectTimeout: 10000
  timeout: 3000
  retryAttempts: 3
  retryInterval: 1500
  reconnectionTimeout: 3000
  failedAttempts: 3
  subscriptionsPerConnection: 5
  clientName: null
  loadBalancer: !<org.redisson.connection.balancer.RoundRobinLoadBalancer> {}
  slaveSubscriptionConnectionMinimumIdleSize: 1
  slaveSubscriptionConnectionPoolSize: 50
  slaveConnectionMinimumIdleSize: 10
  slaveConnectionPoolSize: 64
  masterConnectionMinimumIdleSize: 10
  masterConnectionPoolSize: 64
  readMode: "SLAVE"
threads: 0
nettyThreads: 0
codec: !<org.redisson.codec.JsonJacksonCodec> {}
useLinuxNativeEpoll: false
- 创建一个启动类
Application,详细如下
package com.lushwe.spring.boot.start.test;

import org.redisson.api.RBucket;
import org.redisson.api.RedissonClient;
import org.springframework.boot.SpringApplication;
import org.springframework.boot.autoconfigure.SpringBootApplication;
import org.springframework.context.ConfigurableApplicationContext;

/**
 * 说明:应用启动类
 *
 * @author Jack Liu
 * @date 2019-06-12 13:28
 * @since 1.0
 */
@SpringBootApplication
public class Application {

    public static void main(String[] args) {

        ConfigurableApplicationContext context = SpringApplication.run(Application.class, args);

        System.out.println(context.getBean("redissonClient"));

        RedissonClient redissonClient = context.getBean(RedissonClient.class);

        System.out.println(redissonClient);

        RBucket<String> bucket1 = redissonClient.getBucket("redisson-v");
        bucket1.set("lushwe1");
        System.out.println(bucket1.get());

        RBucket<String> bucket2 = redissonClient.getBucket("redisson-v");
        bucket2.set("lushwe2");
        System.out.println(bucket2.get());

        RBucket<String> bucket3 = redissonClient.getBucket("redisson-v");
        System.out.println(bucket3.get());

    }
}
运行 Application ,日志打印如下
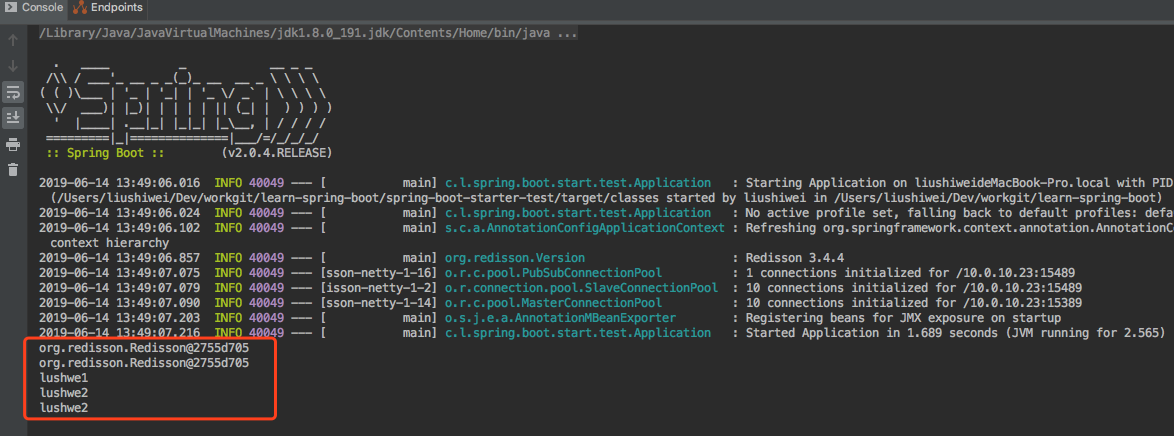
日志显示,我们能正常使用 RedissonClient 了
本文主要介绍了如何开发你自己的 starter ,以及如何使用 starter ,比较简单,如有什么问题欢迎指正和提问。
本文完