在一般的 web 应用开发里通常会使用开发工具(如 Eclipse、IntelJ )集成 tomcat ,这样可以将 web 工程项目直接到 tomcat 中,然后一键启动。经常遇到的一种情况是直接修改一个类的源文件,此时开发工具会直接将编译后的 class 文件到 tomcat 的 web 工程里,但如果 tomcat 没有配置应用的自动加载功能的话,当前 JVM 中运行的 class 还是源文件修改之前编译好的 class 文件。可以重启 tomcat 来加载新的 class 文件,但这样做需要再手工点击一次restart,为了能够在应用中即时看到 java 文件修改之后的执行情况,可以在 tomcat 中将应用配置成自动加载模式,其配置很简单,只要在配置文件的Context节点中加上一个 reloadable 属性为true即可,示例如下:
<Context path="/HelloWorld" docBase="C:/apps/apache-tomcat/DeployedApps/HelloWorld" reloadable="true"/>
如果你的开发工具已经集成了 tomcat 的话应该会有一个操作界面配置来代替手工添加文件信息,如 Eclipse 中是如下界面来配置的:
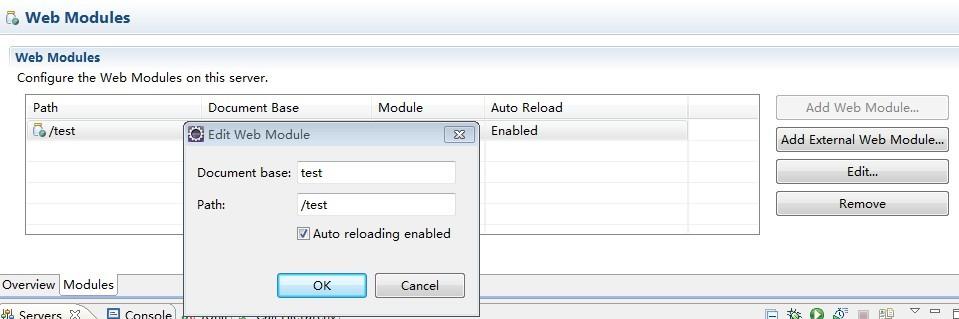 此时需要把
此时需要把 Auto reloading enabled前面的复选框钩上。其背后的原理实际也是在 server.xml 文件中加上 Context 节点的描述:
<Context docBase="test" path="/test" reloadable="true"/>
这样 Tomcat 就会监控所配置的 web 应用实际路径下的/WEB-INF/classes和/WEB-INF/lib两个目录下文件的变动,如果发生变更 tomcat 将会自动重启该应用。
熟悉 Tomcat 的人应该都用过这个功能,就不再详述它的配置步骤了。我感兴趣的是这个自动加载功能在 Tomcat 7 中是怎么实现的。
在前面的文章中曾经讲过 Tomcat 7 在启动完成后会有一个后台线程ContainerBackgroundProcessor[StandardEngine[Catalina]],这个线程将会定时(默认为 10 秒)执行 Engine、Host、Context、Wrapper 各容器组件及与它们相关的其它组件的 backgroundProcess 方法,这段代码在所有容器组件的父类org.apache.catalina.core.ContainerBase类的 backgroundProcess`方法中:
public void backgroundProcess() {

    if (!getState().isAvailable())
        return;

    if (cluster != null) {
        try {
            cluster.backgroundProcess();
        } catch (Exception e) {
            log.warn(sm.getString("containerBase.backgroundProcess.cluster", cluster), e);
        }
    }
    if (loader != null) {
        try {
            loader.backgroundProcess();
        } catch (Exception e) {
            log.warn(sm.getString("containerBase.backgroundProcess.loader", loader), e);
        }
    }
    if (manager != null) {
        try {
            manager.backgroundProcess();
        } catch (Exception e) {
            log.warn(sm.getString("containerBase.backgroundProcess.manager", manager), e);
        }
    }
    Realm realm = getRealmInternal();
    if (realm != null) {
        try {
            realm.backgroundProcess();
        } catch (Exception e) {
            log.warn(sm.getString("containerBase.backgroundProcess.realm", realm), e);
        }
    }
    Valve current = pipeline.getFirst();
    while (current != null) {
        try {
            current.backgroundProcess();
        } catch (Exception e) {
            log.warn(sm.getString("containerBase.backgroundProcess.valve", current), e);
        }
        current = current.getNext();
    }
    fireLifecycleEvent(Lifecycle.PERIODIC_EVENT, null);
}
与自动加载类相关的代码在 loader 的 backgroundProcess 方法的调用时。每一个 StandardContext 会关联一个loader变量,该变量的初始化在org.apache.catalina.core.StandardContext类的 startInternal 方法中的这段代码:
if (getLoader() == null) {
    WebappLoader webappLoader = new WebappLoader(getParentClassLoader());
    webappLoader.setDelegate(getDelegate());
    setLoader(webappLoader);
}
所以上面的 loader.backgroundProcess() 方法的调用将会执行org.apache.catalina.loader.WebappLoader类的 backgroundProcess 方法:
public void backgroundProcess() {
    if (reloadable && modified()) {
        try {
            Thread.currentThread().setContextClassLoader
                (WebappLoader.class.getClassLoader());
            if (container instanceof StandardContext) {
                ((StandardContext) container).reload();
            }
        } finally {
            if (container.getLoader() != null) {
                Thread.currentThread().setContextClassLoader
                    (container.getLoader().getClassLoader());
            }
        }
    } else {
        closeJARs(false);
    }
}
其中reloadable变量的值就是本文开始提到的配置文件的 Context 节点的reloadable属性的值,当它为true并且 modified() 方法返回也是true时就会执行 StandardContext 的 reload 方法:
public synchronized void reload() {

    // Validate our current component state
    if (!getState().isAvailable())
        throw new IllegalStateException
            (sm.getString("standardContext.notStarted", getName()));

    if(log.isInfoEnabled())
        log.info(sm.getString("standardContext.reloadingStarted",
                getName()));

    // Stop accepting requests temporarily.
    setPaused(true);

    try {
        stop();
    } catch (LifecycleException e) {
        log.error(
            sm.getString("standardContext.stoppingContext", getName()), e);
    }

    try {
        start();
    } catch (LifecycleException e) {
        log.error(
            sm.getString("standardContext.startingContext", getName()), e);
    }

    setPaused(false);

    if(log.isInfoEnabled())
        log.info(sm.getString("standardContext.reloadingCompleted",
                getName()));

}
reload 方法中将先执行 stop 方法将原有的该 web 应用停掉,再调用 start 方法启动该 Context ,start 方法的分析前文已经说过,stop 方法可以参照 start 方法一样分析,不再赘述。
这里重点要说的是上面提到的监控文件变动的方法 modified ,只有它返回true才会导致应用自动加载。看下该方法的实现:
public boolean modified() {
    return classLoader != null ? classLoader.modified() : false ;
}
可以看到这里面实际调用的是 WebappLoader 的实例变量 classLoader 的 modified 方法来判断的,下文就详细分析这个 modified 方法的实现。
先简要说一下 Tomcat 中的加载器。在 Tomcat 7 中每一个 web 应用对应一个 Context 节点,这个节点在 JVM 中就对应一个org.apache.catalina.core.StandardContext对象,而每一个 StandardContext 对象内部都有一个加载器实例变量(即其父类org.apache.catalina.core.ContainerBase的loader实例变量),前面已经看到这个 loader 变量实际上是org.apache.catalina.loader.WebappLoader对象。而每一个 WebappLoader 对象内部关联了一个 classLoader 变量(就这这个类的定义中,可以看到该变量的类型是org.apache.catalina.loader.WebappClassLoader)。
在 Tomcat 7 的源码中给出了 6 个 web 应用:
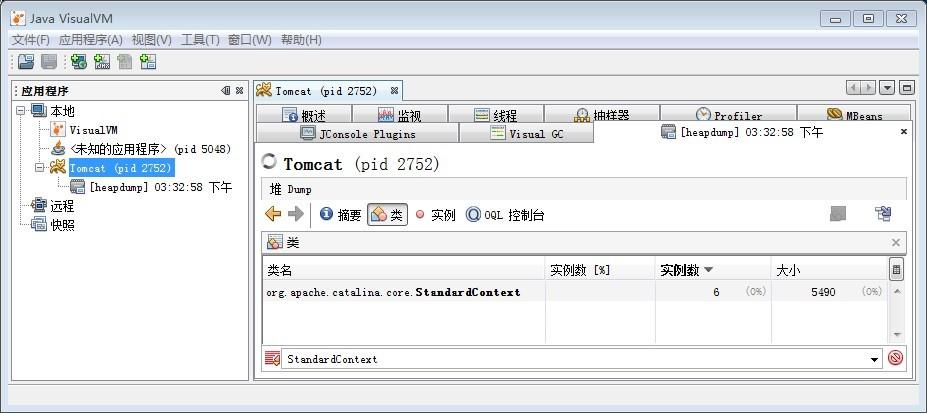
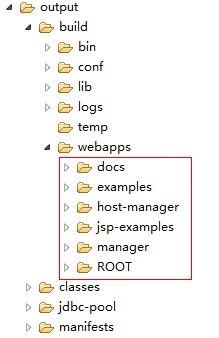 所以在 Tomcat 启动完成之后理论上应该有 6 个 StandardContext 对象,6 个 WebappLoader 对象,6 个 WebappClassLoader 对象。用 jvisualvm 观察实际情况也证实了上面的判断:
StandardContext 实例数:
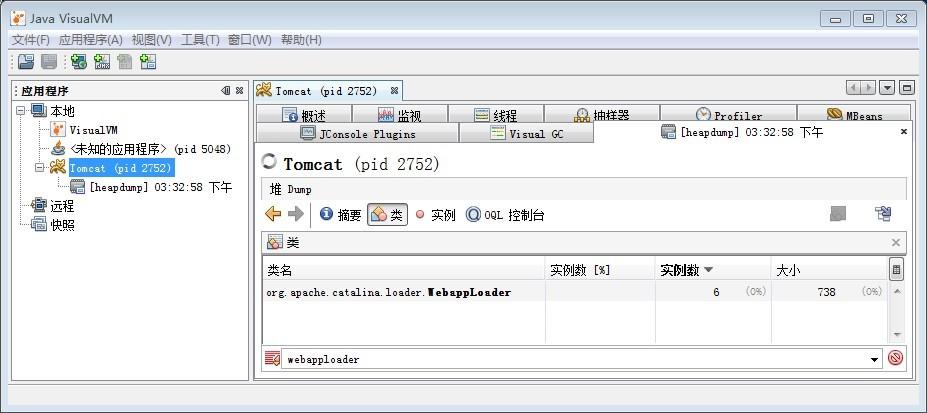
WebappLoader 实例数:
WebappClassLoader 实例数

上面讲过了 WebappLoader 的初始化代码,接下来讲一下 WebappClassLoader 的对象初始化代码。同样还是在 StandardContext 类的 startInternal 方法中,有如下两段代码:
if (getLoader() == null) {
    WebappLoader webappLoader = new WebappLoader(getParentClassLoader());
    webappLoader.setDelegate(getDelegate());
    setLoader(webappLoader);
}
这一段是上面已经说过的 WebappLoader 的初始化。
try {

    if (ok) {

        // Start our subordinate components, if any
        if ((loader != null) && (loader instanceof Lifecycle))
            ((Lifecycle) loader).start();
这一段与 WebappLoader 的对象相关,执行的就是 WebappLoader 类的 start 方法,因为 WebappLoader 继承自 LifecycleBase 类,所以调用它的 start 方法最终将会执行该类自定义的 startInternal 方法,看下 startInternal 方法中的这段代码:
classLoader = createClassLoader();
classLoader.setResources(container.getResources());
classLoader.setDelegate(this.delegate);
classLoader.setSearchExternalFirst(searchExternalFirst);
if (container instanceof StandardContext) {
    classLoader.setAntiJARLocking(
            ((StandardContext) container).getAntiJARLocking());
    classLoader.setClearReferencesStatic(
            ((StandardContext) container).getClearReferencesStatic());
    classLoader.setClearReferencesStopThreads(
            ((StandardContext) container).getClearReferencesStopThreads());
    classLoader.setClearReferencesStopTimerThreads(
            ((StandardContext) container).getClearReferencesStopTimerThreads());
    classLoader.setClearReferencesHttpClientKeepAliveThread(
            ((StandardContext) container).getClearReferencesHttpClientKeepAliveThread());
}

for (int i = 0; i < repositories.length; i++) {
    classLoader.addRepository(repositories[i]);
}

// Configure our repositories
setRepositories();
setClassPath();

setPermissions();

((Lifecycle) classLoader).start();
一开始调用了 createClassLoader 方法:
/**
 * Create associated classLoader.
 */
private WebappClassLoader createClassLoader()
    throws Exception {

    Class clazz = Class.forName(loaderClass);
    WebappClassLoader classLoader = null;

    if (parentClassLoader == null) {
        parentClassLoader = container.getParentClassLoader();
    }
    Class[] argTypes = { ClassLoader.class };
    Object[] args = { parentClassLoader };
    Constructor constr = clazz.getConstructor(argTypes);
    classLoader = (WebappClassLoader) constr.newInstance(args);

    return classLoader;

}
可以看出这里通过反射实例化了一个 WebappClassLoader 对象。
回到文中上面提的问题,看下 WebappClassLoader 的 modified 方法代码:
/**
 * Have one or more classes or resources been modified so that a reload
 * is appropriate?
 */
public boolean modified() {

    if (log.isDebugEnabled())
        log.debug("modified()");

    // Checking for modified loaded resources
    int length = paths.length;

    // A rare race condition can occur in the updates of the two arrays
    // It's totally ok if the latest class added is not checked (it will
    // be checked the next time
    int length2 = lastModifiedDates.length;
    if (length > length2)
        length = length2;

    for (int i = 0; i < length; i++) {
        try {
            long lastModified =
                ((ResourceAttributes) resources.getAttributes(paths[i]))
                .getLastModified();
            if (lastModified != lastModifiedDates[i]) {
                if( log.isDebugEnabled() )
                    log.debug("  Resource '" + paths[i]
                              + "' was modified; Date is now: "
                              + new java.util.Date(lastModified) + " Was: "
                              + new java.util.Date(lastModifiedDates[i]));
                return (true);
            }
        } catch (NamingException e) {
            log.error("    Resource '" + paths[i] + "' is missing");
            return (true);
        }
    }

    length = jarNames.length;

    // Check if JARs have been added or removed
    if (getJarPath() != null) {

        try {
            NamingEnumeration enumeration =
                resources.listBindings(getJarPath());
            int i = 0;
            while (enumeration.hasMoreElements() && (i < length)) {
                NameClassPair ncPair = enumeration.nextElement();
                String name = ncPair.getName();
                // Ignore non JARs present in the lib folder
                if (!name.endsWith(".jar"))
                    continue;
                if (!name.equals(jarNames[i])) {
                    // Missing JAR
                    log.info("    Additional JARs have been added : '"
                             + name + "'");
                    return (true);
                }
                i++;
            }
            if (enumeration.hasMoreElements()) {
                while (enumeration.hasMoreElements()) {
                    NameClassPair ncPair = enumeration.nextElement();
                    String name = ncPair.getName();
                    // Additional non-JAR files are allowed
                    if (name.endsWith(".jar")) {
                        // There was more JARs
                        log.info("    Additional JARs have been added");
                        return (true);
                    }
                }
            } else if (i < jarNames.length) {
                // There was less JARs
                log.info("    Additional JARs have been added");
                return (true);
            }
        } catch (NamingException e) {
            if (log.isDebugEnabled())
                log.debug("    Failed tracking modifications of '"
                    + getJarPath() + "'");
        } catch (ClassCastException e) {
            log.error("    Failed tracking modifications of '"
                      + getJarPath() + "' : " + e.getMessage());
        }

    }

    // No classes have been modified
    return (false);

}
这段代码从总体上看共分成两部分,第一部分检查 web 应用中的 class 文件是否有变动,根据 class 文件的最近修改时间来比较,如果有不同则直接返回true,如果 class 文件被删除也返回true。第二部分检查 web 应用中的 jar 文件是否有变动,如果有同样返回true。稍有编程经验的人对于以上比较代码都容易理解,但对这些变量的值,特别是里面比较时经常用到 WebappClassLoader 类的实例变量的值是在什么地方赋值的会比较困惑,这里就这点做一下说明。
以 class 文件变动的比较为例,比较的关键代码是:
long lastModified =
                    ((ResourceAttributes) resources.getAttributes(paths[i]))
                    .getLastModified();
                if (lastModified != lastModifiedDates[i]) {
即从 WebappClassLoader 的实例变量resources中取出文件当前的最近修改时间,与 WebappClassLoader 原来缓存的该文件的最近修改时间做比较。
关于 resources.getAttributes 方法,看下 resources 的声明类型javax.naming.directory.DirContext可知实际这里面执行的是通常的 JNDI 查询一个属性的方法(如果对 JNDI 不熟悉请看一下 JNDI 的相关文档大致了解一下,这里不再做单独介绍),所以有必要把 resources 变量究竟是何对象拎出来说一下。
在上面看 WebappLoader 的 startInternal 方法的源码里 createClassLoader() 方法调用并赋值给 classLoader 下一行:
classLoader.setResources(container.getResources());
这里设置的 resources 就是上面用到的 resources 变量,可以看到它实际是 WebappLoader 所关联容器的实例变量 resources 。按前面的描述所关联的容器即 StandardContext ,再来看看 StandardContext 中 resources 是怎么赋值的。
还是在 StandardContext 的 startInternal 方法中,开头部分有这段代码:
// Add missing components as necessary
if (webappResources == null) {   // (1) Required by Loader
    if (log.isDebugEnabled())
        log.debug("Configuring default Resources");
    try {
        if ((getDocBase() != null) && (getDocBase().endsWith(".war")) &&
                (!(new File(getBasePath())).isDirectory()))
            setResources(new WARDirContext());
        else
            setResources(new FileDirContext());
    } catch (IllegalArgumentException e) {
        log.error("Error initializing resources: " + e.getMessage());
        ok = false;
    }
}
if (ok) {
    if (!resourcesStart()) {
        log.error( "Error in resourceStart()");
        ok = false;
    }
}
因为默认的应用是不是 war 包,而是以目录形式的所以会执行setResources(new FileDirContext())方法。这里稍微曲折的地方是 setResources 里实际只是给 StandardContext 的 webappResources 变量赋值,而 StandardContext 的 resources 变量赋为null,在上面源码中的最后 resourcesStart 方法的调用中才会给 resources 赋值。看下 resourcesStart 方法:
public boolean resourcesStart() {

    boolean ok = true;

    Hashtable env = new Hashtable();
    if (getParent() != null)
        env.put(ProxyDirContext.HOST, getParent().getName());
    env.put(ProxyDirContext.CONTEXT, getName());

    try {
        ProxyDirContext proxyDirContext =
            new ProxyDirContext(env, webappResources);
        if (webappResources instanceof FileDirContext) {
            filesystemBased = true;
            ((FileDirContext) webappResources).setAllowLinking
                (isAllowLinking());
        }
        if (webappResources instanceof BaseDirContext) {
            ((BaseDirContext) webappResources).setDocBase(getBasePath());
            ((BaseDirContext) webappResources).setCached
                (isCachingAllowed());
            ((BaseDirContext) webappResources).setCacheTTL(getCacheTTL());
            ((BaseDirContext) webappResources).setCacheMaxSize
                (getCacheMaxSize());
            ((BaseDirContext) webappResources).allocate();
            // Alias support
            ((BaseDirContext) webappResources).setAliases(getAliases());

            if (effectiveMajorVersion >=3 && addWebinfClassesResources) {
                try {
                    DirContext webInfCtx =
                        (DirContext) webappResources.lookup(
                                "/WEB-INF/classes");
                    // Do the lookup to make sure it exists
                    webInfCtx.lookup("META-INF/resources");
                    ((BaseDirContext) webappResources).addAltDirContext(
                            webInfCtx);
                } catch (NamingException e) {
                    // Doesn't exist - ignore and carry on
                }
            }
        }
        // Register the cache in JMX
        if (isCachingAllowed()) {
            String contextName = getName();
            if (!contextName.startsWith("/")) {
                contextName = "/" + contextName;
            }
            ObjectName resourcesName =
                new ObjectName(this.getDomain() + ":type=Cache,host="
                               + getHostname() + ",context=" + contextName);
            Registry.getRegistry(null, null).registerComponent
                (proxyDirContext.getCache(), resourcesName, null);
        }
        this.resources = proxyDirContext;
    } catch (Throwable t) {
        ExceptionUtils.handleThrowable(t);
        log.error(sm.getString("standardContext.resourcesStart"), t);
        ok = false;
    }

    return (ok);

}
可以看出 resources 赋的是 proxyDirContext 对象,而 proxyDirContext 是一个代理对象,代理的就是 webappResources ,按上面的描述即org.apache.naming.resources.FileDirContext。
org.apache.naming.resources.FileDirContext继承自抽象父类org.apache.naming.resources.BaseDirContext,而 BaseDirContext 又实现了javax.naming.directory.DirContext接口。所以 JNDI 操作中的 lookup、bind、getAttributes、rebind、search 等方法都已经在这两个类中实现了。当然里面还有 JNDI 规范之外的方法如 list 等。
这里就看下前面看到的 getAttributes 方法的调用,在 BaseDirContext 类中所有的 getAttributes 方法最终都会调用抽象方法 doGetAttributes 来返回查询属性的结果,这个方法在 FileDirContext 的定义如下:
protected Attributes doGetAttributes(String name, String[] attrIds)
    throws NamingException {

    // Building attribute list
    File file = file(name);

    if (file == null)
        return null;

    return new FileResourceAttributes(file);

}
可以看到内部执行了 file 方法:
/**
 * Return a File object representing the specified normalized
 * context-relative path if it exists and is readable.  Otherwise,
 * return null.
 *
 * @param name Normalized context-relative path (with leading '/')
 */
protected File file(String name) {

    File file = new File(base, name);
    if (file.exists() && file.canRead()) {

        if (allowLinking)
            return file;

        // Check that this file belongs to our root path
        String canPath = null;
        try {
            canPath = file.getCanonicalPath();
        } catch (IOException e) {
            // Ignore
        }
        if (canPath == null)
            return null;

        // Check to see if going outside of the web application root
        if (!canPath.startsWith(absoluteBase)) {
            return null;
        }

        // Case sensitivity check - this is now always done
        String fileAbsPath = file.getAbsolutePath();
        if (fileAbsPath.endsWith("."))
            fileAbsPath = fileAbsPath + "/";
        String absPath = normalize(fileAbsPath);
        canPath = normalize(canPath);
        if ((absoluteBase.length() < absPath.length())
            && (absoluteBase.length() < canPath.length())) {
            absPath = absPath.substring(absoluteBase.length() + 1);
            if (absPath == null)
                return null;
            if (absPath.equals(""))
                absPath = "/";
            canPath = canPath.substring(absoluteBase.length() + 1);
            if (canPath.equals(""))
                canPath = "/";
            if (!canPath.equals(absPath))
                return null;
        }

    } else {
        return null;
    }
    return file;

}
了解 java 的文件操作的人这段代码就很容易理解了,实际就是根据传入的文件名查找目录下是否存在该文件,如果存在则返回包装了的文件属性对象 FileResourceAttributes 。 FileResourceAttributes 类实际是对java.io.File类做了一层包装,如 getLastModified 方法实际调用的是 File 类的 lastModified 方法返回:
long lastModified =
                    ((ResourceAttributes) resources.getAttributes(paths[i]))
                    .getLastModified();
                if (lastModified != lastModifiedDates[i]) {
以上分析了上面这段代码中((ResourceAttributes) resources.getAttributes(paths[i])).getLastModified()这部分,但两个内置变量paths和lastModifiedDates值究竟什么时候赋的呢?
这个简要说一下 WebappClassLoader 这个自定义类加载器的用法,在 Tomcat 中所有 web 应用内WEB-INF\classes目录下的 class 文件都是用这个类加载器来加载的,一般的自定义加载器都是覆写 ClassLoader 的 findClass 方法,这里也不例外。WebappClassLoader 覆盖的是 URLClassLoader 类的 findClass 方法,而在这个方法内部最终会调用findResourceInternal(String name, String path)方法:
 该方法代码段较长,为不偏离主题,摘出本文描述相关的代码段:
// Register the full path for modification checking
// Note: Only syncing on a 'constant' object is needed
synchronized (allPermission) {

    int j;

    long[] result2 =
        new long[lastModifiedDates.length + 1];
    for (j = 0; j < lastModifiedDates.length; j++) {
        result2[j] = lastModifiedDates[j];
    }
    result2[lastModifiedDates.length] = entry.lastModified;
    lastModifiedDates = result2;

    String[] result = new String[paths.length + 1];
    for (j = 0; j < paths.length; j++) {
        result[j] = paths[j];
    }
    result[paths.length] = fullPath;
    paths = result;

}
这里可以看到在加载一个新的 class 文件时会给 WebappClassLoader 的实例变量lastModifiedDates和paths数组添加元素。这里就解答了上面提到的文件变更比较代码的疑问。要说明的是在 tomcat 启动后 web 应用中所有的 class 文件并不是全部加载的,而是配置在 web.xml 中描述的需要与应用一起加载的才会立即加载,否则只有到该类首次使用时才会由类加载器加载。
关于 Tomcat 的自定义类加载器是一个很有意思的话题,可说的地方很多,后面会专文另述。而关于 jar 包文件变动的比较代码同 class 文件比较的类似,同样是取出当前 web 应用WEB-INF\lib目录下的所有 jar 文件,与 WebappClassLoader 内部缓存的jarNames数组做比较,如果文件名不同或新加或删除了 jar 文件都返回true。
但这里 jarNames 变量的初始赋值代码在 WebappClassLoader 类的 addJar 方法中的开头部分:
if ((jarPath != null) && (jar.startsWith(jarPath))) {

    String jarName = jar.substring(jarPath.length());
    while (jarName.startsWith("/"))
        jarName = jarName.substring(1);

    String[] result = new String[jarNames.length + 1];
    for (i = 0; i < jarNames.length; i++) {
        result[i] = jarNames[i];
    }
    result[jarNames.length] = jarName;
    jarNames = result;

}
而 addJar 方法是在 WebappLoader 类的 startInternal 方法中,上面已经给出与这个相关的代码,里面的这段代码部分:
// Configure our repositories
setRepositories();
setClassPath();
在 setRepositories 的方法最后部分:
try {
    JarFile jarFile = new JarFile(destFile);
    classLoader.addJar(filename, jarFile, destFile);
} catch (Exception ex) {
    // Catch the exception if there is an empty jar file
    // Should ignore and continue loading other jar files
    // in the dir
}

loaderRepositories.add( filename );
即在 tomcat 启动时的加载web应用的过程里就会加载该应用的 lib 目录下的所有 jar 文件,同时给 WebappClassLoader 的实例变量 jarNames 添加数组元素。
addJar 方法的调用路径:

在看 jar 包加载的代码时会不断碰到 resources 对象 list、getAttributes 等方法的调用,记住这里实际上调用的是上面提到的 FileDirContext 的相关方法,也即对于文件的查询访问方法就清楚了。