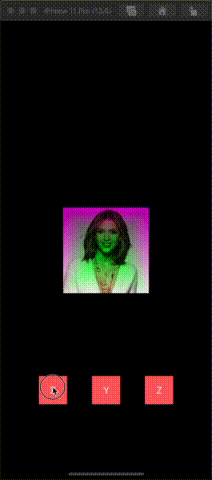
这个案例是在上个案例的基础上,在金字塔上贴上纹理,并实现纹理和颜色的混合。 最终效果:
一、使用GLSL实现
结合我们上一个案例,我们需要修改三个地方:
- 顶点着色器
shaderv.glsl中代码 - 片源着色器
shaderf.glsl中代码 - (void)render中代码
1.顶点着色器shaderv.glsl中代码
attribute vec4 position;
attribute vec4 positionColor;
attribute vec2 textCoordinate;

uniform mat4 projectionMatrix;
uniform mat4 modelViewMatrix;

varying lowp vec4 varyColor;
varying lowp vec2 varyTextCoord;

void main()
{
    varyColor = positionColor;
    varyTextCoord = textCoordinate;

    vec4 vPos;

    //4*4 * 4*4 * 4*1
    vPos = projectionMatrix * modelViewMatrix * position;

    gl_Position = vPos;
}
这里面我们新增了两个变量:
textCoordinate:纹理坐标varyTextCoord:传递给片源着色器的桥接纹理坐标 然后直接赋值:
varyTextCoord = textCoordinate;
实现了纹理坐标的从顶点着色器到片源着色器的传递。
2.片源着色器shaderf.glsl中代码
precision highp float;
varying lowp vec4 varyColor;
varying lowp vec2 varyTextCoord;
uniform sampler2D colorMap;
void main()
{
//    gl_FragColor = varyColor;

    lowp vec4 tex = texture2D(colorMap, varyTextCoord);
    gl_FragColor = tex * varyColor;
}
这里面我们新增了两个变量:
varyTextCoord:通过顶点着色器传递过来的桥接纹理坐标colorMap:采样得到的纹理数据 然后:
 lowp vec4 tex = texture2D(colorMap, varyTextCoord);
 gl_FragColor = tex * varyColor;
得到对应的纹理数据,并使用矩阵相乘的方式得到对应的纹理数据和颜色混合之后的数据。
3.- (void)render中代码
在render方法里面,我需要增加纹理的设置和colorMap设置。
- 设置纹理数据:
//从图片中加载纹理
- (GLuint)setupTexture:(NSString *)fileName {

    //1、将 UIImage 转换为 CGImageRef
    CGImageRef spriteImage = [UIImage imageNamed:fileName].CGImage;

    //判断图片是否获取成功
    if (!spriteImage) {
        NSLog(@"Failed to load image %@", fileName);
        exit(1);
    }

    //2、读取图片的大小,宽和高
    size_t width = CGImageGetWidth(spriteImage);
    size_t height = CGImageGetHeight(spriteImage);

    //3.获取图片字节数 宽*高*4(RGBA)
    GLubyte * spriteData = (GLubyte *) calloc(width * height * 4, sizeof(GLubyte));

    //4.创建上下文
    /*
     参数1:data,指向要渲染的绘制图像的内存地址
     参数2:width,bitmap的宽度,单位为像素
     参数3:height,bitmap的高度,单位为像素
     参数4:bitPerComponent,内存中像素的每个组件的位数,比如32位RGBA,就设置为8
     参数5:bytesPerRow,bitmap的没一行的内存所占的比特数
     参数6:colorSpace,bitmap上使用的颜色空间  kCGImageAlphaPremultipliedLast:RGBA
     */
    CGContextRef spriteContext = CGBitmapContextCreate(spriteData, width, height, 8, width*4,CGImageGetColorSpace(spriteImage), kCGImageAlphaPremultipliedLast);

    //5、在CGContextRef上--> 将图片绘制出来
    /*
     CGContextDrawImage 使用的是Core Graphics框架,坐标系与UIKit 不一样。UIKit框架的原点在屏幕的左上角,Core Graphics框架的原点在屏幕的左下角。
     CGContextDrawImage
     参数1:绘图上下文
     参数2:rect坐标
     参数3:绘制的图片
     */
    CGRect rect = CGRectMake(0, 0, width, height);
    //将纹理手动翻转,避免纹理翻转的发生
    CGContextTranslateCTM(spriteContext, rect.origin.x, rect.origin.y);
    CGContextTranslateCTM(spriteContext, 0, rect.size.height);
    CGContextScaleCTM(spriteContext, 1.0, -1.0);
    CGContextTranslateCTM(spriteContext, -rect.origin.x, -rect.origin.y);

    //6.使用默认方式绘制
    CGContextDrawImage(spriteContext, rect, spriteImage);

    //7、画图完毕就释放上下文
    CGContextRelease(spriteContext);

    //8、绑定纹理到默认的纹理ID(
    glBindTexture(GL_TEXTURE_2D, 0);

    //9.设置纹理属性
    /*
     参数1:纹理维度
     参数2:线性过滤、为s,t坐标设置模式
     参数3:wrapMode,环绕模式
     */
    glTexParameteri( GL_TEXTURE_2D, GL_TEXTURE_MIN_FILTER, GL_LINEAR );
    glTexParameteri( GL_TEXTURE_2D, GL_TEXTURE_MAG_FILTER, GL_LINEAR );
    glTexParameteri( GL_TEXTURE_2D, GL_TEXTURE_WRAP_S, GL_CLAMP_TO_EDGE);
    glTexParameteri( GL_TEXTURE_2D, GL_TEXTURE_WRAP_T, GL_CLAMP_TO_EDGE);

    float fw = width, fh = height;

    //10.载入纹理2D数据
    /*
     参数1:纹理模式,GL_TEXTURE_1D、GL_TEXTURE_2D、GL_TEXTURE_3D
     参数2:加载的层次,一般设置为0
     参数3:纹理的颜色值GL_RGBA
     参数4:宽
     参数5:高
     参数6:border,边界宽度
     参数7:format
     参数8:type
     参数9:纹理数据
     */
    glTexImage2D(GL_TEXTURE_2D, 0, GL_RGBA, fw, fh, 0, GL_RGBA, GL_UNSIGNED_BYTE, spriteData);

    //11.释放spriteData
    free(spriteData);
    return 0;
}
在这个方法中,我们为了避免纹理的翻转,使用了上篇文章中讲到的方案2。
render中设置纹理数据和采样器colorMap
  //10.----处理纹理数据-------
  //(1).glGetAttribLocation,用来获取vertex attribute的入口的
  //注意:第二参数字符串必须和shaderv.vsh中的输入变量:textCoordinate保持一致
  GLuint textCoor = glGetAttribLocation(self.myProgram, "textCoordinate");
  //(2).设置合适的格式从buffer里面读取数据
  glEnableVertexAttribArray(textCoor);
  //(3).设置读取方式
  //参数1:index,顶点数据的索引
  //参数2:size,每个顶点属性的组件数量,1,2,3,或者4.默认初始值是4.
  //参数3:type,数据中的每个组件的类型,常用的有GL_FLOAT,GL_BYTE,GL_SHORT。默认初始值为GL_FLOAT
  //参数4:normalized,固定点数据值是否应该归一化,或者直接转换为固定值。(GL_FALSE)
  //参数5:stride,连续顶点属性之间的偏移量,默认为0;
  //参数6:指定一个指针,指向数组中的第一个顶点属性的第一个组件。默认为0
  glVertexAttribPointer(textCoor, 2, GL_FLOAT, GL_FALSE, sizeof(GLfloat)*8, (float *)NULL + 6);
  [self setupTexture:@"Jessica"];
  //11. 设置纹理采样器 sampler2D
  glUniform1i(glGetUniformLocation(self.myProgram, "colorMap"), 0);
在之前
render代码第9步后增加以上代码即可。
二、GLKit实现
GLKit相对GLSL会简单很多,只需要修改render中代码即可:
- (void)render{
    GLfloat attrArr[] =
    {
        -0.5f, 0.5f, 0.0f,      1.0f, 0.0f, 1.0f,  0.0f,0.0f,//左上
        0.5f, 0.5f, 0.0f,       1.0f, 0.0f, 1.0f,  1.0f,0.0f,//右上
        -0.5f, -0.5f, 0.0f,     1.0f, 1.0f, 1.0f,  0.0f,1.0f,//左下

        0.5f, -0.5f, 0.0f,      1.0f, 1.0f, 1.0f,  1.0f,1.0f,//右下
        0.0f, 0.0f, 1.0f,       0.0f, 1.0f, 0.0f,  0.5f,0.5f,//顶点
    };

    //2.绘图索引
    GLuint indices[] =
    {
        0, 3, 2,
        0, 1, 3,
        0, 2, 4,
        0, 4, 1,
        2, 3, 4,
        1, 4, 3,
    };

    //顶点个数
    self.count = sizeof(indices) /sizeof(GLuint);

    //将顶点数组放入数组缓冲区中 GL_ARRAY_BUFFER
    GLuint buffer;
    glGenBuffers(1, &buffer);
    glBindBuffer(GL_ARRAY_BUFFER, buffer);
    glBufferData(GL_ARRAY_BUFFER, sizeof(attrArr), attrArr, GL_STATIC_DRAW);

    //将索引数组存储到索引缓冲区 GL_ELEMENT_ARRAY_BUFFER
    GLuint index;
    glGenBuffers(1, &index);
    glBindBuffer(GL_ELEMENT_ARRAY_BUFFER, index);
    glBufferData(GL_ELEMENT_ARRAY_BUFFER, sizeof(indices), indices, GL_STATIC_DRAW);

    //使用顶点数据
       glEnableVertexAttribArray(GLKVertexAttribPosition);
       glVertexAttribPointer(GLKVertexAttribPosition, 3, GL_FLOAT, GL_FALSE, sizeof(GLfloat) * 8, NULL);

       //使用颜色数据
       glEnableVertexAttribArray(GLKVertexAttribColor);
       glVertexAttribPointer(GLKVertexAttribColor, 3, GL_FLOAT, GL_FALSE, sizeof(GLfloat) * 8, (GLfloat *)NULL + 3);

    //使用纹理数据
    glEnableVertexAttribArray(GLKVertexAttribTexCoord0);
          glVertexAttribPointer(GLKVertexAttribTexCoord0, 2, GL_FLOAT, GL_FALSE, sizeof(GLfloat) * 8, (GLfloat *)NULL + 6);

        //1.获取纹理图片路径
        NSString *filePath = [[NSBundle mainBundle]pathForResource:@"Jessica" ofType:@"jpg"];

        //2.设置纹理参数
        //纹理坐标原点是左下角,但是图片显示原点应该是左上角.
        NSDictionary *options = [NSDictionary dictionaryWithObjectsAndKeys:@(0),GLKTextureLoaderOriginBottomLeft, nil];

        GLKTextureInfo *textureInfo = [GLKTextureLoader textureWithContentsOfFile:filePath options:options error:nil];

       //着色器
       self.mEffect = [[GLKBaseEffect alloc]init];

        self.mEffect.texture2d0.enabled = GL_TRUE;
        self.mEffect.texture2d0.name = textureInfo.name;

       //投影视图
       CGSize size = self.view.bounds.size;
       float aspect = fabs(size.width / size.height);
       GLKMatrix4 projectionMatrix = GLKMatrix4MakePerspective(GLKMathDegreesToRadians(90.0), aspect, 0.1f, 100.0);
       projectionMatrix = GLKMatrix4Scale(projectionMatrix, 1.0f, 1.0f, 1.0f);
       self.mEffect.transform.projectionMatrix = projectionMatrix;

       //模型视图
       GLKMatrix4 modelViewMatrix = GLKMatrix4Translate(GLKMatrix4Identity, 0.0f, 0.0f, -2.0f);
       self.mEffect.transform.modelviewMatrix = modelViewMatrix;

       //定时器
       double seconds = 0.1;
       myTimer = dispatch_source_create(DISPATCH_SOURCE_TYPE_TIMER, 0, 0, dispatch_get_main_queue());
       dispatch_source_set_timer(myTimer, DISPATCH_TIME_NOW, seconds * NSEC_PER_SEC, 0.0);
       dispatch_source_set_event_handler(myTimer, ^{

           self.XDegree += self.isXRotate * 0.1f;
           self.YDegree += self.isYRotate * 0.1f;
           self.ZDegree += self.isZRotate * 0.1f;

       });
       dispatch_resume(myTimer);

}
主要增加了读取纹理和打开
self.mEffect读取纹理属性
  //使用纹理数据
      glEnableVertexAttribArray(GLKVertexAttribTexCoord0);
      glVertexAttribPointer(GLKVertexAttribTexCoord0, 2, GL_FLOAT, GL_FALSE, sizeof(GLfloat) * 8, (GLfloat *)NULL + 6);
      //1.获取纹理图片路径
      NSString *filePath = [[NSBundle mainBundle]pathForResource:@"Jessica" ofType:@"jpg"];
      //2.设置纹理参数
      //纹理坐标原点是左下角,但是图片显示原点应该是左上角.
      NSDictionary *options = [NSDictionary dictionaryWithObjectsAndKeys:@(0),GLKTextureLoaderOriginBottomLeft, nil];
      GLKTextureInfo *textureInfo = [GLKTextureLoader textureWithContentsOfFile:filePath options:options error:nil];
       //着色器
      self.mEffect = [[GLKBaseEffect alloc]init];
      self.mEffect.texture2d0.enabled = GL_TRUE;
      self.mEffect.texture2d0.name = textureInfo.name;
上述就是GLSL和GLKit的分别实现。
觉得不错记得点赞哦!听说看完点赞的人逢考必过,逢奖必中。ღ( ´・ᴗ・` )比心