- 文章内容输出来源:拉勾教育Java高薪训练营
Spring概述
1. Spring简介
Spring 是分层的 full-stack(全栈) 轻量级开源框架,以 IoC 和 AOP 为内核,提供了展现层 Spring MVC 和业务层事务管理等众多的企业级应⽤技术,还能整合开源世界众多著名的第三⽅框架和类库,已经成为使⽤最多的 Java EE 企业应⽤开源框架。
Spring 官⽅⽹址:spring.io/
2. Spring的优势
- 方便解耦,简化开发
Spring提供的IoC容器,可以将对象之间的依赖关系由Spring来控制,避免硬编码所造成的过度程序耦合。⽤户也不必再为单例模式类、属性⽂件解析等这些很底层的需求编写代码,可以更专注于上层的应⽤。
-
支持AOP编程
AOP:Aspect Oriented Programming,面向切面编程,通过AOP编程,可以轻松实现许多OOP解决不了的功能和代码优化需求。
-
声明式事务
@Transactional
可以将我们从单调烦闷的事务管理代码中解脱出来,通过声明式⽅式灵活的进⾏事务的管理,提⾼开发效率和质量。 -
测试方便
可以⽤⾮容器依赖的编程⽅式进⾏⼏乎所有的测试⼯作,测试不再是昂贵的操作,⽽是随⼿可做的事情。例如:Spring对Junit4支持,可以通过注解方便的测试Spring程序。
-
降低Java API的使用难度
Spring对很多难用的Java EE API(如JDBC,JavaMail,远程调用等)提供了一个薄薄的封装层,通过Spring的简易封装,这些Java EE API的使用难度大为降低。
-
方便集成各种优秀的框架
Spring不排斥各种优秀的开源框架,相反,Spring可以降低各种框架的使用难度,Spring提供了对各种优秀框架(如Struts,Hibernate、Hessian、Quartz)等的直接支持。
-
源码是经典的Java学习范例
Spring的源代码设计精妙、结构清晰、匠⼼独⽤,处处体现着⼤师对Java设计模式灵活运⽤以及对Java技术的⾼深造诣。它的源代码⽆意是Java技术的最佳实践的范例。
3. Spring的核心结构
Spring是⼀个分层⾮常清晰并且依赖关系、职责定位⾮常明确的轻量级框架,主要包括⼏个⼤模块:数据处理模块、Web模块、AOP(Aspect Oriented Programming)/Aspects模块、Core Container模块和 Test 模块,如下图所示,Spring依靠这些基本模块,实现了⼀个令⼈愉悦的融合了现有解决⽅案的零侵⼊的轻量级框架。
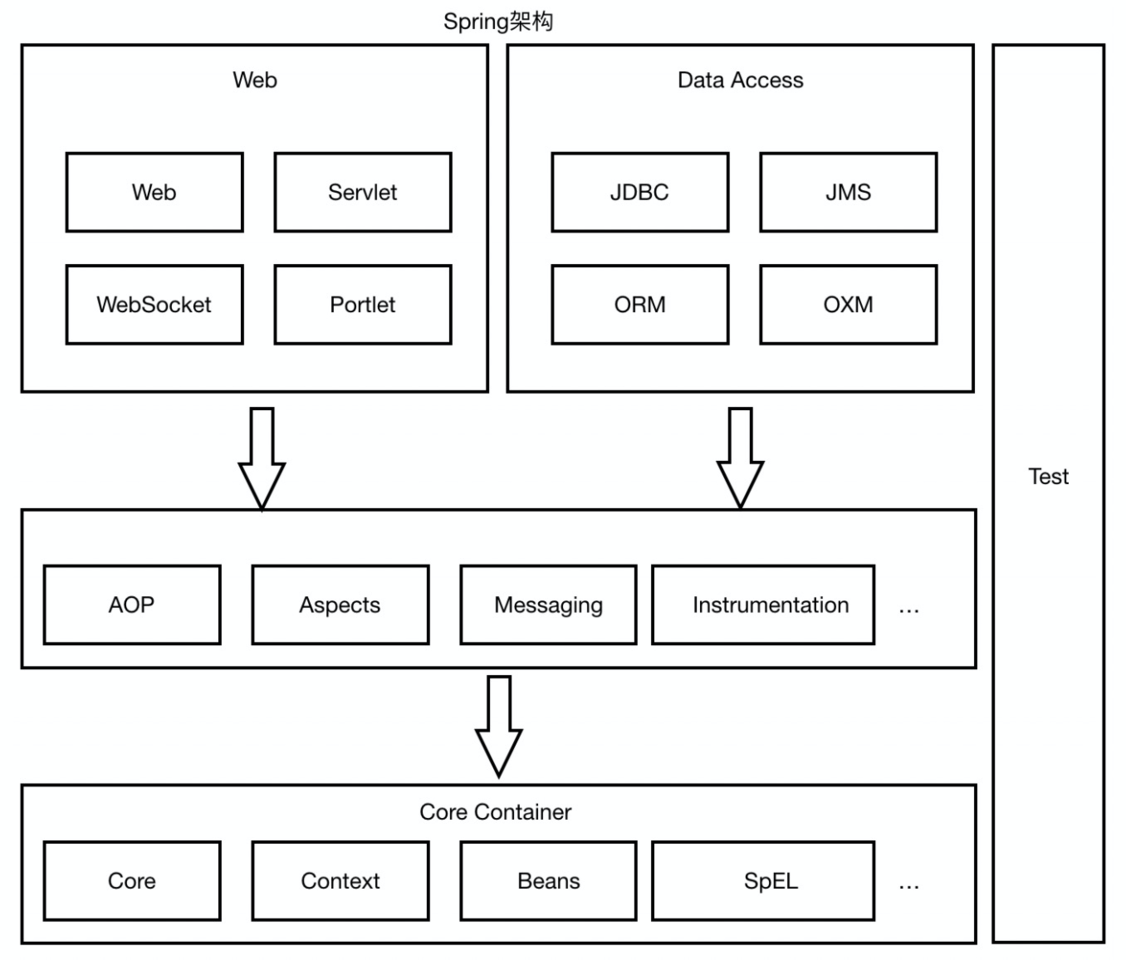
- Spring核心容器(Core Container)
容器是Spring框架最核⼼的部分,它管理着Spring应⽤中bean的创建、配置和管理。在该模块中,包括了Spring bean⼯⼚,它为Spring提供了DI的功能。基于bean⼯⼚,我们还会发现有多种Spring应⽤上下⽂的实现。所有的Spring模块都构建于核⼼容器之上。
-
AOP(Aspect Oriented Programming)/Aspects模块
Spring对⾯向切⾯编程提供了丰富的⽀持。这个模块是Spring应⽤系统中开发切⾯的基础,与DI⼀样,AOP可以帮助应⽤对象解耦。
-
数据访问与集成(Data Access/Integration)
Spring的JDBC和DAO模块封装了⼤量样板代码,这样可以使得数据库代码变得简洁,也可以更专注于我们的业务,还可以避免数据库资源释放失败⽽引起的问题。 另外,Spring AOP为数据访问提供了事务管理服务,同时Spring还对ORM进⾏了集成,如Hibernate、MyBatis等。该模块由JDBC、Transactions、ORM、OXM 和 JMS 等模块组成。
-
Web模块
该模块提供了SpringMVC框架给Web应⽤,还提供了多种构建和其它应⽤交互的远程调⽤⽅案。SpringMVC框架在Web层提升了应⽤的松耦合⽔平。
-
Test模块
Spring提供了测试模块以致⼒于Spring应⽤的测试。 通过该模块,Spring为使⽤Servlet、JNDI等编写单元测试提供了⼀系列的mock对象实现。
4. Spring的框架版本
Spring Framework不同版本对 Jdk 的要求:

核心思想
IoC和AOP不是Spring提出来的,在Spring之前就已经存在,只不过Spring在技术上对这两个思想做了很好地实现(Java)。
1. IoC
1.1. 什么是IoC?
- IoC:Inversion of Control(控制反转/反转控制),它是一个技术思想,描述的是Java开发领域对象的创建和管理问题。
- 控制:指的是对象创建(实例化、管理)的权利。
- 反转:将控制权交给外部框架了(Spring框架、IoC容器)。
1.2. IoC解决了什么问题?
解决了对象之间的耦合问题。
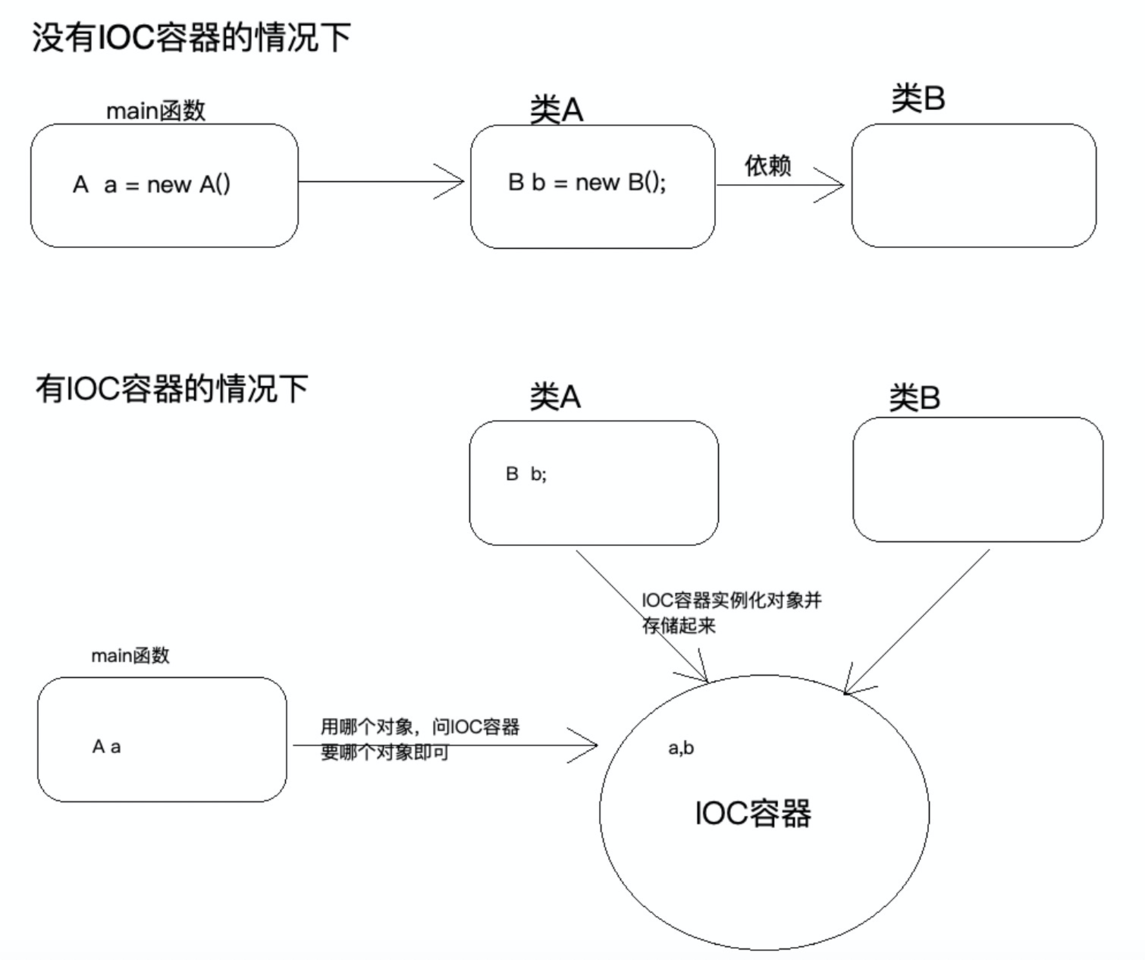
- 没有IoC容器的情况下
传统的开发方式,若类A依赖于类B,往往会在类A中new一个类B。 - 有IoC容器的情况下
IoC思想下的开发方式,我们不用自己去new对象了,而是由IoC容器(Spring框架)帮我们实例化并管理它们,我们需要用哪个对象,直接去问IoC容器要。
我们得到了一个福利,不用考虑对象的创建、管理等一系列的问题,同时也失去了创建、管理对象这一权利。
1.3. IoC和DI的区别
IoC和DI描述的是同一件事情(对象实例化和依赖关系维护),只是角度不同。
- IoC: Inversion of Control(控制反转/反转控制)
- 它是站在对象的角度,对象实例化与管理的权力交(反转)给了容器。
- DI: Dependancy Injection(依赖注⼊)
- 它是站在容器的角度,容器会把对象依赖的其他对象注入进去,比如A对象依赖于B对象,不在需要手动new一个对象出来,而是只需要声明一个B对象的属性,在实例化的过程中,容器会把B对象注入进去。
2. AOP
2.1. 什么是AOP?
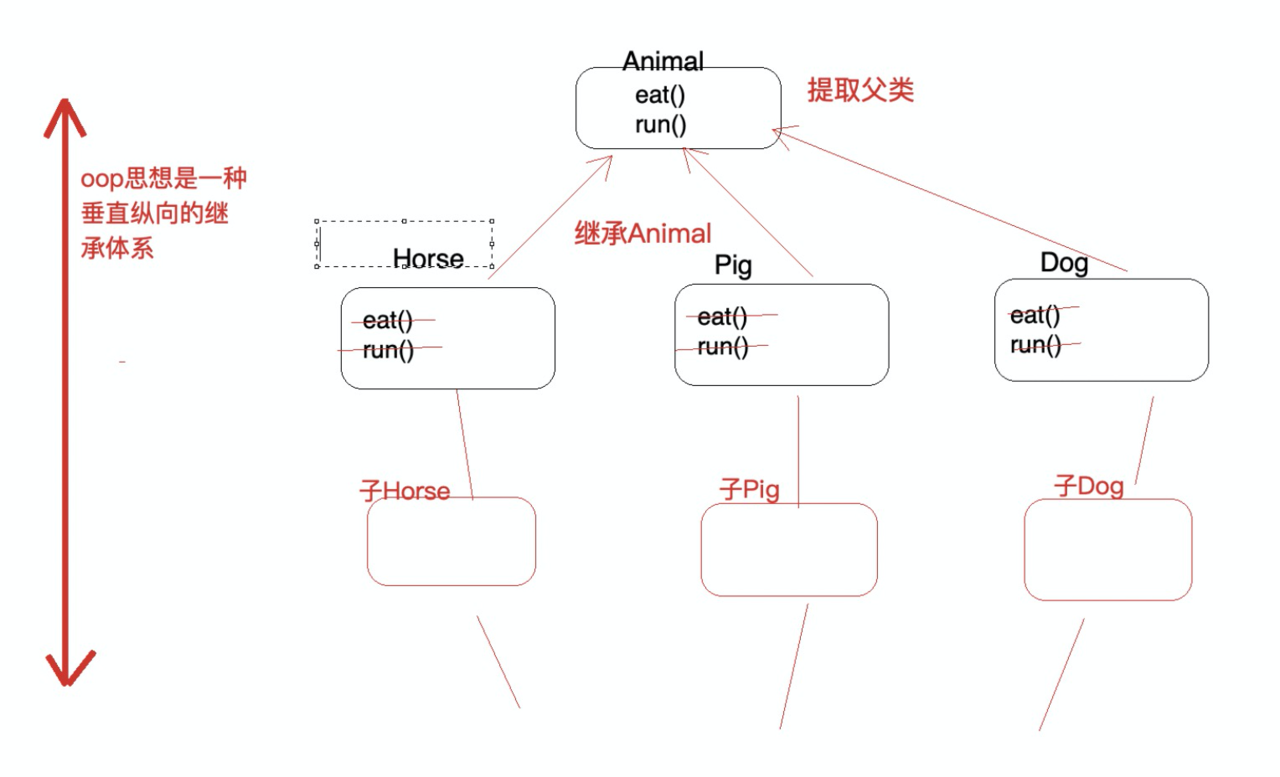
AOP:Aspect oriented Programming ⾯向切⾯编程OOP:Object oriented Programming ⾯向对象编程AOP是OOP的延续,那么先来看一下OOP。
OOP的三大基本特征是封装、继承、多态,它是一种纵向的继承体系,将重复的代码抽取到父类中,子类去继承父类,可以解决大多数的代码重复问题。
但是有一些情况,OOP是处理不了的,比如在顶级父类中的多个方法的相同位置出现了重复代码,OOP就解决不了了。
-
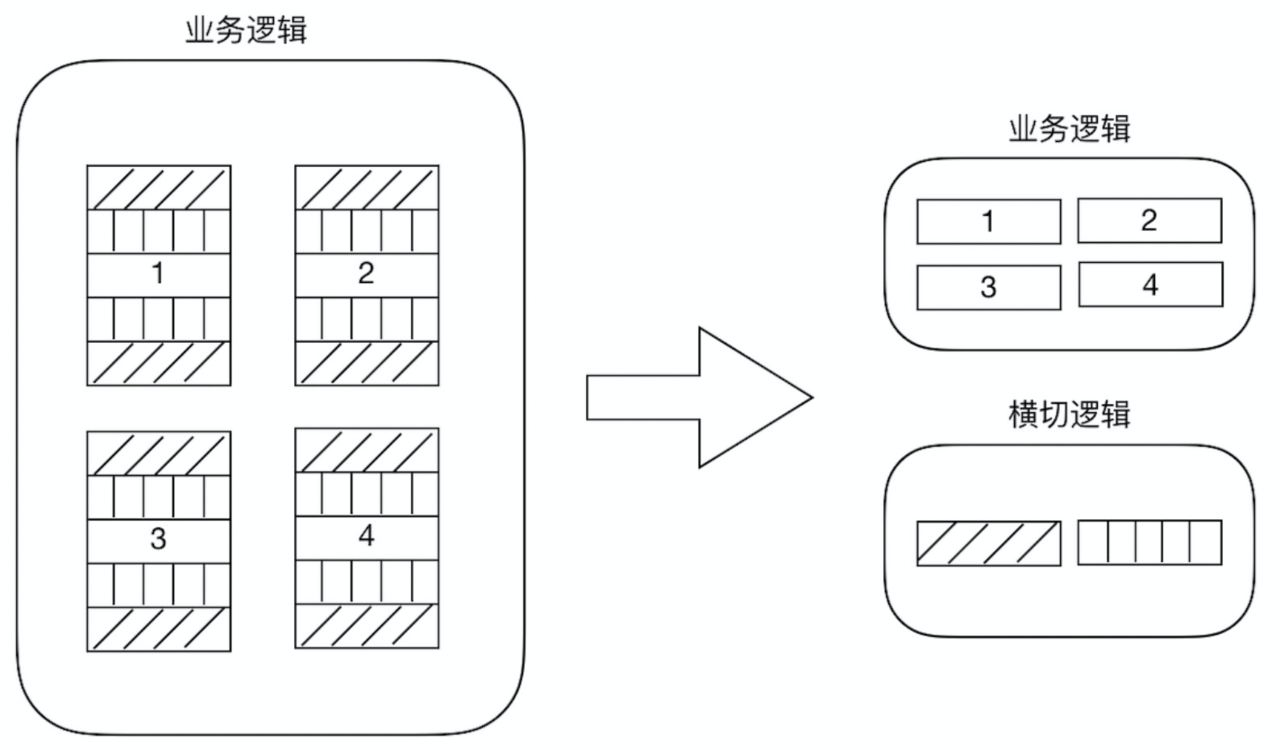
横切逻辑代码
- 在多个纵向(顺序)流程中出现的相同子流程代码,我们称之为横切逻辑代码。
- 横切逻辑代码的应用场景有限:性能监控、日志、权限校验、事务控制等。
- 横切逻辑代码存在的问题
- 代码重复,即使在其他类中封装,也要在需要的地方重复调用。
- 与业务代码耦合在一起,不方便维护。
那么现在就轮到AOP出场了,AOP提出了横向抽取机制,将横切逻辑代码抽取出来,与业务代码分离。
 代码拆分容易,那么如何在不改变原有业务逻辑的情况下,悄⽆声息的把横切逻辑代码应⽤到原有的业务逻辑中,达到和原来⼀样的效果,这个是⽐较难的。就像我上面说到的,即使在其他地方封装重复横切逻辑代码,也会重复调用。
2.2. AOP解决了什么问题?
在不改变原有业务逻辑情况下,增强横切逻辑代码,根本上解耦合,避免横切逻辑代码重复。
2.3. 为什么是面向切面编程?
- 「切」:指的是很切逻辑代码,在不改变原有业务逻辑情况下,增强横切逻辑,只能操作横切逻辑代码。
- 「面」:通常相同的横切逻辑代码不止有一处,多处横切逻辑代码就像多个点,组成一个切面。
手写IoC和AOP
1. 案例代码逻辑和结构
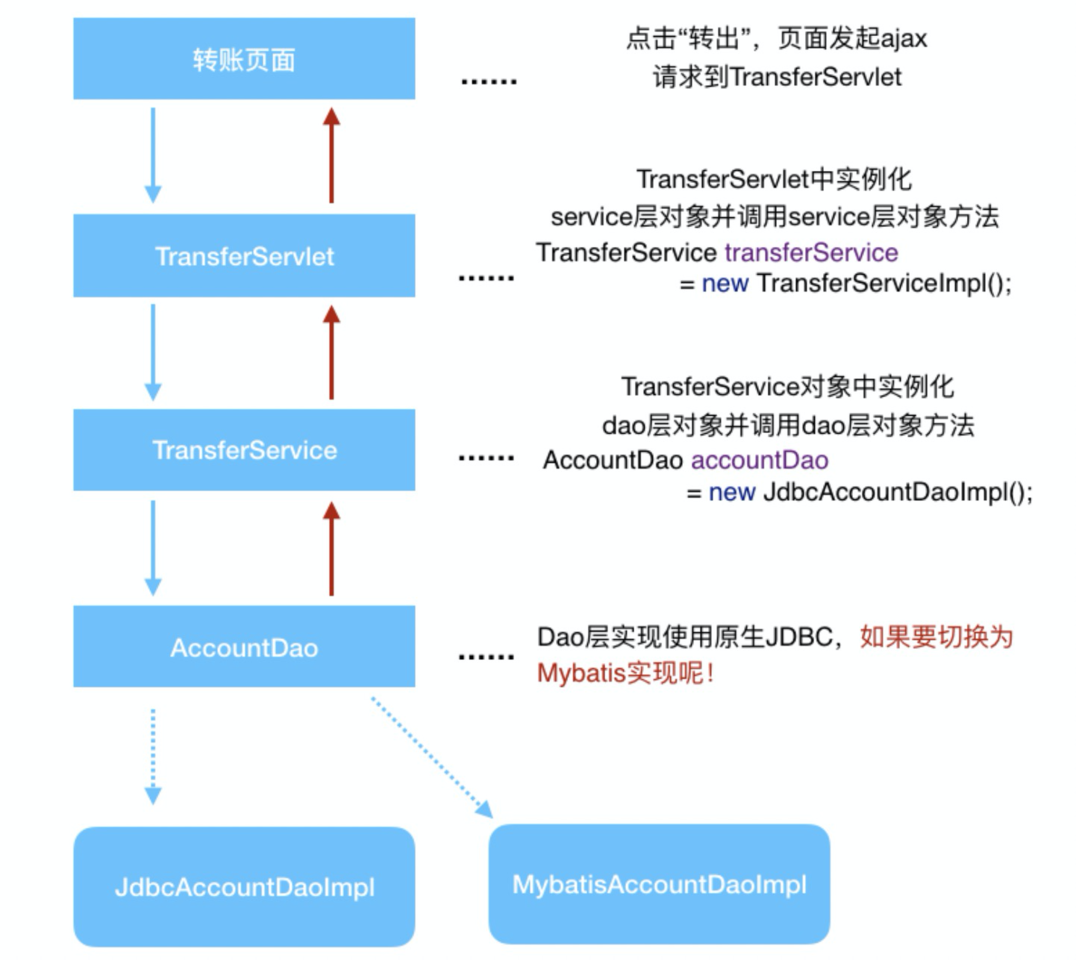 如上图,现有一个银行转账案例,代码结构分为三层,
 TransferServlet、 TransferService和 AccountDao。
- TransferServlet:前端发起转账请求到
TransferServlet,TransferServlet会实例化service层对象并调用该对象的方法。 - TransferService:
TransferService中会实例化dao层对象并调用dao层对象的方法。 - AccountDao:
dao层可以使用不同的实现与数据库交互(原生JDBC、MyBatis等),完成业务数据更新。
2. 案例代码问题分析
 上述案例中主要有两个问题:
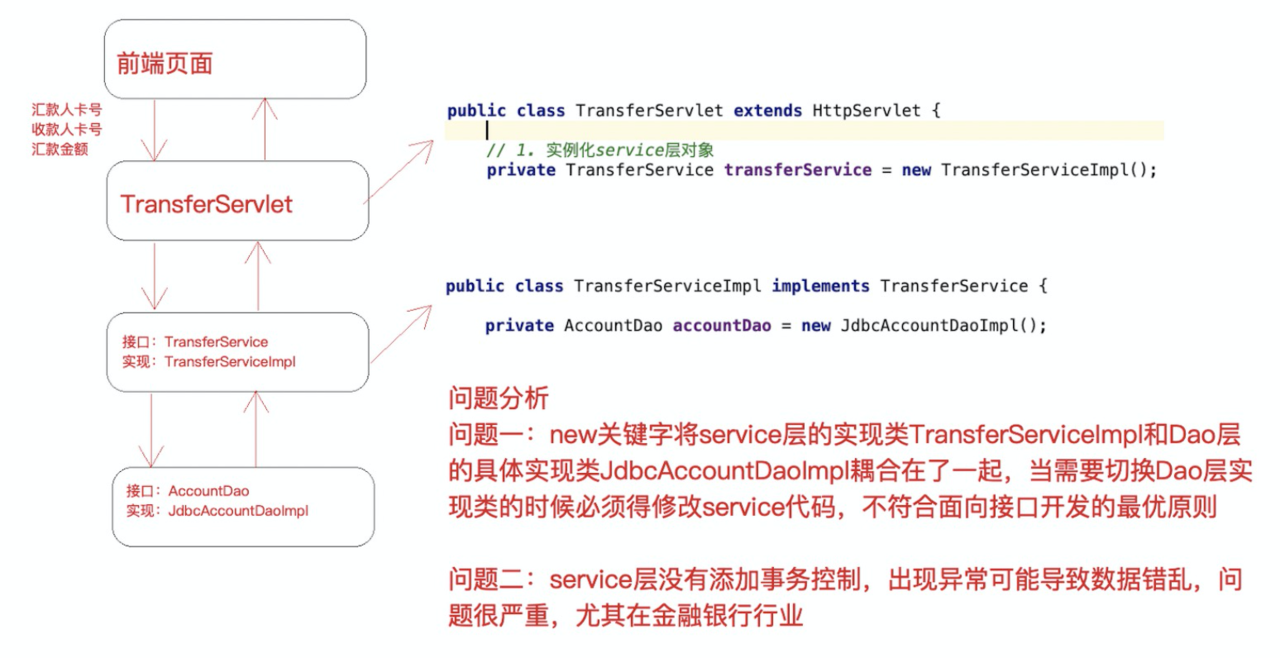
- 问题一:耦合问题
在service层中,使用
new关键字实例化对象来使用,将dao层的实现类AccountDaoImpl和service层的实现类TransferServiceImpl耦合在了一起,当dao层更换了实现类,就要修改service层的代码,面向接口开发的优势大打折扣。 -
问题二:没有添加事务控制
在service层没有添加事务控制,一旦发生异常引起数据错乱,后果是非常严重的,特别是在金融银行行业。
3. 解决方案
-
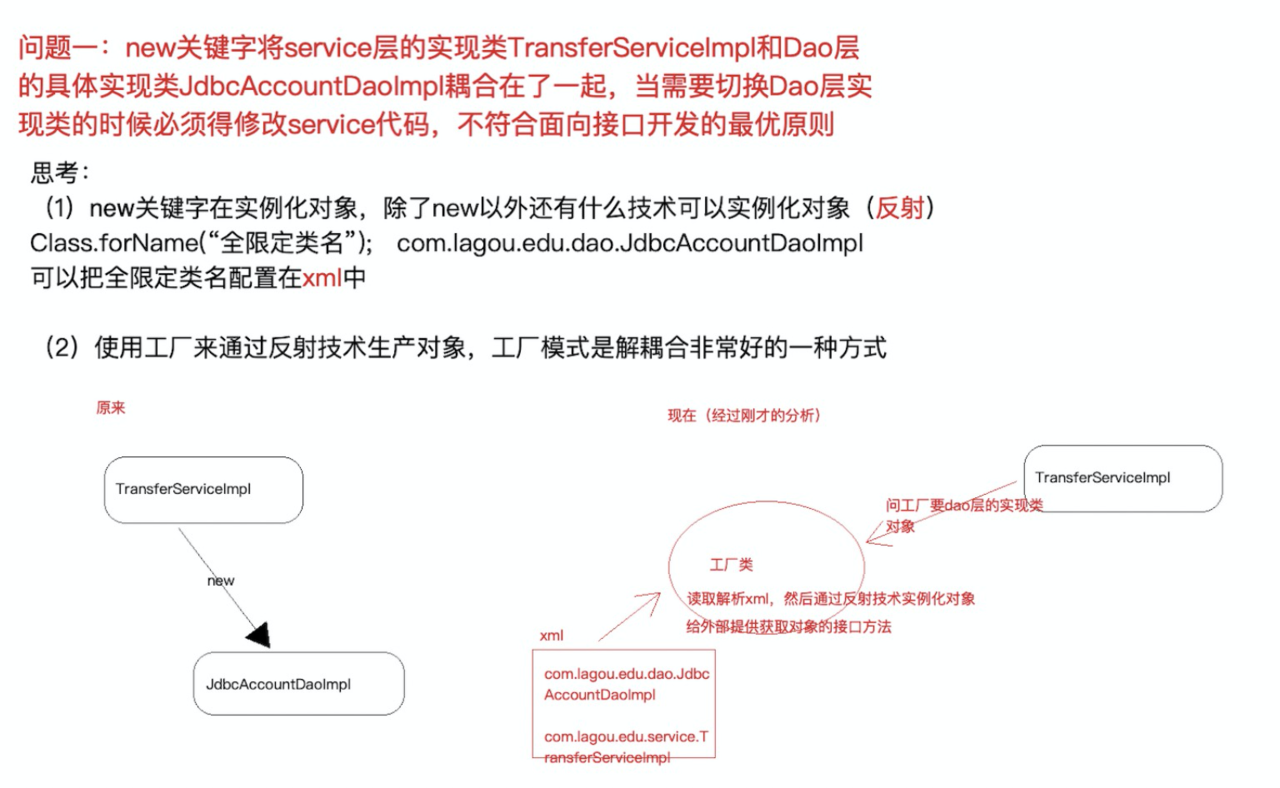
问题一:
- 使用反射技术实例化对象,由于
Class.forName("全限定类名")需要“全限定类名”,可以把全限定类名配置在xml文件中。 - 使用工厂来通过反射技术生产对象,工厂模式是解耦合非常好的一种方式。
- 更进⼀步,代码中能否只声明所需实例的接⼝类型,不出现 new也不出现⼯⼚类的字眼,如下图? 能!声明⼀个变量并提供 set ⽅法,在反射的时候将所需要的对象注⼊进去。
- 使用反射技术实例化对象,由于
- 问题二:
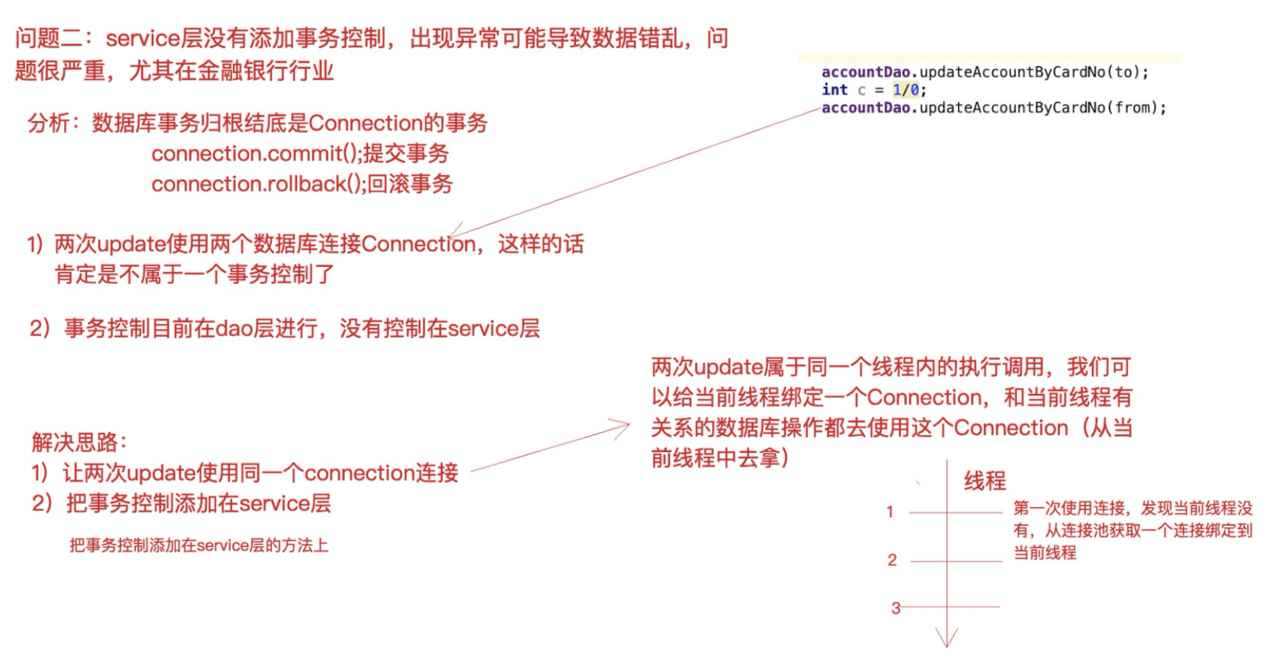
- 在
service层添加上事务控制,⼿动控制JDBC的Connection事务,但要注意将Connection和当前线程绑定(即保证⼀个线程只有⼀个Connection,这样操作才针对的是同⼀个Connection,进⽽控制的是同⼀个事务)。
- 在
-
JDK动态代理和CGLib动态代理的区别(插播一个小知识)
- 区别:
- JDK动态代理只能对实现了接口的类生成代理,而不能针对类。
- CGLIB是针对类实现代理,主要是对指定的类生成一个子类,覆盖其中的方法,并覆盖其中方法实现增强,但是因为采用的是继承,所以该类或方法最好不要声明成
final,对于final类或方法,是无法继承的。
- Spring如何选择两种代理:
- 当Bean实现接口时,Spring就会用JDK的动态代理。
- 当Bean实现接口时,可以强制使用CGLIB的动态代理。
- 当Bean没有实现接口时,Spring使用CGlib的动态代理。
- 区别:
4. 案例代码改造
- 问题一:
- XML配置文件
beans.xml:
- XML配置文件
    <?xml version="1.0" encoding="UTF-8" ?>
    <!--根标签,里面包含许多的bean子标签,每一个bean子标签都代表一个类的配置-->
    <beans>
        <!--id标识对象,class是全限定类名-->
        <bean id="accountDao" class="com.lzx.dao.impl.JdbcAccountDaoImpl"></bean>
        <bean id="transferService" class="com.lzx.service.impl.TransferServiceImpl">
            <!--set+name就锁定到传值的set方法了,可以使用反射技术调用该方法传入值-->
            <property name="AccountDao" ref="accountDao"></property>
        </bean>
    </beans>
* 增加生产对象的工厂类`BeanFactory.java`:
    package com.lzx.factory;

    import org.dom4j.Document;
    import org.dom4j.DocumentException;
    import org.dom4j.Element;
    import org.dom4j.io.SAXReader;

    import java.io.InputStream;
    import java.lang.reflect.InvocationTargetException;
    import java.lang.reflect.Method;
    import java.util.HashMap;
    import java.util.List;
    import java.util.Map;

    /**
     * 工厂类,使用反射技术生产对象
     *
     * @author lzx
     */
    public class BeanFactory {

        /**
         * 任务一:读取解析xml,通过反射技术实例化对象并且存储待用(map集合)
         * 任务二:对外提供获取实例对象的接口(根据id获取)
         */

        // 存储生产的对象
        private static Map<String,Object> beanMap = new HashMap<>();

        static {
            // 任务一:读取解析xml,通过反射技术实例化对象并且存储待用(map集合)
            // 读取xml
            InputStream resourceAsStream = BeanFactory.class.getClassLoader().getResourceAsStream("beans.xml");
            // 解析xml
            SAXReader reader = new SAXReader();
            try {
                Document document = reader.read(resourceAsStream);
                Element rootElement = document.getRootElement();//<beans>
                List<Element> elementList = rootElement.selectNodes("//bean");
                if (elementList != null && !elementList.isEmpty()) {
                    for (Element element : elementList) {
                        // 处理每个bean元素,获取id和class
                        String id = element.attributeValue("id");           //accountDao
                        String clazz = element.attributeValue("class");     //com.lzx.dao.impl.JdbcAccountDaoImpl

                        // 通过反射技术实例化对象
                        Class<?> aClass = Class.forName(clazz);
                        Object o = aClass.newInstance();

                        // 将实例化后的对象存储到map中
                        beanMap.put(id,o);
                    }
                }

                // 实例化后还要维护对象的依赖关系
                List<Element> propertyList = rootElement.selectNodes("//property");
                if (propertyList != null && !propertyList.isEmpty()) {
                    for (Element element : propertyList) {
                        // 处理每个property,获取name和ref
                        String name = element.attributeValue("name");
                        String ref = element.attributeValue("ref");

                        // 找到需要被处理依赖关系的bean
                        Element parent = element.getParent();
                        String parentId = parent.attributeValue("id");
                        Object parentObject = beanMap.get(parentId);
                        Method[] methods = parentObject.getClass().getMethods();
                        if (methods.length != 0) {
                            for (Method method : methods) {
                                if (method.getName().equalsIgnoreCase("set" + name)) {
                                    method.invoke(parentObject,beanMap.get(ref));
                                }
                            }
                        }

                        // 把处理后的bean重新放入map
                        beanMap.put(parentId,parentObject);
                    }
                }
            } catch (DocumentException e) {
                e.printStackTrace();
            } catch (ClassNotFoundException e) {
                e.printStackTrace();
            } catch (IllegalAccessException e) {
                e.printStackTrace();
            } catch (InstantiationException e) {
                e.printStackTrace();
            } catch (InvocationTargetException e) {
                e.printStackTrace();
            }
        }

        // 任务二:对外提供获取实例对象的接口(根据id获取)
        public static Object getBean(String id) {
            return beanMap.get(id);
        }
    }
* 修改`TransferServlet`:
    // 1. 实例化service层对象
    //    private TransferService transferService = new TransferServiceImpl();
    private TransferService transferService = (TransferService) BeanFactory.getBean("transferService");
* 修改`TransferServiceImpl`:
    //    private AccountDao accountDao = new JdbcAccountDaoImpl();
    // 声明
    private AccountDao accountDao;

    // set方法传值
    public void setAccountDao(AccountDao accountDao) {
        this.accountDao = accountDao;
    }
- 问题二:
- 增加ConnectionUtil.java
    package com.lzx.utils;

    import java.sql.Connection;
    import java.sql.SQLException;

    /**
     * @author lzx
     */
    public class ConnectionUtil {

        private ThreadLocal<Connection> threadLocal = new ThreadLocal<>();//存储当前线程的连接

    //    //饿汉 单例模式
    //    private static ConnectionUtil connectionUtil = new ConnectionUtil();
    //
    //    private ConnectionUtil() {
    //
    //    }
    //
    //    public static ConnectionUtil getInstance() {
    //        return connectionUtil;
    //    }

        /**
         * 从当前线程获取连接
         * @return
         * @throws SQLException
         */
        public Connection getCurrentThreadConn() throws SQLException {

            /**
             * 判断当前线程是否绑定连接,如果没有绑定,需要从连接池拿,并绑定到当前线程
             */
            Connection connection = threadLocal.get();
            if (connection == null) {
                // 从连接池获取连接
                connection = DruidUtils.getInstance().getConnection();
                // 绑定到当前线程
                threadLocal.set(connection);
            }
            return connection;
        }
    }
* 增加 **TransactionManager** 事务管理器类
    package com.lzx.utils;

    import java.sql.SQLException;

    /**
     * 事务管理器
     * @author lzx
     */
    public class TransactionManager {

    //    private static TransactionManager transactionManager = new TransactionManager();
    //
    //    // 饿汉 单例模式
    //    private TransactionManager() {
    //
    //    }
    //
    //    public static TransactionManager getInstance() {
    //        return transactionManager;
    //    }

        private ConnectionUtil connectionUtil;

        public void setConnectionUtil(ConnectionUtil connectionUtil) {
            this.connectionUtil = connectionUtil;
        }

        // 开启事务(关闭自动提交)
        public void beginTransaction() throws SQLException {
            connectionUtil.getCurrentThreadConn().setAutoCommit(false);
        }

        // 提交事务
        public void commitTransaction() throws SQLException {
            connectionUtil.getCurrentThreadConn().commit();
        }

        // 回滚事务
        public void rollBackTransaction() throws SQLException {
            connectionUtil.getCurrentThreadConn().rollback();;
        }
    }
* 增加 **ProxyFactory** 代理⼯⼚类
    package com.lzx.factory;

    import com.lzx.utils.TransactionManager;
    import net.sf.cglib.proxy.Enhancer;
    import net.sf.cglib.proxy.MethodInterceptor;
    import net.sf.cglib.proxy.MethodProxy;

    import java.lang.reflect.InvocationHandler;
    import java.lang.reflect.Method;
    import java.lang.reflect.Proxy;

    /**
     * 代理对象工厂类
     *
     * @author lzx
     */
    public class ProxyFactory {

    //    // 构造函数私有
    //    private ProxyFactory() {
    //
    //    }
    //
    //    // 饿汉 单例模式
    //    private static ProxyFactory proxyFactory = new ProxyFactory();
    //
    //    public static ProxyFactory getInstance() {
    //        return proxyFactory;
    //    }

        private TransactionManager transactionManager;

        public void setTransactionManager(TransactionManager transactionManager) {
            this.transactionManager = transactionManager;
        }

        /**
         * 获取JDK动态代理
         * @param object
         * @return
         */
        public Object getJdkProxy(Object object) {
            return Proxy.newProxyInstance(object.getClass().getClassLoader(), object.getClass().getInterfaces(), new InvocationHandler() {
                @Override
                public Object invoke(Object proxy, Method method, Object[] args) throws Throwable {
                    Object result = null;
                    try {
                        //开启事务
                        transactionManager.beginTransaction();
                        //业务逻辑代码
                        result = method.invoke(object,args);
                        // 提交事务
                        transactionManager.commitTransaction();
                    } catch (Exception e) {
                        e.printStackTrace();
                        // 回滚事务
                        transactionManager.rollBackTransaction();
                        // 把异常抛出,方便上层捕获
                        throw e;
                    }
                    return result;
                }
            });
        }

        /**
         * 获取CGLib动态代理
         * @param object
         * @return
         */
        public Object getCglibProxy(Object object) {
            return Enhancer.create(object.getClass(), new MethodInterceptor() {
                @Override
                public Object intercept(Object o, Method method, Object[] objects, MethodProxy methodProxy) throws Throwable {
                    Object result = null;
                    try {
                        //开启事务
                        transactionManager.beginTransaction();
                        //业务逻辑代码
                        result = method.invoke(object,objects);
                        // 提交事务
                        transactionManager.commitTransaction();
                    } catch (Exception e) {
                        e.printStackTrace();
                        // 回滚事务
                        transactionManager.rollBackTransaction();
                        // 把异常抛出,方便上层捕获
                        throw e;
                    }
                    return result;
                }
            });
        }
    }
* 修改beans.xml
    <?xml version="1.0" encoding="UTF-8" ?>
    <!--根标签,里面包含许多的bean子标签,每一个bean子标签都代表一个类的配置-->
    <beans>
        <!--id标识对象,class是全限定类名-->
        <bean id="accountDao" class="com.lzx.dao.impl.JdbcAccountDaoImpl">
            <property name="ConnectionUtil" ref="connectionUtil"/>
        </bean>
        <bean id="transferService" class="com.lzx.service.impl.TransferServiceImpl">
            <!--set+name就锁定到传值的set方法了,可以使用反射技术调用该方法传入值-->
            <property name="AccountDao" ref="accountDao"></property>
        </bean>

        <!--配置新增的三个bean-->
        <bean id="connectionUtil" class="com.lzx.utils.ConnectionUtil"></bean>

        <!--事务管理器-->
        <bean id="transactionManager" class="com.lzx.utils.TransactionManager">
            <property name="ConnectionUtil" ref="connectionUtil"/>
        </bean>

        <!--代理对象工厂-->
        <bean id="proxyFactory" class="com.lzx.factory.ProxyFactory">
            <property name="TransactionManager" ref="transactionManager"/>
        </bean>
    </beans>
* 修改 **JdbcAccountDaoImpl** 实现类
    package com.lzx.dao.impl;

    import com.lzx.dao.AccountDao;
    import com.lzx.pojo.Account;
    import com.lzx.utils.ConnectionUtil;

    import java.sql.Connection;
    import java.sql.PreparedStatement;
    import java.sql.ResultSet;

    /**
     * @author lzx
     */
    public class JdbcAccountDaoImpl implements AccountDao {

        private ConnectionUtil connectionUtil;

        public void setConnectionUtil(ConnectionUtil connectionUtil) {
            this.connectionUtil = connectionUtil;
        }

        @Override
        public Account queryAccountByCardNo(String cardNo) throws Exception {
            //从连接池获取连接
    //        Connection con = DruidUtils.getInstance().getConnection();
            Connection con = connectionUtil.getCurrentThreadConn();
            String sql = "select * from account where cardNo=?";
            PreparedStatement preparedStatement = con.prepareStatement(sql);
            preparedStatement.setString(1,cardNo);
            ResultSet resultSet = preparedStatement.executeQuery();
            Account account = new Account();
            while(resultSet.next()) {
                account.setCardNo(resultSet.getString("cardNo"));
                account.setName(resultSet.getString("name"));
                account.setMoney(resultSet.getInt("money"));
            }
            resultSet.close();
            preparedStatement.close();
    //        con.close();
            return account;
        }

        @Override
        public int updateAccountByCardNo(Account account) throws Exception {
            //从连接池获取连接
    //        Connection con = DruidUtils.getInstance().getConnection();
            Connection con = connectionUtil.getCurrentThreadConn();
            String sql = "update account set money=? where cardNo=?";
            PreparedStatement preparedStatement = con.prepareStatement(sql);
            preparedStatement.setInt(1,account.getMoney());
            preparedStatement.setString(2,account.getCardNo());
            int i = preparedStatement.executeUpdate();
            preparedStatement.close();
    //        con.close();
            return i;
        }
    }
Spring IoC 应用
1. Spring IoC 基础
1.1. Spring IoC的实现
| 定义bean信息方式 | 加载方式 |
|---|---|
| 纯xml模式 (bean信息全部配置在xml文件中) |
JavaSE应用:ApplicationContext applicationContext = new ClassPathXmlApplicationContext(“beans.xml”)或new FileSystemXmlApplicationContext(“c:/beans.xml”) JavaWeb应用:ContextLoaderListener(监听器去加载xml) |
| xml + 注解 (部分bean配置在xml中,部分bean使用注解定义) |
JavaSE应用:ApplicationContext applicationContext = new ClassPathXmlApplicationContext(“beans.xml”)或new FileSystemXmlApplicationContext(“c:/beans.xml”) JavaWeb应用:ContextLoaderListener(监听器去加载xml) |
| 纯注解模式 (所有的bean全部使用注解定义) |
JavaSE应用:ApplicationContext applicationContext = new AnnotationConfigApplicationContext(SpringConfig.class) JavaWeb应用:ContextLoaderListener(监听器去加载xml) |
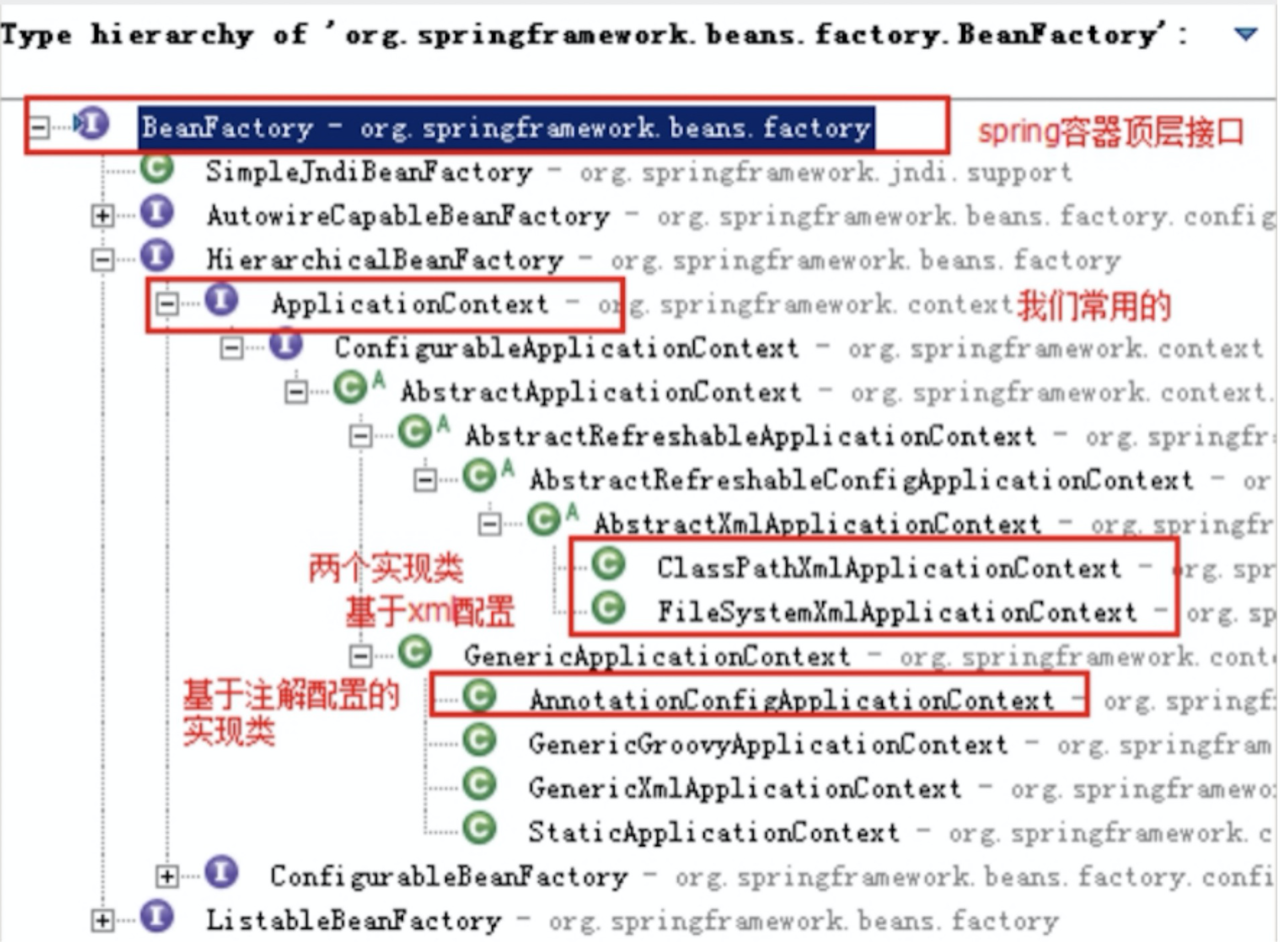
1.2. BeanFactory和ApplicationContext的区别
BeanFactory是Spring框架中IoC容器的顶层接⼝,它只是⽤来定义⼀些基础功能,定义⼀些基础规范,⽽ApplicationContext是它的⼀个⼦接⼝,所以ApplicationContext是具备BeanFactory提供的全部功能的。
通常,我们称BeanFactory为SpringIOC的基础容器,ApplicationContext是容器的⾼级接⼝,⽐BeanFactory要拥有更多的功能,⽐如说国际化⽀持和资源访问(xml,java配置类)等等.
1.3. Spring IoC容器的启动方式
- Java环境下启动
- ClassPathXmlApplicationContext : 从类的根路径下加载配置⽂件(推荐使⽤)
- FileSystemXmlApplicationContext : 从磁盘路径上加载配置⽂件
- AnnotationConfigApplicationContext : 纯注解模式下启动Spring IoC容器
- Web环境下启动
- 从Xml启动
    <!DOCTYPE web-app PUBLIC
     "-//Sun Microsystems, Inc.//DTD Web Application 2.3//EN"
     "http://java.sun.com/dtd/web-app_2_3.dtd" >

    <web-app>
      <display-name>Archetype Created Web Application</display-name>

      <!--配置spring ioc容器的配置文件-->
      <context-param>
        <param-name>contextConfigLocation</param-name>
        <param-value>classpath:applicationContext.xml</param-value>
      </context-param>

      <!--使用监听器启动Spring IoC容器-->
      <listener>
        <listener-class>org.springframework.web.context.ContextLoaderListener</listener-class>
      </listener>
    </web-app>
* 从配置类启动
    <!DOCTYPE web-app PUBLIC
     "-//Sun Microsystems, Inc.//DTD Web Application 2.3//EN"
     "http://java.sun.com/dtd/web-app_2_3.dtd" >

    <web-app>
      <display-name>Archetype Created Web Application</display-name>

      <!--告诉ContextLoaderListener使用注解启动IOC容器-->
      <context-param>
        <param-name>contextClass</param-name>
        <param-value>org.springframework.web.context.support.AnnotationConfigWebApplicationContext</param-value>
      </context-param>

      <!--配置spring ioc容器的配置文件-->
      <context-param>
        <param-name>contextConfigLocation</param-name>
        <!--配置启动类的全限定类名-->
        <param-value>com.lzx.SpringConfig</param-value>
      </context-param>

      <!--使用监听器启动Spring IoC容器-->
      <listener>
        <listener-class>org.springframework.web.context.ContextLoaderListener</listener-class>
      </listener>
    </web-app>
1.4. 纯xml模式
- 文件头
<?xml version="1.0" encoding="UTF-8"?>
<beans xmlns="http://www.springframework.org/schema/beans"
 xmlns:xsi="http://www.w3.org/2001/XMLSchema-instance"
 xsi:schemaLocation="http://www.springframework.org/schema/beans
 https://www.springframework.org/schema/beans/spring-beans.xsd">
- 实例化
Bean的三种方式- 使用无参构造函数
默认情况下会通过反射技术调用无参构造函数来实例化对象,若类中没有无参构造函数,将实例化失败。
- 使用无参构造函数
    <!--方式一:无参构造(推荐使用)-->
    <bean id="connectionUtil" class="com.lzx.utils.ConnectionUtil"></bean>
 *  使用静态方法
    使用`factory-method`属性指定一个`Bean`中静态方法,将这个静态方法中`new`出来的对象放入IoC容器中。
    <!--方式二:静态方法-->
    <bean id="connectionUtil" class="com.lzx.factory.CreateBeanFactory" factory-method="getInstanceStatic"/>
 *  使用实例化方法
    使用实例化方法时,要先实例化含有这个方法的`Bean`,然后使用`factory-bean`属性指定这个被实例化的`Bean`,最后再使用`factory-method`属性指定该实例化方法。
    <!--方式三:实例化方法-->
    <bean id="createBeanFactory" class="com.lzx.factory.CreateBeanFactory"/>
    <bean id="connectionUtil" factory-bean="createBeanFactory" factory-method="getInstance"/>
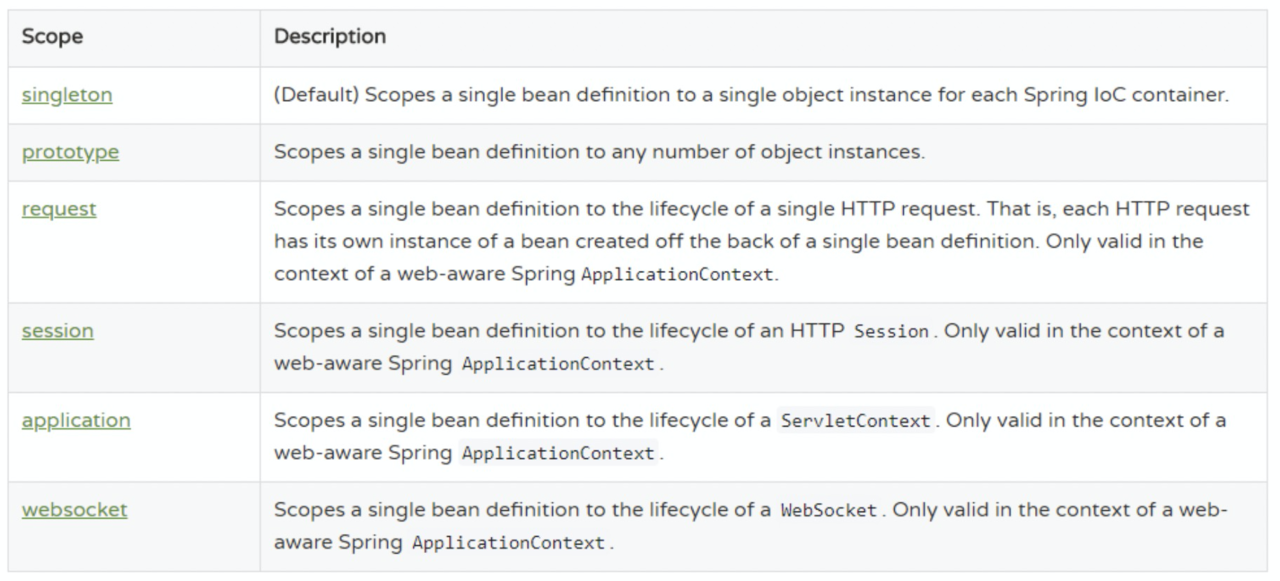
Bean的作用范围和生命周期- 作用范围 在
bean标签中,使用scope属性指定bean的作用范围,默认signleton(单例)。常用的是signleton(单例)、prototype(原型,也称多例)。 - 生命周期
生命周期\作用范围 signleton prototype 对象出⽣ 当创建容器时,对象就被创建了 当使⽤对象时,创建新的对象实例 对象活着 只要容器在,对象⼀直活着 只要对象在使⽤中,就⼀直活着 对象死亡 当销毁容器时,对象就被销毁了 当对象⻓时间不⽤时,被java的垃圾回收器回收了 ⼀句话总结 单例模式的bean对象⽣命周期与容器相同 多例模式的bean对象,spring框架只负责创建,不负责销毁 - 作用范围 在
Bean标签属性id属性: ⽤于给bean提供⼀个唯⼀标识。在⼀个标签内部,标识必须唯⼀。class属性:⽤于指定创建Bean对象的全限定类名。name属性:⽤于给bean提供⼀个或多个名称。多个名称⽤空格分隔。factory-bean属性:⽤于指定创建当前bean对象的⼯⼚bean的唯⼀标识。当指定了此属性之后,class属性失效。factory-method属性:⽤于指定创建当前bean对象的⼯⼚⽅法,如配合factory-bean属性使⽤,则class属性失效。如配合class属性使⽤,则⽅法必须是static的。scope属性:⽤于指定bean对象的作⽤范围。通常情况下就是singleton。当要⽤到多例模式时,可以配置为prototype。init-method属性:⽤于指定bean对象的初始化⽅法,此⽅法会在bean对象装配后调⽤。必须是⼀个⽆参⽅法。destory-method属性:⽤于指定bean对象的销毁⽅法,此⽅法会在bean对象销毁前执⾏。它只能为scope是singleton时起作⽤。
- DI依赖注⼊的xml配置
- 按注入方式分类
- set方法注入:通过类成员的set⽅法实现数据的注⼊。(使⽤最多的)
- 构造函数注入:利⽤带参构造函数实现对类成员的数据赋值。
- 按注入的数据类型分类
- 基本数据类型和String
- 其他Bean类型:注⼊的数据类型是对象类型
- 复杂类型(集合类型)
- 在使⽤构造函数注⼊时,涉及的标签是
constructor-arg,该标签有如下属性:name:⽤于给构造函数中指定名称的参数赋值。index:⽤于给构造函数中指定索引位置的参数赋值。value:⽤于指定基本类型或者String类型的数据。ref:⽤于指定其他Bean类型的数据。写的是其他bean的唯⼀标识。
- 按注入方式分类
        <!--构造器注入-->
        <constructor-arg name="connectionUtil" ref="connectionUtil"/>
        <constructor-arg name="name" value="lisi"/>
 *  在使⽤**set⽅法注⼊**时,需要使⽤`property`标签,该标签属性如下:

     *  `name`:指定注⼊时调⽤的set⽅法名称。(注:不包含set这三个字⺟,druid连接池指定属性名称)
     *  `value`:指定注⼊的数据。它⽀持基本类型和String类型。
     *  `ref`:指定注⼊的数据。它⽀持其他bean类型。写的是其他bean的唯⼀标识。
 *  复杂数据类型注⼊
    它指的是集合类型数据。集合分为两类,⼀类是List结构(数组结构),⼀类是Map接⼝(键值对) 。 接下来就是注⼊的⽅式的选择,只能在构造函数和set⽅法中选择,我们的示例选⽤set⽅法注⼊。
        <!--复杂参数注入-->
        <property name="myArray">
            <array>
                <value>array1</value>
                <value>array2</value>
            </array>
        </property>
        <property name="myMap">
            <map>
                <entry key="map1" value="value1"/>
                <entry key="map2" value="value2"/>
            </map>
        </property>
        <property name="mySet">
            <set>
                <value>set1</value>
                <value>set2</value>
            </set>
        </property>
        <property name="myProperties">
            <props>
                <prop key="prop1"> value1</prop>
                <prop key="prop2"> value2</prop>
            </props>
        </property>
1.5. xml+注解模式
注意: 1)实际企业开发中,纯xml模式使⽤已经很少了
2)引⼊注解功能,不需要引⼊额外的jar
3)xml+注解结合模式,xml⽂件依然存在,所以,springIOC容器的启动仍然从加载xml开始
4)哪些bean的定义写在xml中,哪些bean的定义使⽤注解
第三⽅jar中的bean定义在xml,⽐如德鲁伊数据库连接池第三⽅jar中的bean定义在xml,⽐如德鲁伊数据库连接池
⾃⼰开发的bean定义使⽤注解
| xml形式 | 对应的注解形式 |
|---|---|
标签bean |
@Component("accountDao"),注解加在类上,bean的id属性内容直接配置在注解后⾯如果不配置,默认定义个这个bean的id为类的类名⾸字⺟⼩写;另外,针对分层代码开发提供了@Componenet的三种别名@Controller``、@Service、@Repository分别⽤于控制层类、服务层类、dao层类的bean定义,这四个注解的⽤法完全⼀样,只是为了更清晰的区分⽽已 |
标签的scope属性 |
@Scope("prototype"),默认单例,注解加在类上标签的 |
标签的initmethod属性 |
@PostConstruct,注解加在⽅法上,该⽅法就是初始化后调⽤的⽅法 |
标签的destorymethod属性 |
@PreDestory,注解加在⽅法上,该⽅法就是销毁前调⽤的⽅法 |
- DI 依赖注⼊的注解实现⽅式
- @Autowried(推荐使用)
采取的策略为按照类型注⼊。
- @Autowried(推荐使用)
    @Autowired
    private AccountDao accountDao;
当⼀个类型有多个bean值的时候,会造成⽆法选择具体注⼊哪⼀个的情况,这个时候我们需要配合着@Qualifier使⽤。
    @Autowired
    @Qualifier("accountDao")
    private AccountDao accountDao;
 *  @Resource(不推荐使用)
    由 J2EE 提供,需要导⼊包 javax.annotation.Resource。
    @Resource 默认按照 ByName ⾃动注⼊。

> @Resource 在 Jdk 11中已经移除,如果要使⽤,需要单独引⼊jar包
    <dependency>
        <groupId>javax.annotation</groupId>
        <artifactId>javax.annotation-api</artifactId>
        <version>1.3.2</version>
    </dependency>
1.6. 纯注解模式
@Configuration注解,表名当前类是⼀个配置类@ComponentScan注解,替代 context:component-scan@PropertySource,引⼊外部属性配置⽂件@Import引⼊其他配置类@Value对变量赋值,可以直接赋值,也可以使⽤ ${} 读取资源配置⽂件中的信息@Bean将⽅法返回对象加⼊ SpringIOC 容器
2. Spring IoC 高级特性
2.1. lazy-Init 延迟加载
bean标签的lazy-init属性只对scope="singleton"(单例)的bean生效,多例的bean即使配置了lazy-init属性也没用,它只会在getBean的时候实例化。
lazy-init默认是为false的.
lazy-init="false"时,关闭延迟加载,bean在容器初始化的时候就实例化。
<bean id="connectionUtil" class="com.lzx.utils.ConnectionUtil" lazy-init="false"></bean>
lazy-init="true"时,开启延迟加载,bean在被使用的时候才实例化。
<bean id="connectionUtil" class="com.lzx.utils.ConnectionUtil" lazy-init="true"></bean>
全局配置延迟加载:使用beans根标签的default-lazy-init属性,用法和lazy-init相同。
<beans default-lazy-init="true">
 <!-- no beans will be eagerly pre-instantiated... -->
</beans>
注解模式使用延迟加载:在bean上添加@Lazy注解即可开启延迟加载。
2.2. BeanFactory和FactoryBean
- BeanFactory
是容器的顶级接⼝,定义了容器的⼀些基础⾏为,负责⽣产和管理Bean的⼀个⼯⼚, 具体使⽤它下⾯的⼦接⼝类型,⽐如ApplicationContext。 - FactoryBean
Spring中Bean有两种,⼀种是普通Bean,⼀种是⼯⼚Bean(FactoryBean),FactoryBean可以⽣成某⼀个类型的Bean实例(返回给我们),也就是说我们可以借助于它⾃定义Bean的创建过程。
FactoryBean源码:
// 可以让我们⾃定义Bean的创建过程(完成复杂Bean的定义)
public interface FactoryBean<T> {
    // 返回FactoryBean创建的Bean实例,如果isSingleton返回true,则该实例会放到Spring容器的单例对象缓存池中Map
    @Nullable
    T getObject() throws Exception;
    // 返回FactoryBean创建的Bean类型
    @Nullable
    Class<?> getObjectType();
    // 返回作⽤域是否单例
    default boolean isSingleton() {
        return true;
    }
}
使用FactoryBean创建复杂Bean:Company
public class Company {
    private String name;
    private String address;
    //省略getter/setter/toString..
}
CompanyFactoryBean类
public class CompanyFactoryBean implements FactoryBean<Company> {

    private String companyInfo;

    public void setCompanyInfo(String companyInfo) {
        this.companyInfo = companyInfo;
    }

    @Override
    public Company getObject() throws Exception {
        String[] strings = companyInfo.split(",");
        Company company = new Company();
        company.setName(strings[0]);
        company.setAddress(strings[1]);
        return company;
    }

    @Override
    public Class<?> getObjectType() {
        return Company.class;
    }

    @Override
    public boolean isSingleton() {
        return true;
    }
}
Xml配置
<bean id="companyBean" class="com.lzx.factory.CompanyFactoryBean">
    <property name="companyInfo" value="拉勾,中关村"/>
</bean>
获取Company使用getBean(id),获取FactoryBean,需要在id前加上’&’。
Object companyBean = applicationContext.getBean("companyBean");
Object companyBeanFactory = applicationContext.getBean("&companyBean");
System.out.println(companyBean);
System.out.println(companyBeanFactory);

//测试结果
Company{name='拉勾', address='中关村'}
com.lzx.factory.CompanyFactoryBean@2805d709
2.3. 后置处理器
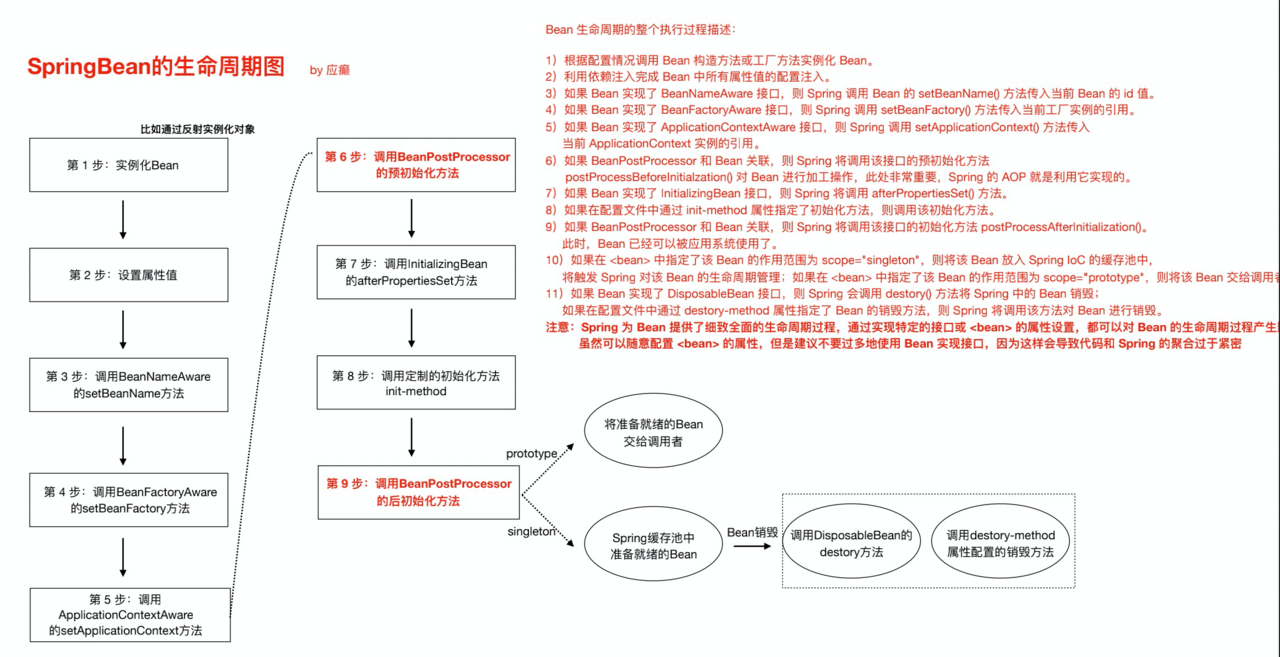
2.3.1 SpringBean的生命周期
1)根据配置情况调⽤Bean构造⽅法或⼯⼚⽅法实例化Bean。
2)利⽤依赖注⼊完成Bean中所有属性值的配置注⼊。
3)如果Bean实现了BeanNameAware接⼝,则Spring调⽤Bean的setBeanName()⽅法传⼊当前Bean的id值。
4)如果Bean实现了BeanFactoryAware接⼝,则Spring调⽤setBeanFactory()⽅法传⼊当前⼯⼚实例的引⽤。
5)如果Bean实现了ApplicationContextAware接⼝,则Spring调⽤setApplicationContext()⽅法传⼊当前ApplicationContext实例的引⽤。
6)如果BeanPostProcessor和Bean关联,则Spring将调⽤该接⼝的预初始化⽅法 postProcessBeforeInitialzation()对Bean进⾏加⼯操作,此处⾮常重要Spring的AOP就是利⽤它实现的。
7)如果Bean实现了InitializingBean接⼝,则Spring将调⽤afterPropertiesSet()⽅法。
8)如果在配置⽂件中通过init-method属性指定了初始化⽅法,则调⽤该初始化⽅法。
9)如果BeanPostProcessor和Bean关联,则Spring将调⽤该接⼝的初始化⽅法postProcessAfterInitialization()。此时,Bean已经可以被应⽤系统使⽤了。
10)如果在 中指定了该Bean的作⽤范围为scope="singleton",则将该Bean放⼊Spring IoC的缓存池中,将触发Spring对该Bean的⽣命周期管理;如果在 中指定了该Bean的作⽤范围为scope="prototype",则将该Bean交给调⽤者,调⽤者管理该Bean的⽣命周期,Spring不再管理该Bean。
11)如果Bean实现了DisposableBean接⼝,则Spring会调⽤destory()⽅法将Spring中的Bean销毁; 如果在配置⽂件中通过destory-method属性指定了Bean的销毁⽅法,则Spring将调⽤该⽅法对Bean进⾏销毁。
注意:Spring 为 Bean 提供了细致全⾯的⽣命周期过程,通过实现特定的接⼝或 的属性设置,都可以对 Bean 的⽣命周期过程产⽣影响。 虽然可以随意配置 的属性,但是建议不要过多地使⽤ Bean 实现接⼝,因为这样会导致代码和 Spring 的聚合过于紧密
Spring提供了两种后处理bean的扩展接⼝:
⼯⼚初始化(BeanFactory)—> Bean对象
- BeanFactoryPostProcessor:
在BeanFactory初始化之后可以使⽤BeanFactoryPostProcessor进⾏后置处理做⼀些事情。 - BeanPostProcessor:
在Bean对象实例化(并不是Bean的整个⽣命周期完成)之后可以使⽤BeanPostProcessor进⾏后置处理做⼀些事情。
Spring IoC源码深度剖析
1. Spring IoC容器初始化主体流程
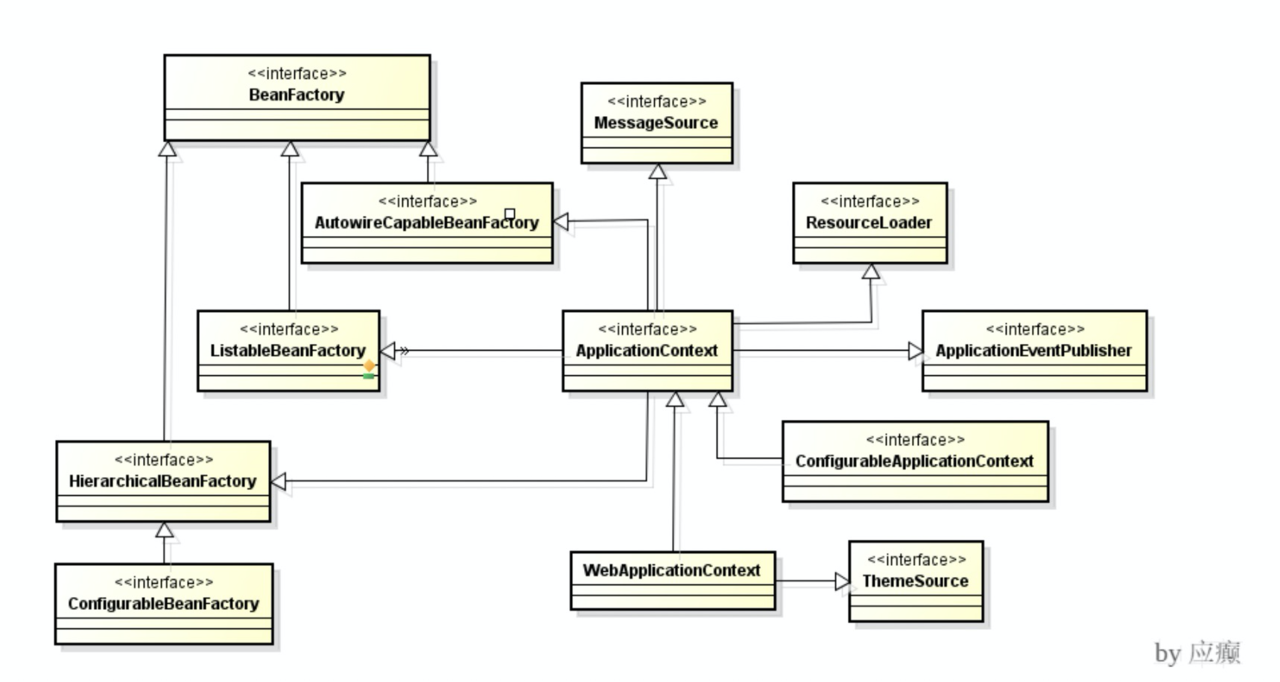
1.1. Spring IoC的容器体系
BeanFactory容器继承体系
1.2. Bean⽣命周期关键时机点
Bean对象创建的⼏个关键时机点代码层级的调⽤都在AbstractApplicationContext类的refresh⽅法中,可⻅这个⽅法对于Spring IoC容器初始化来说相当关键。
| 关键点 | 触发代码 |
|---|---|
| 构造器 | refresh#finishBeanFactoryInitialization(beanFactory)(beanFactory) |
BeanFactoryPostProcessor初始化 |
refresh#invokeBeanFactoryPostProcessors(beanFactory) |
BeanFactoryPostProcessor⽅法调⽤ |
refresh#invokeBeanFactoryPostProcessors(beanFactory) |
BeanPostProcessor初始化 |
registerBeanPostProcessors(beanFactory) |
BeanPostProcessor⽅法调⽤ |
refresh#finishBeanFactoryInitialization(beanFactory) |
1.3. Spring IoC容器初始化主流程
Spring IoC容器初始化的关键环节就在AbstractApplicationContext#refresh()⽅法中,我们查看refresh⽅法来俯瞰容器创建的主体流程。
@Override
public void refresh() throws BeansException, IllegalStateException {
 synchronized (this.startupShutdownMonitor) {
 // 第⼀步:刷新前的预处理
 prepareRefresh();
 /*
 第⼆步:
 获取BeanFactory;默认实现是DefaultListableBeanFactory
 加载BeanDefition 并注册到 BeanDefitionRegistry
 */
 ConfigurableListableBeanFactory beanFactory = obtainFreshBeanFactory();
 // 第三步:BeanFactory的预准备⼯作(BeanFactory进⾏⼀些设置,⽐如context的类加载器等)
 prepareBeanFactory(beanFactory);
 try {
 // 第四步:BeanFactory准备⼯作完成后进⾏的后置处理⼯作
 postProcessBeanFactory(beanFactory);
 // 第五步:实例化并调⽤实现了BeanFactoryPostProcessor接⼝的Bean
 invokeBeanFactoryPostProcessors(beanFactory);
 // 第六步:注册BeanPostProcessor(Bean的后置处理器),在创建bean的前后等执⾏
 registerBeanPostProcessors(beanFactory);
 // 第七步:初始化MessageSource组件(做国际化功能;消息绑定,消息解析);
 initMessageSource();
 // 第⼋步:初始化事件派发器
 initApplicationEventMulticaster();
 // 第九步:⼦类重写这个⽅法,在容器刷新的时候可以⾃定义逻辑
 onRefresh();
 // 第⼗步:注册应⽤的监听器。就是注册实现了ApplicationListener接⼝的监听器bean
 registerListeners();
 /*
 第⼗⼀步:
 初始化所有剩下的⾮懒加载的单例bean
 初始化创建⾮懒加载⽅式的单例Bean实例(未设置属性)
 填充属性
 初始化⽅法调⽤(⽐如调⽤afterPropertiesSet⽅法、init-method⽅法)
 调⽤BeanPostProcessor(后置处理器)对实例bean进⾏后置处
 */
 finishBeanFactoryInitialization(beanFactory);
 /*
 第⼗⼆步:
 完成context的刷新。主要是调⽤LifecycleProcessor的onRefresh()⽅法,并且发布事
件 (ContextRefreshedEvent)
 */
 finishRefresh();
 ......
 }
}
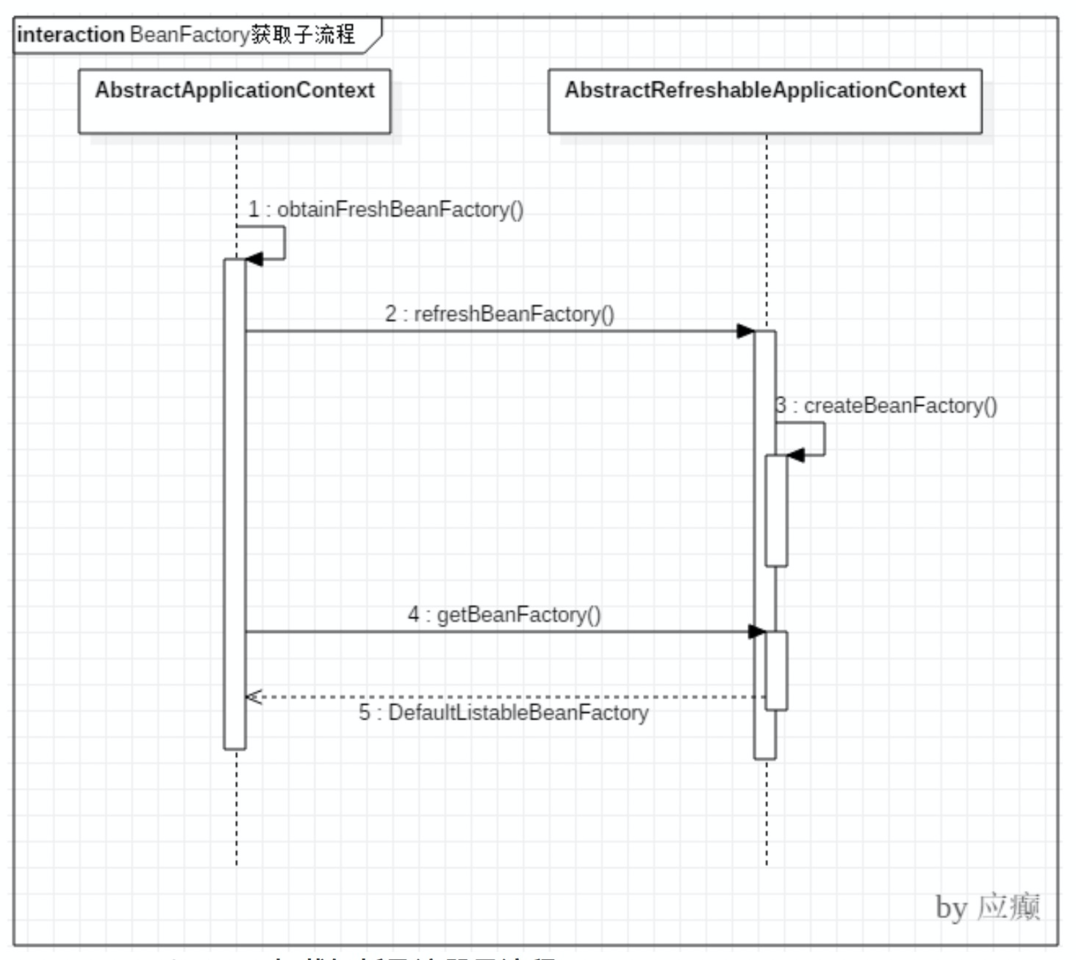
1.2. BeanFactory创建流程
1.2.1 获取BeanFactory⼦流程
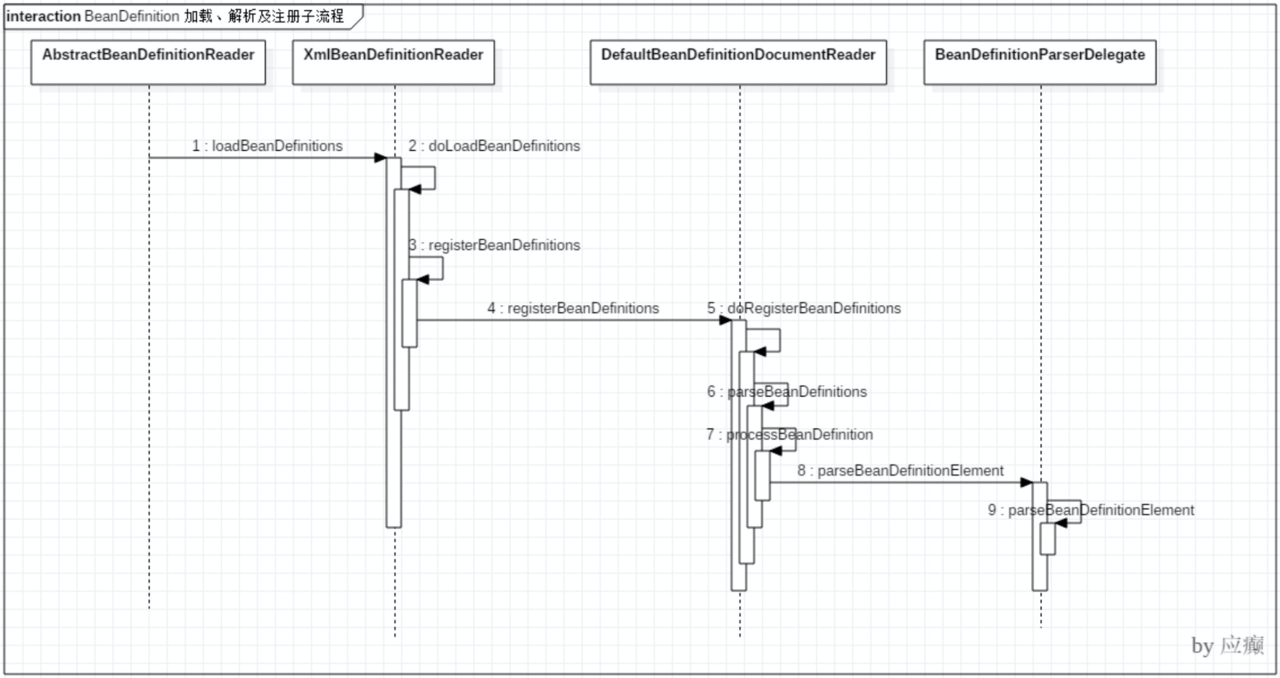
1.2.2 BeanDefinition加载解析及注册⼦流程
(1)几个关键步骤
- Resource定位:指对BeanDefinition的资源定位过程。通俗讲就是找到定义Javabean信息的XML⽂件,并将其封装成Resource对象。
- BeanDefinition载⼊:把⽤户定义好的Javabean表示为IoC容器内部的数据结构,这个容器内部的数据结构就是BeanDefinition。
- 注册BeanDefinition到 IoC 容器
(2)时序图
1.3. Bean创建流程
- 方法调用流程
| 全限定类名 | 描述 |
|---|---|
| org.springframework.context.support.AbstractApplicationContext#refresh | 刷新,c初始化容器 |
| org.springframework.context.support.AbstractApplicationContext#finishBeanFactoryInitialization | 实例化所有剩余的(非延迟初始化)单例Bean |
| org.springframework.beans.factory.support.DefaultListableBeanFactory#preInstantiateSingletons | 一个一个循环实例化所有立即加载的单例bean |
| org.springframework.beans.factory.support.AbstractBeanFactory#getBean | 实例化当前bean |
| org.springframework.beans.factory.support.AbstractBeanFactory#doGetBean | 真正实例化的方法 |
| org.springframework.beans.factory.support.AbstractAutowireCapableBeanFactory#createBean | 创建bean |
| org.springframework.beans.factory.support.AbstractAutowireCapableBeanFactory#doCreateBean | 真真正正创建bean |
| org.springframework.beans.factory.support.AbstractAutowireCapableBeanFactory#createBeanInstance | 创建bean实例 |
| org.springframework.beans.factory.support.AbstractAutowireCapableBeanFactory#populateBean | bean属性填充 |
- 时序图

1.4. lazy-init 延迟加载机制原理
Spring启动的时候会将bean的信息(包括xml和注解)加载成BeanDefinition,然后对每个BeanDefinition进行处理,如果是懒加载的则不处理,其他的实例化并依赖注入。
- 对于被修饰为
lazy-init的bean,Spring容器初始化阶段不会进⾏init并且依赖注⼊,当第⼀次进⾏getBean时候才进⾏初始化并依赖注⼊ - 对于⾮懒加载的
bean,getBean的时候会从缓存⾥头获取,因为容器初始化阶段Bean已经初始化完成并缓存了起来。
    public void preInstantiateSingletons() throws BeansException {
        if (logger.isTraceEnabled()) {
            logger.trace("Pre-instantiating singletons in " + this);
        }

        // Iterate over a copy to allow for init methods which in turn register new bean definitions.
        // While this may not be part of the regular factory bootstrap, it does otherwise work fine.
        // 所有bean的名字
        List<String> beanNames = new ArrayList<>(this.beanDefinitionNames);

        // Trigger initialization of all non-lazy singleton beans...
        // 触发所有非延迟加载单例bean的初始化,主要步骤为getBean
        for (String beanName : beanNames) {
            // 合并父BeanDefinition对象
            // map.get(beanName)
            RootBeanDefinition bd = getMergedLocalBeanDefinition(beanName);
            // 这里做了处理,懒加载的bean不被处理
            // 不是抽象的 && 是单例 && 不是懒加载
            if (!bd.isAbstract() && bd.isSingleton() && !bd.isLazyInit()) {
                if (isFactoryBean(beanName)) {
                    Object bean = getBean(FACTORY_BEAN_PREFIX + beanName);
                    // 如果是FactoryBean则加&
                    if (bean instanceof FactoryBean) {
                        final FactoryBean<?> factory = (FactoryBean<?>) bean;
                        boolean isEagerInit;
                        if (System.getSecurityManager() != null && factory instanceof SmartFactoryBean) {
                            isEagerInit = AccessController.doPrivileged((PrivilegedAction<Boolean>)
                                            ((SmartFactoryBean<?>) factory)::isEagerInit,
                                    getAccessControlContext());
                        }
                        else {
                            isEagerInit = (factory instanceof SmartFactoryBean &&
                                    ((SmartFactoryBean<?>) factory).isEagerInit());
                        }
                        if (isEagerInit) {
                            getBean(beanName);
                        }
                    }
                }
                else {
                    // 实例化当前bean
                    getBean(beanName);
                }
            }
        }

        // Trigger post-initialization callback for all applicable beans...
        for (String beanName : beanNames) {
            Object singletonInstance = getSingleton(beanName);
            if (singletonInstance instanceof SmartInitializingSingleton) {
                final SmartInitializingSingleton smartSingleton = (SmartInitializingSingleton) singletonInstance;
                if (System.getSecurityManager() != null) {
                    AccessController.doPrivileged((PrivilegedAction<Object>) () -> {
                        smartSingleton.afterSingletonsInstantiated();
                        return null;
                    }, getAccessControlContext());
                }
                else {
                    smartSingleton.afterSingletonsInstantiated();
                }
            }
        }
    }
1.5. Spring IoC循环依赖问题
1.5.1 什么是循环依赖
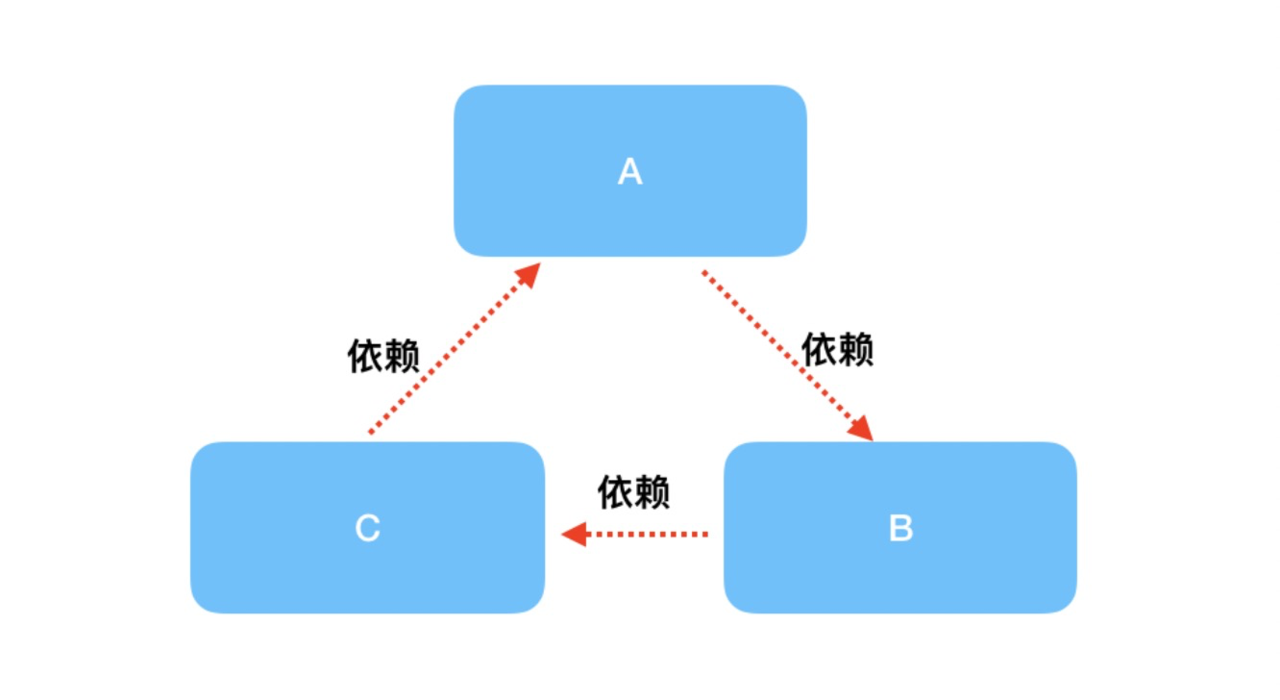
循环依赖其实就是循环引⽤,也就是两个或者两个以上的 Bean 互相持有对⽅,最终形成闭环。⽐如A 依赖于B,B依赖于C,C⼜依赖于A。
 Spring中循环依赖场景有:
- 构造器的循环依赖(构造器注⼊)
- Field 属性的循环依赖(set注⼊)
其中,构造器的循环依赖问题⽆法解决,只能拋出BeanCurrentlyInCreationException异常,在解决属性循环依赖时,spring采⽤的是提前暴露对象的⽅法(三级缓存)。
Spring会先将实例化但未填充属性的对象放入缓存,然后再去填充它的属性,填充过程中若发现它的属性依赖于它本身,则去缓存中拿到提前缓存起来的对象
- Spring容器初始化ClassA通过构造器初始化对象后提前暴露到Spring容器。
- ClassA调⽤setClassB⽅法,Spring⾸先尝试从容器中获取ClassB,此时ClassB不存在Spring容器中。
- Spring容器初始化ClassB,同时也会将ClassB提前暴露到Spring容器中。
- ClassB调⽤setClassA⽅法,Spring从容器中获取ClassA,因为第⼀步中已经提前暴露了ClassA,因此可以获取到ClassA实例
- ClassA通过spring容器获取到ClassB,完成了对象初始化操作。
- 这样ClassA和ClassB都完成了对象初始化操作,解决了循环依赖问题。
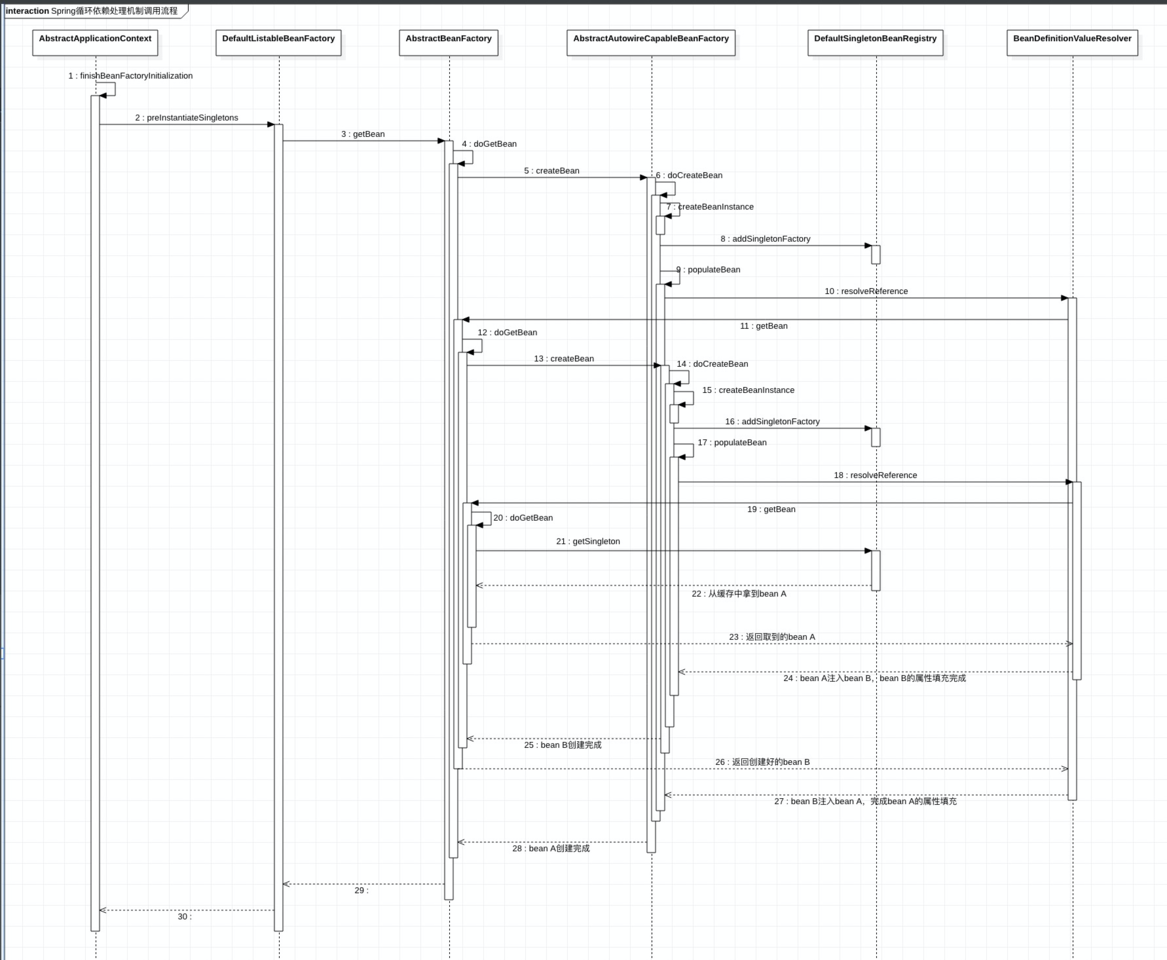
1.5.2 循环依赖处理机制
- 方法调用流程
| 全限定类名 | 描述 |
|---|---|
| org.springframework.context.support.AbstractApplicationContext#refresh | 刷新,c初始化容器 |
| org.springframework.context.support.AbstractApplicationContext#finishBeanFactoryInitialization | 实例化所有剩余的(非延迟初始化)单例Bean |
| org.springframework.beans.factory.support.DefaultListableBeanFactory#preInstantiateSingletons | 一个一个循环实例化所有立即加载的单例bean |
| org.springframework.beans.factory.support.AbstractBeanFactory#getBean | 实例化当前bean(bean A) |
| org.springframework.beans.factory.support.AbstractBeanFactory#doGetBean | 真正实例化(bean A)的方法 |
| org.springframework.beans.factory.support.AbstractAutowireCapableBeanFactory#createBean | 创建bean(bean A) |
| org.springframework.beans.factory.support.AbstractAutowireCapableBeanFactory#doCreateBean | 真真正正创建bean(bean A) |
| org.springframework.beans.factory.support.AbstractAutowireCapableBeanFactory#createBeanInstance | 创建bean(bean A)实例,但还没有填充属性 |
| org.springframework.beans.factory.support.DefaultSingletonBeanRegistry#addSingletonFactory | 将实例化的bean(bean A)放入三级缓存singletonFactory |
| org.springframework.beans.factory.support.AbstractAutowireCapableBeanFactory#populateBean | bean(bean A)属性填充 |
| org.springframework.beans.factory.support.BeanDefinitionValueResolver#resolveReference | 解析对工厂中另一个bean(bean B)的引用。 |
| org.springframework.beans.factory.support.AbstractBeanFactory#getBean(java.lang.String) | 实例化当前bean(bean B) |
| org.springframework.beans.factory.support.AbstractBeanFactory#doGetBean | 真正实例化(bean B)的方法 |
| org.springframework.beans.factory.support.AbstractAutowireCapableBeanFactory#createBean(java.lang.String, org.springframework.beans.factory.support.RootBeanDefinition, java.lang.Object[]) | 创建bean(bean B) |
| org.springframework.beans.factory.support.AbstractAutowireCapableBeanFactory#doCreateBean | 真真正正创建bean(bean B) |
| org.springframework.beans.factory.support.AbstractAutowireCapableBeanFactory#createBeanInstance | 创建bean(bean B)实例,但还没有填充属性 |
| org.springframework.beans.factory.support.DefaultSingletonBeanRegistry#addSingletonFactory | 将实例化的bean(bean B)放入三级缓存singletonFactory |
| org.springframework.beans.factory.support.AbstractAutowireCapableBeanFactory#populateBean | bean(bean B)属性填充 |
| org.springframework.beans.factory.support.AbstractAutowireCapableBeanFactory#applyPropertyValues | 处理依赖关系,感知到bean B依赖bean A |
| org.springframework.beans.factory.support.BeanDefinitionValueResolver#resolveValueIfNecessary | 如果需要,处理依赖 |
| org.springframework.beans.factory.support.BeanDefinitionValueResolver#resolveReference | 处理bean B依赖bean A |
| org.springframework.beans.factory.support.AbstractBeanFactory#getBean(java.lang.String) | 实例化当前bean(bean A) |
| org.springframework.beans.factory.support.AbstractBeanFactory#doGetBean | 真正实例化(bean A)的方法 |
| org.springframework.beans.factory.support.DefaultSingletonBeanRegistry#getSingleton(java.lang.String, boolean) | 从缓存中获取到bean A |
- 时序图
Spring AOP 应⽤
- AOP的本质
在不改变原有业务逻辑的情况下,增强横切逻辑,横切逻辑代码往往是权限校验代码、⽇志代码、事务控制代码、性能监控代码。
1. AOP相关术语
| 名词 | 解释 |
|---|---|
| Joinpoint(连接点) | 方法开始时、结束时、正常执行完毕时、异常时这些特殊的时机点,我们称之为连接点,每个方法都有连接点,连接点是一种候选点。 |
| Pointcut(切入点) | 它指的时AOP思想想要影响(增强)的方法。 |
| Advice(通知/增强) | 它指的是切⾯类中⽤于提供增强功能的⽅法。其分类有:前置通知 后置通知 异常通知 最终通知 环绕通知。 |
| Target(⽬标对象) | 它指的是代理的⽬标对象。即被代理对象。 |
| Proxy(代理) | 它指的是⼀个类被AOP织⼊增强后,产⽣的代理类。即代理对象。 |
| Weaving(织⼊) | 它指的是把增强应⽤到⽬标对象来创建新的代理对象的过程。spring采⽤动态代理织⼊,⽽AspectJ采⽤编译期织⼊和类装载期织⼊。 |
| Aspect(切⾯) | 它指定是增强的代码所关注的⽅⾯,把这些相关的增强代码定义到⼀个类中,这个类就是切⾯类。例如,事务切⾯,它⾥⾯定义的⽅法就是和事务相关的,像开启事务,提交事务,回滚事务等等,不会定义其他与事务⽆关的⽅法。 |
2. Spring中AOP的代理选择
Spring是使用动态代理技术实现的AOP思想。 默认情况下,Spring会根据是否实现接口来选择使用JDK还是CGLIB。
- JDK动态代理:当被代理对象实现了接口时
- CGLIB动态代理:当被代理对象没有实现任何接口时
我们可以通过配置的方式,让Spring强制使用CGLIB。
3. Spring中AOP的配置⽅式
Spring中AOP也和IOC一样,支持三种配置方式:
- 第一类:纯xml模式
- 第二类:xml + 注解模式
- 第三类:纯注解模式
4. Spring中AOP实现
需求:横切逻辑代码是打印⽇志,希望把打印⽇志的逻辑织⼊到⽬标⽅法的特定位置(service层transfer⽅法)
4.1. XML模式
-
- 使用AOP,需要先引入AOP的依赖jar
        <!--引入AOP依赖-->
        <dependency>
            <groupId>org.springframework</groupId>
            <artifactId>spring-aop</artifactId>
            <version>5.1.12.RELEASE</version>
        </dependency>

        <!--引入aspectj依赖-->
        <dependency>
            <groupId>org.aspectj</groupId>
            <artifactId>aspectjweaver</artifactId>
            <version>1.8.13</version>
        </dependency>
-
- AOP 核⼼配置
- 2.1 在Spring的配置文件中加入aop的约束
    xmlns:aop="http://www.springframework.org/schema/aop"

    http://www.springframework.org/schema/aop
    https://www.springframework.org/schema/aop/spring-aop.xsd
 *  2.2 配置切面

     *  前置通知 后置通知 异常通知 最终通知
            <!--开始aop配置-->
            <!--横切逻辑bean-->
            <bean id="logUtils" class="com.lzx.utils.LogUtils"/>
            <!--使用config标签表明开始aop配置,在内部配置aspect切面-->
            <aop:config>
                <aop:aspect id="logAspect" ref="logUtils">
                    <!--切入点:使用aspectj语法表达式,锁定我们感兴趣的方法-->
                    <aop:pointcut id="pt1" expression="execution(public void com.lzx.service.impl.TransferServiceImpl.transfer(String, String, int))"/>
                    <!--方位信息,pointcut-ref关联切入点-->
                    <!--aop:before  前置通知/增强-->
                    <aop:before method="beforeMethod" pointcut-ref="pt1"/>
                    <!--正常执行时-->
                    <aop:after-returning method="successMethod" pointcut-ref="pt1"/>
                    <!--最终通知-->
                    <aop:after method="afterMethod" pointcut-ref="pt1"/>
                    <!--异常通知-->
                    <aop:after-throwing method="exceptionMethod" pointcut-ref="pt1"/>
                </aop:aspect>
            </aop:config>
     *  环绕通知
        环绕通知一般不与其他通知一起用,因为环绕通知中,可以实现其他通知,也可以控制原方法是否执行
        <!--开始aop配置-->
        <!--横切逻辑bean-->
        <bean id="logUtils" class="com.lzx.utils.LogUtils"/>
        <!--使用config标签表明开始aop配置,在内部配置aspect切面-->
        <aop:config>
            <aop:aspect id="logAspect" ref="logUtils">
                <!--切入点:使用aspectj语法表达式,锁定我们感兴趣的方法-->
                <aop:pointcut id="pt1" expression="execution(public void com.lzx.service.impl.TransferServiceImpl.transfer(String, String, int))"/>
                <!--方位信息,pointcut-ref关联切入点-->
                <!--环绕通知-->
                <aop:around method="aroundMethod" pointcut-ref="pt1"/>
            </aop:aspect>
        </aop:config>
-
- 切入点表达式
- 概念:切⼊点表达式,也称之为AspectJ切⼊点表达式,指的是遵循特定语法结构的字符串。
- 作⽤:是⽤于对符合语法格式的连接点进⾏增强。
- 使用示例:
- 全限定⽅法名
访问修饰符 返回值 包名.包名.包名.类名.⽅法名(参数列表)
* 全匹配⽅式:
public void com.lagou.service.impl.TransferServiceImpl.updateAccountByCardNo(com.lagou.pojo.Account)
* 访问修饰符可以省略
void com.lagou.service.impl.TransferServiceImpl.updateAccountByCardNo(com.lagou.pojo.Account)
* 返回值可以使⽤\*,表示任意返回值
* com.lagou.service.impl.TransferServiceImpl.updateAccountByCardNo(com.lagou.pojo.Account)
* 包名可以使用\*代替,表示任意包,但是有几级包,就要写几个
* *.*.*.*.TransferServiceImpl.updateAccountByCardNo(com.lagou.pojo.Account)
* 包名可以使用..代替,表示当前包及其子包
* *..TransferServiceImpl.updateAccountByCardNo(com.lagou.pojo.Account)
* 类名和⽅法名,都可以使⽤\*表示任意类,任意⽅法
* *..*.*(com.lagou.pojo.Account)
     *  参数列表,可以使⽤具体类型

         *  基本类型直接写类型名称 : `int`
         *  引⽤类型必须写全限定类名:`java.lang.String`
     *  参数列表可以使⽤\*,表示任意参数类型,但是必须有参数
* *..*.*(*)
* 参数列表可以使⽤..,表示有⽆参数均可。有参数可以是任意类型
* *..*.*(..)
* 全通配⽅式:
* *..*.*(..)
-
- 改变代理方式的配置
我们前面说过,Spring在创建代理对象时,会根据实际情况选择代理方式:
- 若被代理对象实现了接口,默认使用JDK动态代理,
-
若被代理对象没有实现接口,使用CGLIB动态代理,当然了,我们可以通过配置,强制让Spring使用CGLIB动态代理。
配置方式有两种:
- 使用
aop:config标签
<aop:config proxy-target-class="true"/>
1. 使用`aop:aspectj-autoproxy`标签
    <!--此标签是基于XML和注解组合配置AOP时的必备标签,表示Spring开启注解配置AOP的⽀持-->
    <aop:aspectj-autoproxy proxy-target-class="true"/>
4.2. xml+注解模式
-
- 开启spring对注解aop的⽀持
<!--开启spring对注解aop的⽀持-->
<aop:aspectj-autoproxy/>
- 代码修改
package com.lzx.utils;

import org.aspectj.lang.JoinPoint;
import org.aspectj.lang.ProceedingJoinPoint;
import org.aspectj.lang.annotation.Aspect;
import org.aspectj.lang.annotation.Before;
import org.aspectj.lang.annotation.Pointcut;
import org.springframework.stereotype.Component;

@Component//bean交给spring管理
@Aspect//切面类
public class LogUtils {

    //注解配置切入点
    @Pointcut("execution(* com.lzx.service.impl.TransferServiceImpl.transfer(..))")
    public void pointcut(){

    }

    @Before("pointcut()")
    public void beforeMethod(JoinPoint joinPoint) {
        Object[] args = joinPoint.getArgs();
        for (Object arg : args) {
            System.out.println(arg);
        }
        System.out.println("开始之前执行。。。。。。。。。。");
    }

    @Before("pointcut()")
    public void afterMethod() {
        System.out.println("无论异常与否,结束时执行。。。。。。。。。。");
    }

    @Before("pointcut()")
    public void exceptionMethod() {
        System.out.println("异常时执行。。。。。。。。。。");
    }

    @Before("pointcut()")
    public void successMethod() {
        System.out.println("业务逻辑正常执行后执行。。。。。。。。。。");
    }

    // 环绕通知
    @Before("pointcut()")
    public Object aroundMethod(ProceedingJoinPoint proceedingJoinPoint) {
        System.out.println("环绕通知中的beforeMethod......");

        Object result = null;
        try {
            result = proceedingJoinPoint.proceed(proceedingJoinPoint.getArgs());
            System.out.println("环绕通知中的successMethod......");
        } catch (Throwable throwable) {
            System.out.println("环绕通知中的exceptionMethod......");
            throwable.printStackTrace();
        } finally {
            System.out.println("环绕通知中的afterMethod......");
        }
        return result;
    }
}
4.3. 纯注解模式
使用配置类替换调xml配置
配置类:
@Configuration
@ComponentScan("com.lzx")
@EnableAspectJAutoProxy //开启spring对注解AOP的⽀持
public class SpringConfiguration {
}
被替换的xml配置:
<!--开启spring对注解aop的⽀持-->
<aop:aspectj-autoproxy/>
5. Spring声明式事务
编程式事务:在业务代码中添加事务控制代码,这样的事务控制机制就叫做编程式事务
声明式事务:通过xml或者注解配置的⽅式达到事务控制的⽬的,叫做声明式事务
5.1. 复习一下事务
5.1.1 什么是事务?
事务指逻辑上的⼀组操作,组成这组操作的各个单元,要么全部成功,要么全部不成功。从⽽确保了数据的准确与安全。
例如转账可以分为两步,
5.1.2 事务的四大特性
- 原子性(Atomicity)
指的是事务是一个不可分割的工作单位,事务中的操作要么都发生,要么都不发生;要么都成功,要么都不成功。
-
一致性(Consistency)
事务必须使数据库状态从一个一致性状态变化到另一个一致性状态;
例如转账前A有1000,B有1000。转账后A+B也得是2000。 ⼀致性是从数据的⻆度来说的,(1000,1000)(900,1100),不应该出现(900,1000)。 -
隔离性(Isolation)
隔离性指的是多个用户并发访问数据库时,数据库要为每一个用户开启事务,不同事务之间互不干扰,多个并发事务之间相互隔离。
-
持久性(Durability)
持久性指的是事务一旦提交,它对数据库中的数据的影响是永久性的,接下来即使数据库发⽣故障也不应该对其有任何影响。
5.1.3 事务的隔离级别
隔离级别解决的是并发问题
不考虑隔离级别,会出现以下情况:(以下情况全是错误的)
- 脏读:⼀个线程中的事务读到了另外⼀个线程中未提交的数据。
- 不可重复读:⼀个线程中的事务读到了另外⼀个线程中已经提交的update的数据(前后内容不⼀样)
- 场景:
- 员⼯A发起事务1,查询⼯资,⼯资为1w,此时事务1尚未关闭
-
财务⼈员发起了事务2,给员⼯A张了2000块钱,并且提交了事务
-
员⼯A通过事务1再次发起查询请求,发现⼯资为1.2w,原来读出来1w读不到了,叫做不可重复读
- 场景:
-
虚读(幻读):⼀个线程中的事务读到了另外⼀个线程中已经提交的
insert或者delete的数据(前后条数不⼀样)- 场景:
- 事务1查询所有⼯资为1w的员⼯的总数,查询出来了10个⼈,此时事务尚未关闭
-
事务2财务⼈员发起,新来员⼯,⼯资1w,向表中插⼊了2条数据,并且提交了事务
-
事务1再次查询⼯资为1w的员⼯个数,发现有12个⼈,⻅了⻤了
- 场景:
数据库共定义了四种隔离级别:
| 隔离 | 作用 | 级别 |
|---|---|---|
Serializable(串⾏化) |
可避免脏读、不可重复读、虚读情况的发⽣。(串⾏化) | 最⾼ |
Repeatable read(可重复读) |
可避免脏读、不可重复读情况的发⽣。(幻读有可能发⽣) | 第⼆,该机制下会对要update的⾏进⾏加锁 |
Read committed(读已提交) |
可避免脏读情况发⽣。不可重复读和幻读⼀定会发⽣。 | 第三 |
Read uncommitted(读未提交) |
最低级别,以上情况均⽆法保证。(读未提交) | 最低 |
注意:级别依次升⾼,效率依次降低
MySQL的默认隔离级别是:REPEATABLE READ
查询当前使⽤的隔离级别: select @@tx_isolation;
设置MySQL事务的隔离级别: set session transaction isolation level xxx; (设置的是当前mysql连接会话的,并不是永久改变的)
5.1.4 事务的传播行为
5.2. Spring中事务的API
5.3. Spring中声明式事务的配置
- 纯xml模式
- xml+注解模式
- 纯注解模式