之前的文章:
在上一篇文章中,我们讲了Spring的统一资源加载策略,我们知道了xml在使用之前必须先用ResourceLoader加载成Resource,而ResourceLoader每次只能把一个文件加载成Resource,所以当需要同时加载多个资源的时候,就需要使用到ResourcePatternReslover。 那么接下来,在将xml加载成了Resource之后,又是怎样解析的呢,解析后xml里的信息变成了什么呢?本篇将会为你解答这个问题。
BeanDefinition
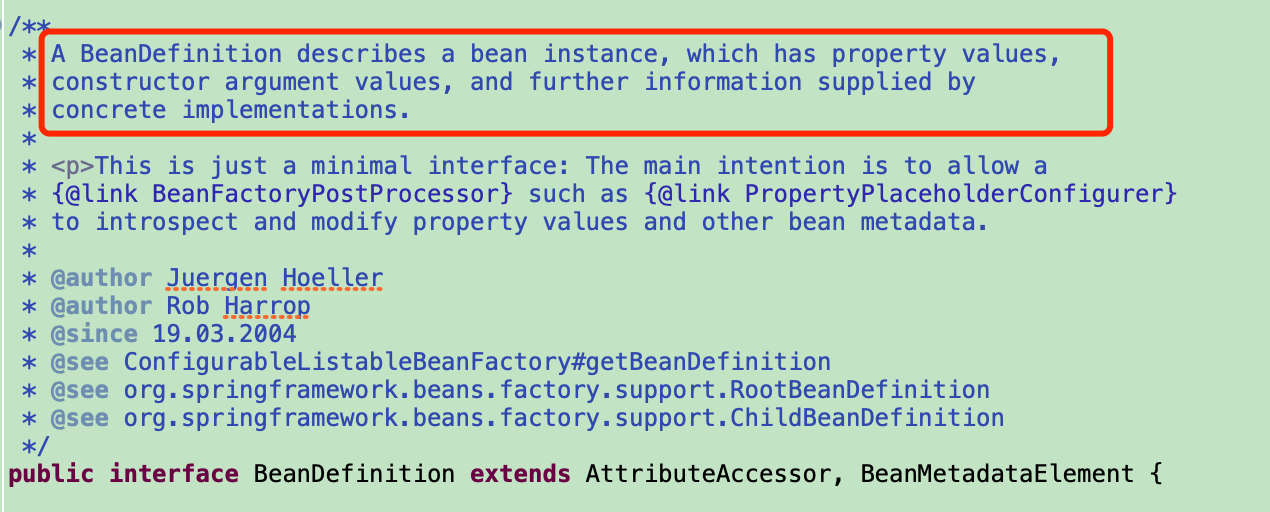
这是我们在说解析xml之前不得不说的一个东西。我们来看看源码中关于对这个接口的描述:
为什么一定要说这个呢?因为BeanDefinition是你真正去阅读源码的基础,不少的扩展基于都是基于这里,也有不少的核心流程需要你理解它。很多人号称自己读过了Spring源码,然而最终却连个最基础的BeanDefinition都不知道。
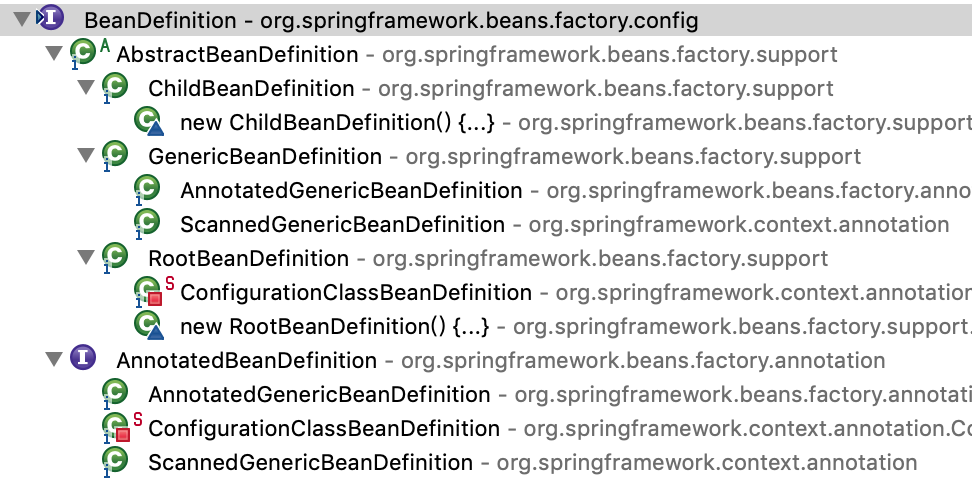
红框中的英文注释直接翻译过来意思就是,BeanDefinition描述的是一个bean的实例有哪些属性,它的构造器的参数,以及被子类所支持的更多的信息。我们来看看BeanDefinition这个接口的继承体系:
 重中之重是AbstractBeanDefinition这个抽象类,它里面有对于BeanDefinition大部分方法的默认实现,以及很多的属性,这些属性决定了Spring要怎么去实例化对应的bean。我们先大概来看看AbstractBeanDefinition这个抽象类里面包含了哪些属性:
属性比较多,并不需要记住它,先把大部分看懂即可
                                                                          代码块1
        // bean 对应的java类
    @Nullable
    private volatile Object beanClass;
    // bean的作用范围,对应scope属性
    @Nullable
    private String scope = SCOPE_DEFAULT;
    // 是否抽象类
    private boolean abstractFlag = false;
    // 是否懒加载
    private boolean lazyInit = false;
    // 自动注入的方式
    private int autowireMode = AUTOWIRE_NO;
    // 依赖检查
    private int dependencyCheck = DEPENDENCY_CHECK_NONE;
    //用来表示一个bean的实例化依靠另一个bean先实例化,对应bean属性depend-on,以及@DependenOn注解
    @Nullable
    private String[] dependsOn;
    // autowire-candidate属性设置为false,这样容器在查找自动装配对象时,将不考虑该bean,即它不会被考虑作为其他bean自动装配的候选者,
        // 但是该bean本身还是可以使用自动装配来注入其他bean的
    private boolean autowireCandidate = true;
    // 自动装配时出现多个bean候选者时,将作为首选者,对应bean属性primary,以及@Primary注解
    private boolean primary = false;
    // 用于记录Qualifier,对应子元素qualifier
    private final Map<String, AutowireCandidateQualifier> qualifiers = new LinkedHashMap<>();

    @Nullable
    private Supplier<?> instanceSupplier;

    private boolean nonPublicAccessAllowed = true;
    // 是否以一种宽松的模式解析构造函数,默认为true
    // 不明白的话先跳过,后边文章会说到这个
    private boolean lenientConstructorResolution = true;
    // 对应bean标签属性factory-bean
    @Nullable
    private String factoryBeanName;
    // 对应bean标签属性factory-method
    @Nullable
    private String factoryMethodName;
    // 记录构造函数注入属性,对应bean属性constructor-arg
    @Nullable
    private ConstructorArgumentValues constructorArgumentValues;
    //普通属性集合
    @Nullable
    private MutablePropertyValues propertyValues;
    //方法重写的持有者,记录lookup-method、replaced-method元素
    @Nullable
    private MethodOverrides methodOverrides;
    //初始化方法,对应bean属性init-method
    @Nullable
    private String initMethodName;
    //销毁方法,对应bean属性destroy-method
    @Nullable
    private String destroyMethodName;
    //是否执行init-method,程序设置
    private boolean enforceInitMethod = true;
    //是否执行destroy-method,程序设置
    private boolean enforceDestroyMethod = true;
    //是否是用户定义的而不是应用程序本身定义的,创建AOP时候为true,程序设置
    private boolean synthetic = false;
    //定义这个bean的应用,APPLICATION:用户,INFRASTRUCTURE:完全内部使用,与用户无关,SUPPORT:某些复杂配置的一部分
        //程序设置
    private int role = BeanDefinition.ROLE_APPLICATION;
    //bean的描述信息
    @Nullable
    private String description;
    //这个bean定义的资源
    @Nullable
    private Resource resource;
为了代码少一些,我只是列出来了大部分的属性。我们可以看到,有很多的属性,我们几乎都可以对着xml看出来它是干嘛的,也有很多我们不熟的属性,别着急,先看看,混个脸熟,后边有需要,我会再回来解释这些东西。作者也不嫌啰嗦的再次提示一下,不用把上面的所有属性都记住,大概看懂就好,我们在这里只需要记住的是,xml的每个bean标签里面的东西,最后都会被解析成这样一个BeanDefinition的某一个子类。
BeanDefinitionReader
我们从类名的字面意思可以看出来,BeanDefinitionReader这个接口的实现类是用来读BeanDefinition的,我们还是按照惯例先来看看它的代码:
                                                                          代码块2
public interface BeanDefinitionReader {

    BeanDefinitionRegistry getRegistry();

    ResourceLoader getResourceLoader();

    ClassLoader getBeanClassLoader();

    BeanNameGenerator getBeanNameGenerator();

        // 核心的四个方法

    int loadBeanDefinitions(Resource resource) throws BeanDefinitionStoreException;

    int loadBeanDefinitions(Resource... resources) throws BeanDefinitionStoreException;

    int loadBeanDefinitions(String location) throws BeanDefinitionStoreException;

    int loadBeanDefinitions(String... locations) throws BeanDefinitionStoreException;
}
按照之前说的看接口要看核心方法的思路,我们不难看出来,核心方法是最下面四个方法,即接受不同参数的loadBeanDefinitions方法,他们都是去加载资源,然后返回被加载的资源的数量,所以同样容易理解的是这个接口的实现类的核心作用就是根据资源或者资源的位置来加载解析BeanDefinition。我们再来看看这个接口的继承体系(图来自网络):
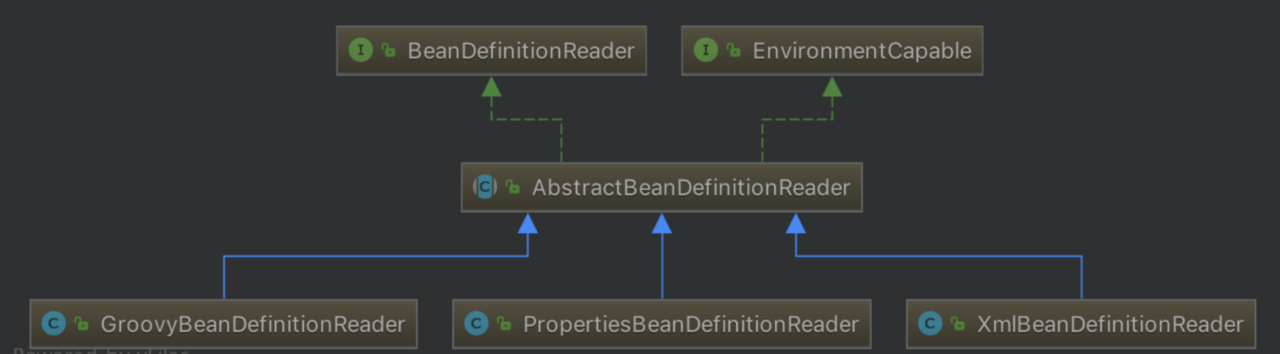 我们先不关注 EnvironmentCapable 接口,然后从上往下看,先看到的是AbstractBeanDefinitionReader,和其他体系的套路类似,这个类给出了BeanDefinitionReader很多方法的默认实现,我们来看看它对loadBeanDefinitions的实现:
                                                                          代码块3
        @Override
    public int loadBeanDefinitions(Resource... resources) throws BeanDefinitionStoreException {
        Assert.notNull(resources, "Resource array must not be null");
        int counter = 0;
        for (Resource resource : resources) {
                // 调用了未实现的方法
            counter += loadBeanDefinitions(resource);
        }
        return counter;
    }

    @Override
    public int loadBeanDefinitions(String... locations) throws BeanDefinitionStoreException {
        Assert.notNull(locations, "Location array must not be null");
        int counter = 0;
        for (String location : locations) {
                // 调用了下面的方法
            counter += loadBeanDefinitions(location);
        }
        return counter;
    }

    @Override
    public int loadBeanDefinitions(String location) throws BeanDefinitionStoreException {
            // 调用了下面的方法
        return loadBeanDefinitions(location, null);
    }
        // 这个是个重载方法
    public int loadBeanDefinitions(String location, Set<Resource> actualResources) throws BeanDefinitionStoreException {
        ResourceLoader resourceLoader = getResourceLoader();
        if (resourceLoader == null) {
            throw new BeanDefinitionStoreException(
                    "Cannot import bean definitions from location [" + location + "]: no ResourceLoader available");
        }
        // 这个if else非常简单,大体意思就是如果本类的resourceLoader属性是个ResourcePatternResolver实例,那么就去用ResourcePatternResolver
        // 批量加载资源然后解析资源,否则就用普通的ResourceLoader来加载单个资源
        if (resourceLoader instanceof ResourcePatternResolver) {
            try {
                Resource[] resources = ((ResourcePatternResolver) resourceLoader).getResources(location);
                int loadCount = loadBeanDefinitions(resources);
                if (actualResources != null) {
                    for (Resource resource : resources) {
                        actualResources.add(resource);
                    }
                }
                if (logger.isDebugEnabled()) {
                    logger.debug("Loaded " + loadCount + " bean definitions from location pattern [" + location + "]");
                }
                return loadCount;
            }
            catch (IOException ex) {
                throw new BeanDefinitionStoreException(
                        "Could not resolve bean definition resource pattern [" + location + "]", ex);
            }
        } else {
            Resource resource = resourceLoader.getResource(location);
            int loadCount = loadBeanDefinitions(resource);
            if (actualResources != null) {
                actualResources.add(resource);
            }
            if (logger.isDebugEnabled()) {
                logger.debug("Loaded " + loadCount + " bean definitions from location [" + location + "]");
            }
            return loadCount;
        }
    }
大家不要被这么长的代码吓到了,这段代码属于纸老虎来的,认真琢磨很容易就明白了。我们可以很容易的看到,AbstractBeanDefinitionReader没有实现BeanDefinitionReader中的loadBeanDefinitions(Resource resource)这个方法,而是实现了的其他三个方法以及增加了一个重载方法,但是,其他的实现最终都是要调用这个没有实现的方法(重载方法也要调用),由此我们可以看出来,解析具体的某个资源,还是要靠loadBeanDefinitions(Resource resource)这个方法,接下来就需要看我们本篇的重点即AbstractBeanDefinitionReader的子类XmlBeanDefinitionReader(至于为什么选的是这个,因为我们正篇到现在为止,讲的都是基于xml的配置方式)。我们直接来看看XmlBeanDefinitionReader对loadBeanDefinitions(Resource resource)的实现:
                                                                          代码块4
        @Override
    public int loadBeanDefinitions(Resource resource) throws BeanDefinitionStoreException {
        return loadBeanDefinitions(new EncodedResource(resource));
    }
然后我们在看loadBeanDefinitions(EncodeResource encodeResource):(接下来代码会比较多,不要害怕,看我的注释即可,如果还是看不懂建议去我的github中的源码中跟一下,一路代码都有注释)
                                                                          代码块5
public int loadBeanDefinitions(EncodedResource encodedResource) throws BeanDefinitionStoreException {
                //参数不能为空的校验
        Assert.notNull(encodedResource, "EncodedResource must not be null");
        if (logger.isInfoEnabled()) {
            logger.info("Loading XML bean definitions from " + encodedResource.getResource());
        }

        // 1.主要是import标签的循环引用的检查,可以理解成检查一个xml和另外一个xml是否通过import标签相互引用
        Set<EncodedResource> currentResources = this.resourcesCurrentlyBeingLoaded.get();
        if (currentResources == null) {
            currentResources = new HashSet<EncodedResource>(4);
            this.resourcesCurrentlyBeingLoaded.set(currentResources);
        }
        // 2.如果相互引用了就报异常了
        // 1和2没看懂可以直接看3,后边再回过头看很容易就会明白了
        if (!currentResources.add(encodedResource)) {
            throw new BeanDefinitionStoreException(
                    "Detected cyclic loading of " + encodedResource + " - check your import definitions!");
        }

        // 3.这里的核心其实就是把Resource转化成了InputSource,然后交给真正的doLoadBeanDefinitions去做。
        try {
            InputStream inputStream = encodedResource.getResource().getInputStream();
            try {
                InputSource inputSource = new InputSource(inputStream);
                if (encodedResource.getEncoding() != null) {
                    inputSource.setEncoding(encodedResource.getEncoding());
                }
                return doLoadBeanDefinitions(inputSource, encodedResource.getResource());
            }
            finally {
                inputStream.close();
            }
        }
        catch (IOException ex) {
            throw new BeanDefinitionStoreException(
                    "IOException parsing XML document from " + encodedResource.getResource(), ex);
        }
        finally {
            currentResources.remove(encodedResource);
            if (currentResources.isEmpty()) {
                this.resourcesCurrentlyBeingLoaded.remove();
            }
        }
    }
上面代码中最重要的,其实也就是步骤3,然后我们来看看doLoadBeanDefinitions方法:
                                                                          代码块6
        protected int doLoadBeanDefinitions(InputSource inputSource, Resource resource)
            throws BeanDefinitionStoreException {
        try {
            // 获取Document对象(Document代表一个html或是一个xml),其实到了这步,spring才知道你的Resource是个xml
            Document doc = doLoadDocument(inputSource, resource);
            // 解析xml注册BeanDefinitions
            return registerBeanDefinitions(doc, resource);
        }
        catch (BeanDefinitionStoreException ex) {
            throw ex;
        }
        ...
doLoadBeanDefinitions这个方法的代码行数很多,但其实核心就是上面的代码,其他的都是catch语句块,我们首先来看看第一句代码中的doLoadDocument方法
                                                                          代码块7
        // 我特地把documentLoader放到这个位置来
        private DocumentLoader documentLoader = new DefaultDocumentLoader();

    protected Document doLoadDocument(InputSource inputSource, Resource resource) throws Exception {
            //加载Document
        return this.documentLoader.loadDocument(inputSource, getEntityResolver(), this.errorHandler,
                getValidationModeForResource(resource), isNamespaceAware());
    }
从上面的代码我们可以看出来,documentLoader是DefaultDocumentLoader的实例(我特地把成员属性放到这个位置来了),在这个loadDocument方法中,最重要的是第四个参数,在上面的代码中,这个参数是通过getValidationModeForResource来获取的,我们首先来看这个方法:
                                                                          代码块8
        protected int getValidationModeForResource(Resource resource) {
        // 拿到已经设置好的验证模式,在ClassPathXmlApplicationoContext的情况下,这个值
        // 是1,如果用上一篇开始的代码去debug,validationModeToUse的值是1
        int validationModeToUse = getValidationMode();
        // VALIDATION_AUTO的值是1,因此不走这个if
        //(VALIDATION_AUTO代表的是由spring来发现应该去用什么样的校验资源的方式)
        if (validationModeToUse != VALIDATION_AUTO) {
            return validationModeToUse;
        }
        // 通过代码去验证,用上一篇文章开始的代码debug后detectedMode的返回值是3
        // 如果我们用的是个DTD格式的文件,那么这里将会返回2
        int detectedMode = detectValidationMode(resource);
        if (detectedMode != VALIDATION_AUTO) {
            return detectedMode;
        }
        // 返回XSD校验模式,其实也是3
        return VALIDATION_XSD;
    }
然后之前的loadDocument方法拿到这个参数之后,主要根据这个参数来把第一个参数的inputSource解析成了一个xml格式的Document对象,限于篇幅,这里就不放这个方法的代码了。然后我们看XmlBeanDefinitionReader中的registerBeanDefinitions(Document doc, Resource resource)方法,其实也就是从代码块6中的第二行代码:
                                                                          代码块9
        @SuppressWarnings("deprecation")
    public int registerBeanDefinitions(Document doc, Resource resource) throws BeanDefinitionStoreException {
        // 1.用反射创建DefaultBeanDefinitionDocumentReader实例对象
        BeanDefinitionDocumentReader documentReader = createBeanDefinitionDocumentReader();
        // 2.设置环境
        documentReader.setEnvironment(getEnvironment());
        // 3.拿到已经注册的BeanDefinition的数量
        int countBefore = getRegistry().getBeanDefinitionCount();
        // 4.真正注册BeanDefinition,即正儿八经解析xml的过程
        documentReader.registerBeanDefinitions(doc, createReaderContext(resource));
        // 返回注册的BeanDefinition的数量
        return getRegistry().getBeanDefinitionCount() - countBefore;
    }
重点是第四行代码了,我们可以看到,真正解析xml还是交给了BeanDefinitionDocumentReader这个类的registerBeanDefinitions方法去做了,这个方法有两个参数,第一个就是我们之前已经被我们转换好的xml格式的Document对象,第二个其实是个XmlReaderContext(这个放到扩展篇讲,这里先忽略),我们来看看这个registerBeanDefinitions方法:
                                                                         代码块10
        @Override
    public void registerBeanDefinitions(Document doc, XmlReaderContext readerContext) {
        this.readerContext = readerContext;
        logger.debug("Loading bean definitions");
        // 就是拿个个root节点然后交给真正的doRegisterBeanDefinitions去解析而已
        // spring源码中还有很多类似风格的代码,doXXX才是真正干活的地方。。。
        Element root = doc.getDocumentElement();
        doRegisterBeanDefinitions(root);
    }
紧接着看真正干活的doRegisterBeanDefinitions方法
                                                                        代码块11
        protected void doRegisterBeanDefinitions(Element root) {
        String profileSpec = root.getAttribute(PROFILE_ATTRIBUTE);
        // 这个if代码块是处理profile相关的(忽略)
        if (StringUtils.hasText(profileSpec)) {
            String[] specifiedProfiles = StringUtils.tokenizeToStringArray(
                    profileSpec, BeanDefinitionParserDelegate.MULTI_VALUE_ATTRIBUTE_DELIMITERS);
            if (!getEnvironment().acceptsProfiles(specifiedProfiles)) {
                return;
            }
        }

        // Any nested <beans> elements will cause recursion in this method. In
        // order to propagate and preserve <beans> default-* attributes correctly,
        // keep track of the current (parent) delegate, which may be null. Create
        // the new (child) delegate with a reference to the parent for fallback purposes,
        // then ultimately reset this.delegate back to its original (parent) reference.
        // this behavior emulates a stack of delegates without actually necessitating one.
        // 由于beans标签里面可以嵌套beans标签,递归调用时候root不一样,所以需要创建一个新的delegate
        BeanDefinitionParserDelegate parent = this.delegate;
        this.delegate = createDelegate(this.readerContext, root, parent);

        preProcessXml(root);
        // 从root节点开始解析,(核心逻辑)
        parseBeanDefinitions(root, this.delegate);
        postProcessXml(root);

        this.delegate = parent;
    }
来看核心逻辑的parseBeanDefinitions
                                                                        代码块12
        protected void parseBeanDefinitions(Element root, BeanDefinitionParserDelegate delegate) {
        // 就是在看标签中有没有"http://www.springframework.org/schema/beans",如果有,说明不是开发者自己定义的xml,就走if
        if (delegate.isDefaultNamespace(root)) {
            NodeList nl = root.getChildNodes();
            for (int i = 0; i < nl.getLength(); i++) {
                Node node = nl.item(i);
                if (node instanceof Element) {
                    Element ele = (Element) node;
                    if (delegate.isDefaultNamespace(ele)) {
                        // 解析默认标签
                        parseDefaultElement(ele, delegate);
                    }
                    else {
                        // 解析自定义标签(稍后会讲自定义标签)
                        delegate.parseCustomElement(ele);
                    }
                }
            }
        }else {
                // 解析自定义标签(稍后会讲自定义标签)
            delegate.parseCustomElement(root);
        }
    }
我们本篇先只看parseDefaultElement,这个方法是spring ioc 这部分自己的标签,自定义标签的我会单独弄一篇出来讲:
                                                                        代码块13
    private void parseDefaultElement(Element ele, BeanDefinitionParserDelegate delegate) {
        // 解析import标签
        if (delegate.nodeNameEquals(ele, IMPORT_ELEMENT)) {
            importBeanDefinitionResource(ele);
        }
        // 解析alias标签
        else if (delegate.nodeNameEquals(ele, ALIAS_ELEMENT)) {
            processAliasRegistration(ele);
        }
        // 解析bean标签
        else if (delegate.nodeNameEquals(ele, BEAN_ELEMENT)) {
            processBeanDefinition(ele, delegate);
        }
        // 解析beans标签,其实就是递归了。。。
        else if (delegate.nodeNameEquals(ele, NESTED_BEANS_ELEMENT)) {
            // recurse
            doRegisterBeanDefinitions(ele);
        }
    }
其实可以看到除过在spring的xml中,只有import 、alias 、bean 、beans这几个标签是ioc本身的,其他的都是属于自定义标签。我们先来看看解析import标签的importBeanDefinitionResource方法:
                                                                        代码块14
// 解析import标签
protected void importBeanDefinitionResource(Element ele) {
        // 拿到location属性值并且校验是否为空(新版本属性名已经变成resource)
        String location = ele.getAttribute(RESOURCE_ATTRIBUTE);
        if (!StringUtils.hasText(location)) {
            getReaderContext().error("Resource location must not be empty", ele);
            return;
        }
        // 如果location里带了诸如("${user.dir}")这类的东西的话需要先解析这个
        location = getEnvironment().resolveRequiredPlaceholders(location);

        Set<Resource> actualResources = new LinkedHashSet<Resource>(4);

        // 判断 location 是相对路径还是绝对路径
        boolean absoluteLocation = false;
        try {
            // 这里面的逻辑其实就是看location是不是以classpath*:开头 或者classpath:开头 或者是不是url 或者根据uri的scheme来判断你是个绝对还是相对路径
            absoluteLocation = ResourcePatternUtils.isUrl(location) || ResourceUtils.toURI(location).isAbsolute();
        } catch (URISyntaxException ex) {

        }

        // 如果是绝对路径,则直接使用xmlBeanDefinitionReader中的loadBeanDefinitions加载解析Resource
        // 如果不是绝对路径,那么计算相对路径,然后再用xmlBeanDefinitionReader中的loadBeanDefinitions来加载解析Resource
        if (absoluteLocation) {
            try {
                // 注意这里的 getReaderContext().getReader()返回的其实就是之前的xmlBeanDefinitionReader对象
                int importCount = getReaderContext().getReader().loadBeanDefinitions(location, actualResources);
                if (logger.isDebugEnabled()) {
                    logger.debug("Imported " + importCount + " bean definitions from URL location [" + location + "]");
                }
            } catch (BeanDefinitionStoreException ex) {
                getReaderContext().error(
                        "Failed to import bean definitions from URL location [" + location + "]", ele, ex);
            }
        } else {
            // 解析相对路径的Resource
            try {
                int importCount;
                Resource relativeResource = getReaderContext().getResource().createRelative(location);
                if (relativeResource.exists()) {
                        // 这里既然找到了相对路径的Resource,那么就去使用上面的loadBeanDefinitions方法去解析
                    importCount = getReaderContext().getReader().loadBeanDefinitions(relativeResource);
                    actualResources.add(relativeResource);
                }
                else {
                        // 如果以相对路径的方式解析失败,则尝试以URL的方式去解析
                    String baseLocation = getReaderContext().getResource().getURL().toString();
                    importCount = getReaderContext().getReader().loadBeanDefinitions(
                            StringUtils.applyRelativePath(baseLocation, location), actualResources);
                }
                if (logger.isDebugEnabled()) {
                    logger.debug("Imported " + importCount + " bean definitions from relative location [" + location + "]");
                }
            } catch (IOException ex) {
                getReaderContext().error("Failed to resolve current resource location", ele, ex);
            } catch (BeanDefinitionStoreException ex) {
                getReaderContext().error("Failed to import bean definitions from relative location [" + location + "]",
                        ele, ex);
            }
        }
        // 解析成功后,进行监听器激活处理,但其实这个版本的这里,P事都没干,因为最终调用的方法是个空实现,所以这里不用管
        Resource[] actResArray = actualResources.toArray(new Resource[actualResources.size()]);
        getReaderContext().fireImportProcessed(location, actResArray, extractSource(ele));
    }
这个方法看起来很长,也有一定的复杂性,总结下就是去拿import标签的location属性然后校验,校验完了判断location是个相对路径还是绝对路径,然后根据路径的不同采取不同的解析方式,但是最终都是要使用之前说的那个loadBeanDefinitions(Resource resource),然后在这个方法中调用的loadBeanDefinitions(EncodedResource encodedResource)中的import循环引用的检查指的就是这里的,代码块5中已经提过。
解析import标签的看完了,我们再看看解析alias标签的代码:
                                                                        代码块15
        protected void processAliasRegistration(Element ele) {
        // 拿到alias标签中的alias属性和name属性
        String name = ele.getAttribute(NAME_ATTRIBUTE);
        String alias = ele.getAttribute(ALIAS_ATTRIBUTE);
        // 校验name属性,如果是空的,就会在error方法中抛出异常
        boolean valid = true;
        if (!StringUtils.hasText(name)) {
            getReaderContext().error("Name must not be empty", ele);
            valid = false;
        }
        // 校验alias属性,如果是空的,就会在error方法中抛出异常
        if (!StringUtils.hasText(alias)) {
            getReaderContext().error("Alias must not be empty", ele);
            valid = false;
        }
        // 如果有效则注册别名
        if (valid) {
            try {
                    // 具体的别名解析逻辑我们后边的文章会说
                getReaderContext().getRegistry().registerAlias(name, alias);
            } catch (Exception ex) {
                getReaderContext().error("Failed to register alias '" + alias +
                        "' for bean with name '" + name + "'", ele, ex);
            }
            getReaderContext().fireAliasRegistered(name, alias, extractSource(ele));
        }
    }
至于beans标签是用的之前提到的doRegisterBeanDefinitions方法,也就是代码块11啦,其实也就是递归解析。接下来看最重要的processBeanDefinition方法,这个也是最重要的方法,它将一个bean标签解析成了一个具体的BeanDefinition对象,方法代码如下
                                                                        代码块16
        protected void processBeanDefinition(Element ele, BeanDefinitionParserDelegate delegate) {
                // 解析bean标签,也是最重要的逻辑
        BeanDefinitionHolder bdHolder = delegate.parseBeanDefinitionElement(ele);
        if (bdHolder != null) {
            // 1.解析默认标签下的自定义标签
            bdHolder = delegate.decorateBeanDefinitionIfRequired(ele, bdHolder);
            try {
                // 2.注册beanDefiniton实例.
                BeanDefinitionReaderUtils.registerBeanDefinition(bdHolder, getReaderContext().getRegistry());
            }
            catch (BeanDefinitionStoreException ex) {
                getReaderContext().error("Failed to register bean definition with name '" +
                        bdHolder.getBeanName() + "'", ele, ex);
            }
            // Send registration event.
            getReaderContext().fireComponentRegistered(new BeanComponentDefinition(bdHolder));
        }
    }
这里面我们先看第一行由委派去解析bean标签的方法,这个也是最重要的,它里面是直接调用了自己类里的parseBeanDefinitionElement(Element ele, BeanDefinition containingBean)。只不过第二个参数传的是null,我们直接看这个方法:
                                                                        代码块17
        // 开始解析<bean>标签
    public BeanDefinitionHolder parseBeanDefinitionElement(Element ele, BeanDefinition containingBean) {
        // 1.拿到bean标签的id和name属性
        String id = ele.getAttribute(ID_ATTRIBUTE);
        String nameAttr = ele.getAttribute(NAME_ATTRIBUTE);

                // 把name放入集合,后续会将name注册成别名
        List<String> aliases = new ArrayList<String>();
        if (StringUtils.hasLength(nameAttr)) {
            String[] nameArr = StringUtils.tokenizeToStringArray(nameAttr, MULTI_VALUE_ATTRIBUTE_DELIMITERS);
            aliases.addAll(Arrays.asList(nameArr));
        }

        // 2.如果没有id属性,则用name属性中的第一个来作为bean在容器中的唯一标识名字
        String beanName = id;
        if (!StringUtils.hasText(beanName) && !aliases.isEmpty()) {
            beanName = aliases.remove(0);
            if (logger.isDebugEnabled()) {
                logger.debug("No XML 'id' specified - using '" + beanName +
                        "' as bean name and " + aliases + " as aliases");
            }
        }
        // 3.检查bean名字是否唯一
        if (containingBean == null) {
            checkNameUniqueness(beanName, aliases, ele);
        }

        // 4.到这里解析成正儿八经的beanDefinition
        AbstractBeanDefinition beanDefinition = parseBeanDefinitionElement(ele, beanName, containingBean);
        if (beanDefinition != null) {
            // 如果到这里beanName还为空或者是空字符串就按规则生成beanName(非重点)
            if (!StringUtils.hasText(beanName)) {
                try {
                    if (containingBean != null) {
                        beanName = BeanDefinitionReaderUtils.generateBeanName(
                                beanDefinition, this.readerContext.getRegistry(), true);
                    }
                    else {
                        beanName = this.readerContext.generateBeanName(beanDefinition);
                        String beanClassName = beanDefinition.getBeanClassName();
                        if (beanClassName != null &&
                                beanName.startsWith(beanClassName) && beanName.length() > beanClassName.length() &&
                                !this.readerContext.getRegistry().isBeanNameInUse(beanClassName)) {
                            aliases.add(beanClassName);
                        }
                    }
                    if (logger.isDebugEnabled()) {
                        logger.debug("Neither XML 'id' nor 'name' specified - " +
                                "using generated bean name [" + beanName + "]");
                    }
                }
                catch (Exception ex) {
                    error(ex.getMessage(), ele);
                    return null;
                }
            }
            String[] aliasesArray = StringUtils.toStringArray(aliases);
            return new BeanDefinitionHolder(beanDefinition, beanName, aliasesArray);
        }

        return null;
    }
上面的代码块分为了四个部分,前三个部分都很简单,我们来看看第四个部分的parseBeanDefinitionElement(ele, beanName, containingBean)这个重载方法,注意此时第三个参数依然传的是null:
                                                                        代码块18
        // 正儿八经解析bean标签,参数containingBean是null
    public AbstractBeanDefinition parseBeanDefinitionElement(
            Element ele, String beanName, BeanDefinition containingBean) {
        this.parseState.push(new BeanEntry(beanName));
        // 1.拿到bean的类名全路径
        String className = null;
        if (ele.hasAttribute(CLASS_ATTRIBUTE)) {
            className = ele.getAttribute(CLASS_ATTRIBUTE).trim();
        }

        try {
            // 2.拿parent bean的id
            String parent = null;
            if (ele.hasAttribute(PARENT_ATTRIBUTE)) {
                parent = ele.getAttribute(PARENT_ATTRIBUTE);
            }
            // 3.到目前为止,找到了parent和class的全路径
            // 这里的bd只有class以及parentName和
            AbstractBeanDefinition bd = createBeanDefinition(className, parent);

            // 4.在给bd set 标签中各种属性
            parseBeanDefinitionAttributes(ele, beanName, containingBean, bd);
            bd.setDescription(DomUtils.getChildElementValueByTagName(ele, DESCRIPTION_ELEMENT));

            parseMetaElements(ele, bd);
            // 5.lookup-method和replace-method,
            // lookup-method对应的是注解@lookup,这个在搭业务框架的时候很有用,大家感兴趣可以百度下
            parseLookupOverrideSubElements(ele, bd.getMethodOverrides());
            parseReplacedMethodSubElements(ele, bd.getMethodOverrides());

            // 6.处理constructor-arg 、property、qualifier 三个标签
            parseConstructorArgElements(ele, bd);
            parsePropertyElements(ele, bd);
            parseQualifierElements(ele, bd);

            bd.setResource(this.readerContext.getResource());
            bd.setSource(extractSource(ele));

            return bd;
        } catch (ClassNotFoundException ex) {
            error("Bean class [" + className + "] not found", ele, ex);
        } catch (NoClassDefFoundError err) {
            error("Class that bean class [" + className + "] depends on not found", ele, err);
        } catch (Throwable ex) {
            error("Unexpected failure during bean definition parsing", ele, ex);
        } finally {
            this.parseState.pop();
        }

        return null;
    }
都是解析各个标签的方法了,我们先看看上面代码块中第3处最终调用的方法:
                                                                        代码块19
        public static AbstractBeanDefinition createBeanDefinition(
            String parentName, String className, ClassLoader classLoader) throws ClassNotFoundException {

        GenericBeanDefinition bd = new GenericBeanDefinition();
        // 父beanDefnition名字
        bd.setParentName(parentName);
        if (className != null) {
            if (classLoader != null) {
                bd.setBeanClass(ClassUtils.forName(className, classLoader));
            }
            else {
                bd.setBeanClassName(className);
            }
        }
        return bd;
    }
我们可以看到,我们的bean标签,最终是被解析成了一个GenericBeanDefinition的实例,而这个GenericBeanDefinition几乎所有的成员属性都是从AbstractBeanDefinition来的,这里面的属性我们在本篇文章开头的时候已经提到过,如果不明白的话,可以翻上去看看。然后在看代码块18第四处的代码:
                                                                        代码块20
        public AbstractBeanDefinition parseBeanDefinitionAttributes(Element ele, String beanName,
            BeanDefinition containingBean, AbstractBeanDefinition bd) {

        // scope属性
        if (ele.hasAttribute(SINGLETON_ATTRIBUTE)) {
            this.readerContext.warning("Old 1.x 'singleton' attribute in use - upgrade to 'scope' declaration", ele);
        }else if (ele.hasAttribute(SCOPE_ATTRIBUTE)) {
            bd.setScope(ele.getAttribute(SCOPE_ATTRIBUTE));
        }else if (containingBean != null) {
            bd.setScope(containingBean.getScope());
        }

        // abstract 属性
        if (ele.hasAttribute(ABSTRACT_ATTRIBUTE)) {
            bd.setAbstract(TRUE_VALUE.equals(ele.getAttribute(ABSTRACT_ATTRIBUTE)));
        }

        // lazy-init属性
        String lazyInit = ele.getAttribute(LAZY_INIT_ATTRIBUTE);
        if (DEFAULT_VALUE.equals(lazyInit)) {
            lazyInit = this.defaults.getLazyInit();
        }
        bd.setLazyInit(TRUE_VALUE.equals(lazyInit));

        String autowire = ele.getAttribute(AUTOWIRE_ATTRIBUTE);
        bd.setAutowireMode(getAutowireMode(autowire));

        // 这个属性从3.0已经过时,用构造器注入即可
        String dependencyCheck = ele.getAttribute(DEPENDENCY_CHECK_ATTRIBUTE);
        bd.setDependencyCheck(getDependencyCheck(dependencyCheck));

        // depend-on 属性,对应现在的注解DependOn(注意他的作用)
        if (ele.hasAttribute(DEPENDS_ON_ATTRIBUTE)) {
            String dependsOn = ele.getAttribute(DEPENDS_ON_ATTRIBUTE);
            bd.setDependsOn(StringUtils.tokenizeToStringArray(dependsOn, MULTI_VALUE_ATTRIBUTE_DELIMITERS));
        }

        // autowire-candidate 属性,指的是这个bean可不可以作为注入其他bean的对象
        String autowireCandidate = ele.getAttribute(AUTOWIRE_CANDIDATE_ATTRIBUTE);
        if ("".equals(autowireCandidate) || DEFAULT_VALUE.equals(autowireCandidate)) {
            String candidatePattern = this.defaults.getAutowireCandidates();
            if (candidatePattern != null) {
                String[] patterns = StringUtils.commaDelimitedListToStringArray(candidatePattern);
                bd.setAutowireCandidate(PatternMatchUtils.simpleMatch(patterns, beanName));
            }
        }
        else {
            bd.setAutowireCandidate(TRUE_VALUE.equals(autowireCandidate));
        }

        // paimary,指的是自动装配优先使用这个bean
        if (ele.hasAttribute(PRIMARY_ATTRIBUTE)) {
            bd.setPrimary(TRUE_VALUE.equals(ele.getAttribute(PRIMARY_ATTRIBUTE)));
        }

        // init-method属性
        if (ele.hasAttribute(INIT_METHOD_ATTRIBUTE)) {
            String initMethodName = ele.getAttribute(INIT_METHOD_ATTRIBUTE);
            if (!"".equals(initMethodName)) {
                bd.setInitMethodName(initMethodName);
            }
        }
        else {
            if (this.defaults.getInitMethod() != null) {
                bd.setInitMethodName(this.defaults.getInitMethod());
                bd.setEnforceInitMethod(false);
            }
        }

        // destory 属性
        // 其实init method 和destory属性等同于post construct 和 pre Destory注解
        if (ele.hasAttribute(DESTROY_METHOD_ATTRIBUTE)) {
            String destroyMethodName = ele.getAttribute(DESTROY_METHOD_ATTRIBUTE);
            if (!"".equals(destroyMethodName)) {
                bd.setDestroyMethodName(destroyMethodName);
            }
        }
        else {
            if (this.defaults.getDestroyMethod() != null) {
                bd.setDestroyMethodName(this.defaults.getDestroyMethod());
                bd.setEnforceDestroyMethod(false);
            }
        }

        // factory-method属性
        if (ele.hasAttribute(FACTORY_METHOD_ATTRIBUTE)) {
            bd.setFactoryMethodName(ele.getAttribute(FACTORY_METHOD_ATTRIBUTE));
        }
        // factory-bean 属性
        if (ele.hasAttribute(FACTORY_BEAN_ATTRIBUTE)) {
            bd.setFactoryBeanName(ele.getAttribute(FACTORY_BEAN_ATTRIBUTE));
        }

        return bd;
    }
代码块18的第5和第6处方法的代码很简单,为了让文章短点就不贴了。在使用委派的parseBeanDefinitionElement解析完了之后,xml中的属性已经都被读到beanDefinition对象上面了。接下来就是对自定义属性和自定义标签的装饰,我会在自定义标签中说这个。过了对自定义的装饰后,就去注册拿到BeanDefinition对象,至此,对xml的解析已完成。
ClassPathApplicationContext 和 BeanDefinitionReader
我们上一篇开始有这么一段代码不知道大家还记得不:
public static void main(String[] args) {
        ApplicationContext applicationContext =
                new ClassPathXmlApplicationContext("classpath*:application-context.xml");
        ATest aTest = applicationContext.getBean(ATest.class);
        aTest.doSomeThing();
}
这段代码中ClassPathApplicationContext将我们的xml加载解析成了beanDefinition对象,并且转换成了最终的bean,我们经过前面的学习已经知道了XmlBeanDefinitionReader是怎样把xml解析成beanDefinition对象的,那么,在上面这段代码运行的时候,这个解析过程是发生在哪里呢?我们一起来看看ClassPathApplicationContext的构造方法:
                                                                        代码块21
        public ClassPathXmlApplicationContext(String configLocation) throws BeansException {
        // 调用的是下边的这个方法
        this(new String[] {configLocation}, true, null);
    }

    public ClassPathXmlApplicationContext(String[] configLocations, boolean refresh, ApplicationContext parent)
            throws BeansException {

        super(parent);
        // 解析配置,此时参数是[classpath*:application-context.xml]
        setConfigLocations(configLocations);
        if (refresh) {
                // 调用下面的refresh方法
            refresh();
        }
    }
注意哈:这里我暂时只放refresh的前几行代码,因为其他的还和我们目前讲的没关系
                                                                        代码块22
        @Override
    public void refresh() throws BeansException, IllegalStateException {
        synchronized (this.startupShutdownMonitor) {
            // 1.加载前的准备工作
            prepareRefresh();
            // 2.获取一个全新的beanFactory实例
            ConfigurableListableBeanFactory beanFactory = obtainFreshBeanFactory();

            // 3.初始化beanFactory,给它设置各种
            prepareBeanFactory(beanFactory);
仅仅放出来了开始的那几行代码,是因为我们目前所说到的,也就和这个第二句有关系,我们直接来看2中的obtainFreshBeanFactory,它也是在AbstractApplicationContext中,
                                                                        代码块23
        protected ConfigurableListableBeanFactory obtainFreshBeanFactory() {
                // 重点
        refreshBeanFactory();

        ConfigurableListableBeanFactory beanFactory = getBeanFactory();
        if (logger.isDebugEnabled()) {
            logger.debug("Bean factory for " + getDisplayName() + ": " + beanFactory);
        }
        return beanFactory;
    }
重点是这第一行的这个方法,这个方法也是AbstractApplicationContext,但是它是个抽象方法,真正的实现是在AbstractRefreshableApplicationContext中,我们直接来看这里的refreshBeanFactory方法:
                                                                        代码块24
        @Override
    protected final void refreshBeanFactory() throws BeansException {
        if (hasBeanFactory()) {
            destroyBeans();
            closeBeanFactory();
        }
        try {
            DefaultListableBeanFactory beanFactory = createBeanFactory();
            beanFactory.setSerializationId(getId());
            customizeBeanFactory(beanFactory);
            // 加载BeanDefinition的
            loadBeanDefinitions(beanFactory);
            synchronized (this.beanFactoryMonitor) {
                this.beanFactory = beanFactory;
            }
        }
        catch (IOException ex) {
            throw new ApplicationContextException("I/O error parsing bean definition source for " + getDisplayName(), ex);
        }
    }
上面代码块中只有一句我给了注释,那个其实也是个抽象方法,真正的实现是在子类AbstractXmlApplicationContext中,我们到AbstractXmlApplicationContext中来:
                                                                        代码块25
        @Override
    protected void loadBeanDefinitions(DefaultListableBeanFactory beanFactory) throws BeansException, IOException {
        // 1.我们前文所说过的XmlBeanDefinitionReader
        XmlBeanDefinitionReader beanDefinitionReader = new XmlBeanDefinitionReader(beanFactory);

        // 2.现在是在AbstractXmlApplicationContext,其父类既继承了DefaultResourceLoader的,也
        // 实现了ResourcePatternResolver
        beanDefinitionReader.setEnvironment(this.getEnvironment());
        beanDefinitionReader.setResourceLoader(this);
        beanDefinitionReader.setEntityResolver(new ResourceEntityResolver(this));

        // 3.设置验证模型
        initBeanDefinitionReader(beanDefinitionReader);
        // 4.加载Resource
        loadBeanDefinitions(beanDefinitionReader);
    }
我们在这里直接就可以看到,ClassPathXmlApplicationContext就是用的XmlBeanDefinitionReader来加载解析Resource的,我们来看看上面代码块中3处的代码
                                                                        代码块26
        protected void initBeanDefinitionReader(XmlBeanDefinitionReader reader) {
        reader.setValidating(this.validating);
    }
它调用的是XmlBeanDefinitionReader的内部方法,注意参数中this.validating的值是true,我们跟到这个方法中:
                                                                        代码块27
        public void setValidating(boolean validating) {
        this.validationMode = (validating ? VALIDATION_AUTO : VALIDATION_NONE);
        this.namespaceAware = !validating;
    }
哈哈,这下应该是知道之前代码块7和8那里大量出现的validationMode的值是怎么来的了吧,其实就是在这里给赋值的,表示让程序去发现到底该使用怎样的解析方式。最后我们再来看看代码块25中4处的代码
                                                                        代码块28
        protected void loadBeanDefinitions(XmlBeanDefinitionReader reader) throws BeansException, IOException {
        Resource[] configResources = getConfigResources();
        if (configResources != null) {
            reader.loadBeanDefinitions(configResources);
        }
        // 实际走的是这里,因为上面的configResources此时是null
        String[] configLocations = getConfigLocations();
        if (configLocations != null) {
            reader.loadBeanDefinitions(configLocations);
        }
    }
这个方法调用的就是我们前文所说过的XmlBeanDefinitionReader中的方法了,至此,xml怎样解析成BeanDefinition就已经说完,我们把我们到现在为止说到过的东西总结成下面的这张图:

我们可以看到,本篇讲的,其实就是最下面这部分的,下篇我们说从BeanDefinition是怎样变成Bean实例的。