 搜云库技术团队
RabbitMQ
RabbitMQ是一个在AMQP基础上完整的,可复用的企业消息系统。
对于RabbitMQ来说,生产和消费不再针对内存里的一个Queue对象,而是某台服务器上的RabbitMQ Server实现的消息队列
用rabbitmq实现一个简单的生产者消费者模型
发送端代码
import pika

connection = pika.BlockingConnection(pika.ConnectionParameters('192.168.1.25'))
channel = connection.channel()

channel.queue_declare(queue="hello")

channel.basic_publish(exchange='',
                     routing_key = 'hello',
                     body='hello world',
)
print("Send hello world")
connection.close()
接收端代码
 import pika

 connection = pika.BlockingConnection(pika.ConnectionParameters('192.168.1.25'))
 channel = connection.channel()
 channel.queue_declare(queue="hello")

 def callback(ch,method,properties,body):
     print(ch,method,properties)
     print("received %s" %body)

 channel.basic_consume(callback,
                       queue='hello',
                       no_ack=True)

 print("waiting for messages to exit press 'CTRL+C'")
 channel.start_consuming()
通过上述代码便可以实现一个简单的生产者消费者模型,但是现在的结果是:当开启多个消费者程序的时候,启动生产者发送消息,这个时候只有一个可以收到,并且再次启动,会下一个消费者收到,类似一个轮询的关系。
acknowledgment 消息不丢失(通过客户端设置实现)
通过no_ack = False参数设置,如果消费者遇到情况突然中断了没有收到,那么RabbitMQ会重新将任务添加到队列中
下面将接收端的代码进行更改:
#AUTHOR:FAN
import pika
import time

connection = pika.BlockingConnection(pika.ConnectionParameters('192.168.1.25'))
channel = connection.channel()
channel.queue_declare(queue="hello")

def callback(ch,method,properties,body):
    print(ch,method,properties)
    time.sleep(10)
    print("received %s" %body)

channel.basic_consume(callback,
                      queue='hello',
                      no_ack=False)

print("waiting for messages to exit press 'CTRL+C'")
channel.start_consuming()
标注的地方就是代码修改的地方,通过将no_ack更改为False,以及在callback回到函数这里让等待10s,这样启动接收端后,再启动发送算,在还没有打印数据的时候将客户端关闭,然后再启动,发现依然可以收到刚才发送端发送的数据。
但是这种方式只能实现客户端断开重新连接的时候数据不丢失,如果是rabbitmq挂了的情况如何解决?
durable消息不丢失(通过在服务端设置保证数据不丢失)
这个时候生产者和消费者的代码都需要改动
发送者代码
 import pika


 connection = pika.BlockingConnection(pika.ConnectionParameters('192.168.1.25'))
 channel = connection.channel()

 channel.queue_declare(queue='fan',durable=True)

 channel.basic_publish(exchange='',
                       routing_key='fan',
                       body='hello world',
                       properties = pika.BasicProperties(
                           delivery_mode=2
                       ))

 print("send 'hello world'")
 connection.close()
接收者的代码
 import pika
 import time

 connection = pika.BlockingConnection(pika.ConnectionParameters('192.168.1.25'))
 channel = connection.channel()

 channel.queue_declare(queue='fan',durable=True)

 def callback(ch,method,properies,body):
     print("received %s" %body)
     time.sleep(10)
     print("is ok")
     ch.basic_ack(delivery_tag=method.delivery_tag)

 channel.basic_consume(callback,
                       queue='fan',
                       no_ack=False)

 print("waitting for messages.To exit press CTRL+C")
 channel.start_consuming()
这样即使在接收者接收数据过程中rabbitmq服务器出现问题了,在服务恢复之后,依然可以收到数据
发布订阅
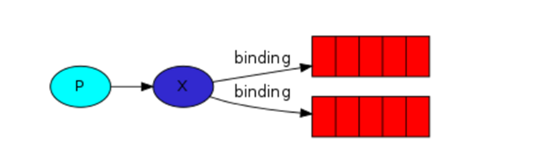
发布订阅和简单的消息队列区别在于,发布订阅会将消息发送给所有的订阅者,而消息队列中的数据被消费一次便消失。所以,RabbitMQ实现发布和订阅时,会为每一个订阅者创建一个队列,而发布者发布消息时,会将消息放置在所有相关队列中。
通过exchange type = fanout参数实现
代码例子:
发布者:
 #AUTHOR:FAN

 import pika
 import sys

 connection = pika.BlockingConnection(pika.ConnectionParameters('192.168.8.103'))
 channel = connection.channel()

 channel.exchange_declare(exchange="fan",
                          type='fanout')

 message = ' '.join(sys.argv[1:]) or "info :hello world"
 channel.basic_publish(exchange = 'fan',
                       routing_key='',
                       body=message)

 print("send %s" %message)
 connection.close()
订阅者:
#AUTHOR:FAN

import pika

connection = pika.BlockingConnection(pika.ConnectionParameters('192.168.8.103'))

channel = connection.channel()

channel.exchange_declare(exchange="fan",
                         type='fanout')

#随机生成队列名字
result = channel.queue_declare(exclusive=True)
queue_name = result.method.queue

#将exchange和队列绑定
channel.queue_bind(exchange='fan',
                   queue=queue_name)

print("waiting for fan ,To exit press CTRL+C")
def callback(ch,method,proerties,body):
    print("---",body)

channel.basic_consume(callback,
                      queue=queue_name,
                      no_ack=True)

channel.start_consuming()
关键字发送

通过参数:exchange type = direct实现
之前事例,发送消息时明确指定某个队列并向其中发送消息,RabbitMQ还支持根据关键字发送,即:队列绑定关键字,发送者将数据根据关键字发送到消息exchange,exchange根据 关键字 判定应该将数据发送至指定队列。
代码例子如下:
消费者代码:
 #AUTHOR:FAN
 import pika
 import sys
 connection = pika.BlockingConnection(pika.ConnectionParameters('192.168.1.25'))
 channel = connection.channel()
 channel.exchange_declare(exchange='direct_logs_1',
                          type='direct')
 result = channel.queue_declare(exclusive=True)
 queue_name = result.method.queue

 severities = sys.argv[1:]
 if not severities:
     sys.stderr.write("Usage: %s [info] [warning] [error]\n" % sys.argv[0])
     exit(1)
 print(severities)
 for severity in severities:
     print(severity)
     channel.queue_bind(exchange='direct_logs_1',
     queue=queue_name,
     routing_key=severity)
 print("waiting for logs,To exit press CTRL+C")
 def callback(ch,method,properties,body):
     print("%s:%s" %(method.routing_key,body))

 channel.basic_consume(callback,
                       queue=queue_name,
                       no_ack=True)
 channel.start_consuming()
生产者代码
 import pika
 import sys

 connection = pika.BlockingConnection(pika.ConnectionParameters('192.168.1.25'))
 channel = connection.channel()

 channel.exchange_declare(exchange='direct_logs_1',
                          type='direct')

 print(sys.argv)
 severity = sys.argv[1] if len(sys.argv) >1 else "error"
 message = ' '.join(sys.argv[2:]) or 'hello world'
 channel.basic_publish(exchange='direct_logs_1',
                       routing_key = severity,
                       body = message)
 print("send %s:%s" %(severity,message))
 connection.close()
模糊匹配
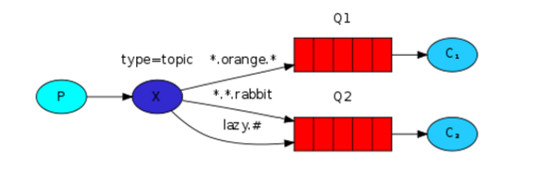
通过参数exchange type = topic实现
在topic类型下,可以让队列绑定几个模糊的关键字,之后发送者将数据发送到exchange,exchange将传入”路由值“和 ”关键字“进行匹配,匹配成功,则将数据发送到指定队列。
# 表示可以匹配 0 个 或 多个 单词
* 表示只能匹配 一个 单词
-——————-还没有整理完

